• Welcome to BirdForum, the internet's largest birding community with thousands of members from all over the world. The forums are dedicated to wild birds, birding, binoculars and equipment and all that goes with it.

    Please register for an account to take part in the discussions in the forum, post your pictures in the gallery and more.
ZEISS DTI thermal imaging cameras. For more discoveries at night, and during the day.

Underexposed in bright sunlight (1 Viewer)

Colin C

Well-known member
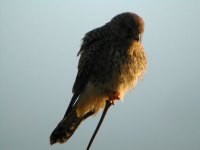
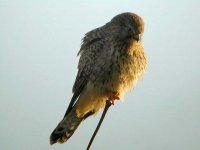
Help Needed. Please can anyone tell me what's the best way in adobe to treat underexposed shots like this ie bird against a bright background.
 

Attachments

  • kestrelue.jpg
    kestrelue.jpg
    27.9 KB · Views: 222
Colin C said:
Help Needed. Please can anyone tell me what's the best way in adobe to treat underexposed shots like this ie bird against a bright background.


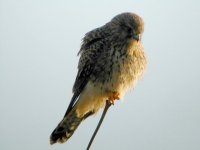
I am not very good at this but all I have done is move the middle slider in Levels to brighten it up a bit. There could be a lot more done this was just a quick fix.
 

Attachments

  • kestreluea.jpg
    kestreluea.jpg
    105.3 KB · Views: 207
Problem

Hi There,
Because the shadow area is so dark there is a not a great deal you can do really as there will not be any detail there.
It is particularly important with Digital cameras (if that's what you used) to allow for backlight. I allow at least one stop, but sometimes 2.
However, the shot you took is still quite appealing.

Cheers,

madmike


Colin C said:
Help Needed. Please can anyone tell me what's the best way in adobe to treat underexposed shots like this ie bird against a bright background.
 
Lovely shot
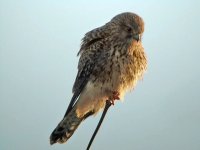
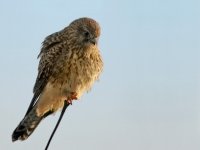
Here's my effort, but this is using the shadow/highlight control in Photoshop CS. This retains contrast. Bringing up the shadow too much gives a very b&w look in comparison to the glorious golden sunlight on the bird's other side.

cheers,
Andy
 

Attachments

  • kestreluefix1.jpg
    kestreluefix1.jpg
    99.3 KB · Views: 234
A trick I use for difficult lighting scenes when taking the shot is to put the camera into manual mode. Then set the exposure on an area like grass ( a mid tone ) which is lit by the same light as your subject. If your camera has a histogram feature use it to check the exposure after your shot and compensate the exposure if need be for the next shot.

That shadow/highlight control feature in Photoshop CS is really effective in toning down highlights and bringing up shadow detail. It has improved many of my shots after earlier versions PS have tried their best. If you know you going to be dealing with high contrast scenes it also pays to shoot in raw format rather than jpg. Processing raw format files gives you more latitude for tweaking contrast and brightness levels.

Andy, I think you have managed to save the day with your compensation.

Robert
 
Many thanks to everyone for the help & advice. I've never tried the shadow/highlight control before so thanks Andy I'll start experimenting. Its certainly brought out the detail.
 
Underexposure

Colin C said:
Many thanks to everyone for the help & advice. I've never tried the shadow/highlight control before so thanks Andy I'll start experimenting. Its certainly brought out the detail.

Colin,

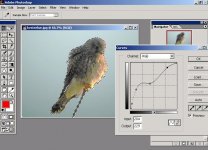
Here's my attempt using Photoshop. I highlighted the background, 'selected similar' (all blue background), then 'selected inverse' (bird only). I then used the 'curves adjustment' to brighten and reduce contrast in the bird. I've attached the curve profile. Apologies but I did this on my notebook so I don't know how well it ultimately turned out (But Andy's attempt looks very good).

Jerry
 

Attachments

  • kestrelue1.jpg
    kestrelue1.jpg
    27.5 KB · Views: 222
  • kestrelue2.jpg
    kestrelue2.jpg
    81.6 KB · Views: 178
Colin C said:
Help Needed. Please can anyone tell me what's the best way in adobe to treat underexposed shots like this ie bird against a bright background.
When you have a small subject that is strongly backlit, the secret is to take an exposure reading from something else nearby (i.e. that is lit similarly) but which can temporarily fill the screen area (setting the camera's exposure control to "spot" will help a good deal).

Professionals sometimes use a "grey card" to do this but anything similarly coloured and lit is fine - your own hand, for example. When digiscoping this can be difficult so an alternative is to zoom in to fill the screen with the subject, if possible, then lock that reading before recomposing the shot. Once you get this exposure, lock it and then recompose the shot and - perfection. The alternative is, as has been suggested, to open up the aperture by a stop (e.g. from f8 to f5.6), or double the time of exposure (e.g. from 1/125 to 1/60).

But, as Andy has shown, digital photos are much easier to correct when they are underexposed so what you did was for the best in the sense that overexposure is far less easy to correct - once burnt out, always burnt out.
 
Last edited:
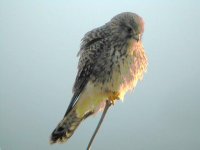
This is a big problem for bird photographers and I still get a lot of these underexposed photos in a days shooting. I had a go with Levels(moved the Center slider a bit to the left,then a bit of Dodging in the shadow areas, an Auto Contrast adjustment and a little Unsharp Masking in Photoshop Elements 3 (I wish I had CS ) and came up with this. I didn't want to lose the nice reddish color you had in the original. Neil

Colin C said:
Help Needed. Please can anyone tell me what's the best way in adobe to treat underexposed shots like this ie bird against a bright background.
 

Attachments

  • kestrelue adj.jpg
    kestrelue adj.jpg
    42.7 KB · Views: 188
What you can do if the image is not for crucial i.d. or if it's just for your own use, is to use the eye-dropper to sample a bit of the good golden colour and use a brush with the 'colour' blend mode (no more than 10%) and go over some of the stark monotone revealed by brightening up... vary the colour samples to make it a bit more realistic.

The sky you can simply use the magic wand to select it (then 'similar' if need be)... go into quick mask to see if you've selected anything other than the sky.... touch up the mask with eraser tool or paint brush (black to add to mask, white to remove), go out of quick mask, feather the selection slightly (or contract by a pixel or two), then work on the sky with levels and/or hue/saturation.

Alternatively, with the sky selected.... choose a nice blue as foreground colour (with white as background) and do a graduated fade from top to bottom of image... you'll probably need to alter the blue you have selected for this once you have applied the fade as it probably won't look too realistic.

This is all a bit drastic and many may have 'objections' to something so radical, but if it's for your own use and pleasure, what the hell ;)
 

Attachments

  • kestreluefix3.jpg
    kestreluefix3.jpg
    62.5 KB · Views: 204
Warning! This thread is more than 19 years ago old.
It's likely that no further discussion is required, in which case we recommend starting a new thread. If however you feel your response is required you can still do so.

Users who are viewing this thread

Back
Top