


-
Welcome to BirdForum, the internet's largest birding community with thousands of members from all over the world. The forums are dedicated to wild birds, birding, binoculars and equipment and all that goes with it.
Please register for an account to take part in the discussions in the forum, post your pictures in the gallery and more.

You are using an out of date browser. It may not display this or other websites correctly.
You should upgrade or use an alternative browser.
You should upgrade or use an alternative browser.
exposure (1 Viewer)
- Thread starter foxydave
- Start date
More options
Who Replied?Marcus Conway - ebirder
Well-known member
Hi Dave. Have you tried using the shadow/highlight tool in Photoshop. Maybe one way of getting some details back.
I find shooting in manual far more effective than shooting in AV for large under/over compensation and often get many more keepers that way.
Marcus
I find shooting in manual far more effective than shooting in AV for large under/over compensation and often get many more keepers that way.
Marcus
IanF
Moderator
Hi Dave,
It should be -2.00 rather than +2 for white subjects against a darker background!
A dark bird against the sky may need +1.00 or more.
I have the 40D as well and in AV mode using spot metering -1.00 or -1.3 is as much as I ever use even for birds like Egrets.
The main thing to do is to take several photos adjusting exposure until you get it correct - assuming the bird stays still long enough. If pushed then -1 is a good starting point if it's a white bird on the ground.
tdodd
Just call me Tim
Dave, you will have far better control over your exposures if you set up a manual exposure to suit the incident light hitting your subject/scene. Battling with autoexposure and metering subjects/scenes of variable reflectivity and having to guess at how much exposure compensation to dial in each time just seems like hard work to me.
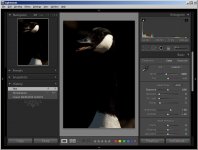
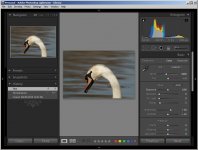
I was out shooting today. It was a sunny day - bright sunshine and blue skies - so I had a manual exposure set up based on the Sunny 16 Rule (guideline). The first two images attached have been shot with identical exposure settings, both equivalent in brightness to a "Sunny 16" exposure. The exposure is pretty good for both shots, despite the considerable variation in tonal content of the two scenes. In truth I could have increased exposure by 1/3 stop for each image, but I was pretty darned close with these. You will note that nothing is blown. Imagine trying to faff around fiddling with EC to get both exposures right (or close) first time using autoexposure.
I've also attached the edited images, with minor tweaks to WB, exposure, black level and cropping. That's it. They're not great works of art, but as examples of reasonable control of exposure in vastly differing scenes they aren't too bad.
Finally, another subject/scene under similar lighting and with the same manual exposure once again, and with no tweaks except WB. Nailed it in one.
Attachments
Last edited:
tdodd
Just call me Tim
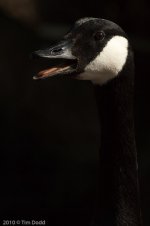
By the way, even if you do make a hash of it, which I am certainly guilty of from time to time, a decent raw processor can go a long way to fixing things up. Here's another from today. I had been shooting backlit deer, with an ETTR exposure set to pull out details on their shaded side, when I caught sight of this chap. Not really a keeper but it never hurts to practice BIF when the opportunity presents itself. Anyway, the exposure here was set 2 stops brighter than Sunny 16, which is not the best choice when the conditions are already bright sun. Even so, Lightroom has done a pretty nice job of recovering my gaff, with no effort at all....
Attachments
Gaz Shilton
Well-known member

Excuse my photographic ignorance, but, what is the sunny 16 rule?
degsy_safc
Well-known member
Excuse my photographic ignorance, but, what is the sunny 16 rule?
Hi Gaz - its an old film term that if you had a bright sunny day with proper shadows and were using ASA100 film you would set the aperture to f16 and shutter speed to 1/the film speed i.e 1/100 (however most cameras would only achieve 1/125 second) so the rule was set 1/125 @ f16 when using ASA100 film on a bright sunny day where proper shadows were cast.
There was also a term called Lunar 11 for shooting the moon on a clear night - i'll let you work out that one yourself based on the above :-O:-O
Sunny 16 is actually a pretty good rule of thumb especially if you work out the various divisible outcomes against each of the different apertures as they get wider....
tdodd
Just call me Tim
As Derek says, a standard "Sunny 16" exposure is to set f/16 as your aperture and then your shutter speed is equal to 1/ISO. Of course, f/16 isn't the best choice for birding (or most things) so the best thing is to adjust settings to better suit the subject, while still maintaining the same equivalent exposure.
So for my exposures, instead of shooting at f/16 I opened up 2 stops to f/8 and to give me a higher shutter speed for shooting BIF I bumped the ISO to 200, thus gaining another stop of brightness, totalling 3 stops brighter in all. To compensate for that I raised shutter speed by 3 stops from 1/100 to 1/800.
Setting a Sunny 16 exposure is a very good starting point on a sunny day, but may need some modification depending on the environment. e.g. if in a snowy setting the reflectivity of the snow, relative to more typical surroundings, will contribute to more brightness on your subject, so you might need to reduce the exposure slightly to compensate. Depending on the sun angle you might find that water can have a similar effect, as can a white sandy beach.
It's also worth noting that a Sunny 16 exposure should hold the detail in the whites/brights, without overexposing. However, if you are shooting raw and like to ETTR, and your subject and scene contain nothing of high brightness/reflectivity then you might push the exposure a little higher in order to nudge the histogram further to the right. I will often increase my exposure by 1 stop from Sunny 16 if my subject/scene contains only mid tones and darker. Usually I will do that simply with a tweak of the ISO.
In other lighting conditions I have other metering tools in my armoury. These include spot metering from my own palm at +1 1/3 stops, metering off green grass at -2/3 stop, spot metering the brightest part of the scene at +3 stops, or shooting a test shot and checking the test image for blinkies and the histogram for positioning, then adjusting exposure until I see the barest hint if clipping in my whites/brights. These techniques give me a good "base" exposure to safeguard brights/whites. As with Sunny 16, if my subject/scene does not have bright tones then I might increase my exposure by up to 1 stop just to capture more image data and reduce noise.
Last edited:
Dave, you will have far better control over your exposures if you set up a manual exposure to suit the incident light hitting your subject/scene. Battling with autoexposure and metering subjects/scenes of variable reflectivity and having to guess at how much exposure compensation to dial in each time just seems like hard work to me.
I was out shooting today. It was a sunny day - bright sunshine and blue skies - so I had a manual exposure set up based on the Sunny 16 Rule (guideline). The first two images attached have been shot with identical exposure settings, both equivalent in brightness to a "Sunny 16" exposure. The exposure is pretty good for both shots,
........... as examples of reasonable control of exposure in vastly differing scenes they aren't too bad.
Despite your patient and generous efforts to explain & advocate Sunny f/16 I find it a distraction for the only photography I do, handheld BIF. I have read several of your posts on different threads Tim and I would ask you to be so kind as to suggest what my procedures should be for 2 BIF scenarios. [By procedure I mean what metering, what mode, what f/stop, what shutter speed, what ISO, what IS, what monitoring method, and then which of the foregoing variables should I adjust first if last shot was overexposed, or if it was underexposed. I have a proven Exposure Compensation Table to use but if, for instance, I'm spot-metering and in M Mode the exposure scale disappears off my panel ... but that's a puff of smoke compared to the overall fog I'm groping around in.]
First scenario are gulls in Ireland, some white, some mottled, flitting within 30 metres across varying backgrounds, in fluctuating light, excluding grey days.
Second are griffon vultures in Spain gliding around very calmly except that they're changing distance from me all the time and may also change from a solid to a sky background, in fluctuating light, excluding grey days.
I am a simple man and I do like simple answers, but I'm too old to expect anyone to offer perfect answers to either scenario, because there are no complete answers. What I'm hoping for would be answers making clever selection (prioritising?) of the variables mentioned to address average conditions of light and background to get the sharpest BIF shots. I use Canon Mark III + 100-400 IS, or f/4 300 IS.
Please refer me to past answers elsewhere if you think they address my query.
tdodd
Just call me Tim
Disclaimer - I am not a skilled bird/BIF photographer, so take what I say with a pinch of salt, but here are my thoughts....
For the scenarios you describe, IMHO, there are no easy answers. If your incident light is fluctuating and the reflectivity of your subject and background is also fluctuating, and the size of your subject is variable, then you're going to have to work a bit to get your exposures right. How you approach the problem is partly driven by personal preference and partly by which variable is changing least - the light, the background or the subject.
My approach for the situations you describe would be to set a manual exposure to suit the incident light reaching the subject/scene, probably by spot metering off my palm at +1.3 stops. I would choose a combination of settings which I felt optimised the balance within the exposure triangle - shutter speed not too slow, ISO not too high, aperture optimised for lens IQ without jeopardising the other values. What those optimum values are depends on many things - camera body, lens, light levels, subject activity level, photographer skills, camera/lens stability, need to crop, enlargement/reproduction size, amount of fine detail content, tolerance to accept noise or need to suppress it.
In bright light (yes, Sunny 16) the optimum combination for a 1D3 and 100-400 might be something like 1/1600, f/8, 400 ISO. That would be a pretty decent combination for low shake/blur, high lens IQ and low noise. As the light levels drop you need to chip away at each in turn, until you end up at something like 1/800, f/5.6, 1600 ISO, which is 4 stops dimmer than "Sunny 16" and my threshold for giving up on shooting BIF, since I have a 100-400. With a faster, sharper lens I see no reason not to shoot at f/4 if you have it available. If you can fill the frame then even shooting at 3200 ISO is not out of the question, but very high ISO, small subjects and fine feather details are not a good combination, so I'd say only go that route if you can avoid cropping.
With my optimum settings dialed in, whatever they might be for the circumstances at the moment, I would simply remain aware of fluctuating light levels and adjust as necessary, or wait until my preferred lighting returned. Choosing which exposure control to adjust as the light changed would depend on exactly which values I had set currently, and which adjustment would most improve IQ or least harm it. I would already have figured out in my mind which exposure variables to adjust, depending on which way the light altered.
It is easy enough to remeter and adjust settings within five seconds. If the light is changing faster than that then I guess you are in trouble. Otherwise, simply keep on top of the light as it changes and be ready to shoot in advance, before your subject makes an appearance or does its thing. If I'm on walkabout I will periodically check my metering and exposure, just as I walk along. That way, as soon as anything interesting appears I am ready to shoot. If the light is up and down like a whore's drawers then I'll choose which lighting condition I would prefer to shoot in (probably the brighter conditions) and set the camera up for that light level. If an opportunity presents itself when the light is "wrong" for my settings then I'll just have to deal with it as best I can or miss the shot.
Overall I find the benefits of my approach to outweigh the cons, so I stick with it. I have pretty much entirely given up on autoexposure, so if you want an answer that takes that approach I'm afraid you'll need to look to someone else for their thoughts on the matter.
As for IS settings, I'm still experimenting. If the shutter speed is high enough (1/1600+) then it's probably best turned off. At 1/800 and slower I feel it is best turned on, but it is important to pick the right mode for the movement of the subject. If your subject is soaring and swooping and flitting about then turn it off. If it is moving steadily towards you (no jerky camera movements to track it) then Mode 1 would be best. If you need to pan, either up or down, but not diagonally, then Mode 2 is the right choice. A combination pan (diagonal) does not play well with IS, unless your panning is slow, controlled and steady. Trying to pan a dive or a bird landing is probably best tackled with IS off.
I don't know if that is any help, but it's the best I can do.
Thank you, Tim for so much relevant food for thought.
I was able to follow you all the way except that at times IQ seemed to mean Image Quality and now & again Intelligence Quota. I guess you meant the former.
Having spot metered, what mode would you opt for? I've always used AV until last week when someone recommended M, since when I'm over-exposing consistently! For one thing I'm not sure how to use M. As you know, shutter speed is the first essential for IQ shooting BIF. Isn't AV more suited to retaining shutter speed at the gradual expense of all other variables (in deteriorating light)? Or could I use M to better effect? And if so, how?
Forgive me for rabbiting on about this but it's truly marvellous to have your thoughtful mind to draw on and I must learn good technique soon or pack it in. You have given me a lot to go on with. It's mainly the mode setting that I now have doubts about.
tdodd
Just call me Tim
I spot meter off my own palm, because I know how bright (reflective) it is and know where I need the meter needle to be (+1 1/3) when metering from my own palm. I then set a MANUAL exposure so that I am in full control of shutter speed, aperture and ISO.
If the light changes then I take another reading off my palm and manually adjust the exposure so that I am back at + 1 1/3.
I don't want the camera to make any exposure decisions for me, so I ignore Av mode, Tv mode and P altogether, except in rare circumstances unrelated to shooting BIF. I also ignore what the meter says, while shooting, except when I am purposely aiming it at my palm to check the incident light brightness.
Note that in order for metering from my palm to work it needs to be exposed to the same light as the subject and the scene before me. If I am sitting in a hide then my palm is not going to get the light on it that the subject is seeing. In such situations I will find something else in the scene to meter off, making a judgement as to how bright it should be, and then set a manual exposure to suit the light outside. I may fire off a test shot or two, checking the histogram and for blinkies in order to confirm that my exposure is good (enough).
If you read up on the "Zone System" it might help guide you a little more into how to read a scene and make judgements about the exposures you require depending upon upon just what you are metering from. Unfortunately I don't have any references to steer you towards. The best practical resource I have seen to explain all this was a DVD tutorial, the name of which escapes me for now. I think this was it, but it was a while ago and I don't have a copy - http://www.photoshopsupport.com/photoshop-blog/08/01/photoshop-digital-photo-dvd-training.html.
Alternatively this might help - http://www.luminous-landscape.com/tutorials/understanding-series/understandexposure.shtml
or this - http://www.cambridgeincolour.com/tutorials/camera-metering.htm
and another - http://www.outdoorphotographer.com/how-to/shooting/digital-exposure-tips-from-the-pros.html
Last edited:
I spot meter off my own palm, because I know how bright (reflective) it is and know where I need the meter needle to be (+1 1/3) when metering from my own palm. I then set a MANUAL exposure so that I am in full control of shutter speed, aperture and ISO.
[/URL]
Tim, I am unable to spot-meter off my own palm!
My Instruction Manual (I.M.) tells me how to select spot metering, which I do. I am already in M mode and my IS is OFF. My settings happen to be f/8.0, 1/1000, ISO 400. But because my min.focusing distance is 1.5m I can't get my palm into focus while handholding the camera. It must be necessary to have my palm in focus if I'm to estimate that my palm is within range of incident light? What silly thing am I doing or not doing? Please?
tdodd
Just call me Tim
There is no need for your palm to be in focus. Simply half press the shutter in order to start metering. All you are interested in is the overall brightness of your palm, not the details on it. You also don't need to take a shot. Simply hold your open palm up in front of you, angled to pick up the light just as your subject would, and making sure you do not cast a shadow with the lens hood, aim the centre spot at the centre of your palm and activate metering. For my palm, which is fairly pale caucasian, I need to adjust the exposure until I see +1.3 on the meter. People with different skin tones from mine will find they will probably need to aim for some other value.
Here is a demonstration of how I would typically hold the camera and meter from my own palm. Normally I would stretch my palm wide open, so that there are no creases or shadows on it. The picture below shows it just a little closed, which is not how I would have my palm if metering for real, but it's close enough to get the idea. If the sun was low in the sky and directly behind me, thus casting a shadow, I would just reorientate a little so that my palm was fully illuminated for metering purposes....
Here is a demonstration of how I would typically hold the camera and meter from my own palm. Normally I would stretch my palm wide open, so that there are no creases or shadows on it. The picture below shows it just a little closed, which is not how I would have my palm if metering for real, but it's close enough to get the idea. If the sun was low in the sky and directly behind me, thus casting a shadow, I would just reorientate a little so that my palm was fully illuminated for metering purposes....
Attachments
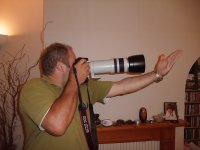
There is no need for your palm to be in focus. Simply half press the shutter in order to start metering. All you are interested in is the overall brightness of your palm, not the details on it. You also don't need to take a shot. Simply hold your open palm up in front of you, angled to pick up the light just as your subject would, and making sure you do not cast a shadow with the lens hood, aim the centre spot at the centre of your palm and activate metering. For my palm, which is fairly pale caucasian, I need to adjust the exposure until I see +1.3 on the meter. People with different skin tones from mine will find they will probably need to aim for some other value.
Here is a demonstration of how I would typically hold the camera and meter from my own palm. Normally I would stretch my palm wide open, so that there are no creases or shadows on it. The picture below shows it just a little closed, which is not how I would have my palm if metering for real, but it's close enough to get the idea. If the sun was low in the sky and directly behind me, thus casting a shadow, I would just reorientate a little so that my palm was fully illuminated for metering purposes....
By my standards this answer is very clever, Tim and the follow-up in your last sentence is most appropriate. I'll be trying this out tomorrow for sure. Thank you sincerely.
You deserve more than just a break, but if I let you go now you'll see me coming the next time. Please don't go far away for a few days until I've got this procedure into my small but active. From thursday next I'll be out of contact in the wilds for weeks.
Thank you for a great hour's shooting today Tim. Your technique worked wonders (by my standards) and it caught me out every time I misused it. I wish myself years of practice.
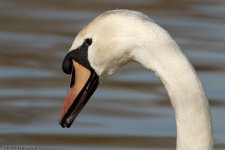
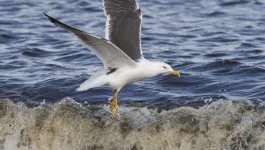
We get few Yellow-legged Gulls in Ireland; I would not have got this one without your help ...
We get few Yellow-legged Gulls in Ireland; I would not have got this one without your help ...
Attachments
tdodd
Just call me Tim
I'm glad it's working out for you. Good luck ")
By the way, if it helps make things any clearer, metering from my palm at +1 1/3 is just like using a photographic "grey card" and metering from that at 0. Since my palm is paler than a grey card (brighter/more reflective) I need to adjust for that, by aiming to get the meter at +1 1/3 instead of 0. The benefit of using my palm is that it is free and I always have it with me. You can Google for "grey card exposure", or just have a look at this article - http://www.benjohnstonphotography.com/understand/greycard/greycard.html. Although the article does not mention using one's palm, it does suggest other alternative options. You just need to get a feel for how to compensate for the differing reflectivity of each chosen metering target. Green grass is another favourite of mine, starting at -2/3, but adjusting as necessary to fine tune things to perfection.
By the way, if it helps make things any clearer, metering from my palm at +1 1/3 is just like using a photographic "grey card" and metering from that at 0. Since my palm is paler than a grey card (brighter/more reflective) I need to adjust for that, by aiming to get the meter at +1 1/3 instead of 0. The benefit of using my palm is that it is free and I always have it with me. You can Google for "grey card exposure", or just have a look at this article - http://www.benjohnstonphotography.com/understand/greycard/greycard.html. Although the article does not mention using one's palm, it does suggest other alternative options. You just need to get a feel for how to compensate for the differing reflectivity of each chosen metering target. Green grass is another favourite of mine, starting at -2/3, but adjusting as necessary to fine tune things to perfection.
Last edited:
Shaggy2070
Well-known member
Quick question from a thickie :h?:.
Does getting a meter reading from your hand mean; putting the camera in one of the auto modes, pointing it at your hand, pressing the shutter half way then dialing the suggested Apeture and Shutter speed settings into the Manual mode???
Does getting a meter reading from your hand mean; putting the camera in one of the auto modes, pointing it at your hand, pressing the shutter half way then dialing the suggested Apeture and Shutter speed settings into the Manual mode???
Users who are viewing this thread
Total: 2 (members: 0, guests: 2)