Keith Reeder
Watch the birdie...
How does that picture look at 800 px, Mark?


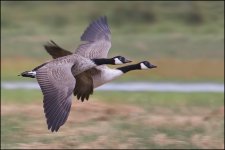
You've just explained to yourself why manual exposure is such a great tool. If you have a dark bird in the shot you want it to remain looking dark. You do not want autoexposure to decide for you that it would look much nicer at 18% grey. It's exactly the same with a light coloured bird. It should look light in the photo. Again, you don't want autoexposure to decide you're going to get an 18% grey bird whether you like it or not. What you really want in the scene is a grey bird (18% grey preferably) that you can use to set your exposure accurately. Then black birds will stay black, white birds will stay white and grey bird will stay grey. All other colours and shades will end up exactly where they belong. If you are not fortunate enough to have an 18% grey bird handy then you can use an 18% grey card and set the exposure from that. It will be just as effective as an 18% grey bird. Alternatively, meter off your palm (so long as it is in the same light as the birds) and set the exposure about +1 to +1 1/3 stops above the centre of the meter. Your palm does not tan and so can be used throughout the year as a fake grey card. Because your palm is paler (more reflective) than a real grey card you will need to dial the exposure in a bit over the zero to compensate. +1 to +1 1/3 will probably be about right, but you can test by trial and error exactly what works best for your skin and your camera.I have read where several people use manual exposure for BIF. Being a novice myself and never really using Manual I am intrigued as to exactly how this works. If you take a reading off something neutral like grass and use that for the exposure then surely the tone of the bird (light or dark) must play a part into whether or not it is exposed correctly or is this a silly question. Can anyone explain in simple terms (idiot proof for me :-C ) exactly how one goes about using manual exposure for bird photography as I would like to give it a shot.
You've just explained to yourself why manual exposure is such a great tool. If you have a dark bird in the shot you want it to remain looking dark. You do not want autoexposure to decide for you that it would look much nicer at 18% grey. It's exactly the same with a light coloured bird. It should look light in the photo. Again, you don't want autoexposure to decide you're going to get an 18% grey bird whether you like it or not. What you really want in the scene is a grey bird (18% grey preferably) that you can use to set your exposure accurately. Then black birds will stay black, white birds will stay white and grey bird will stay grey. All other colours and shades will end up exactly where they belong. If you are not fortunate enough to have an 18% grey bird handy then you can use an 18% grey card and set the exposure from that. It will be just as effective as an 18% grey bird. Alternatively, meter off your palm (so long as it is in the same light as the birds) and set the exposure about +1 to +1 1/3 stops above the centre of the meter. Your palm does not tan and so can be used throughout the year as a fake grey card. Because your palm is paler (more reflective) than a real grey card you will need to dial the exposure in a bit over the zero to compensate. +2/3 will probably be about right, but you can test by trial and error exactly what works best for your skin and your camera.
This is no different to shooting grooms in black tuxedos and brides in white dresses. The exposure should be set according to the incident light falling upon the subject, not the reflected light coming off it. Black tux, white dress, it doesn't matter - the exposure should be the same for both - you still want the skin tones and background to match from one photo to the next. Weddings togs use manual exposure all the time. But with in camera metering you have to make do with reflected light, and if the subject metered is anything other than 18% grey in luminosity then you will need to dial in some EC one way or the other to compensate. That all seems a bit like hard (guess)work to me. Manual keeps things really simple, once you have the exposure set correctly.
Metering off grass is perfect, if the grass and the bird(s) are both enoying the same lighting. If the grass is in bright sunshine and the birds are flying in the shadows of trees (or vice versa) then you'll have to find something else to meter off. If the bird is in shade then meter off some grass in the shade. If the bird is lit by open sky or direct sunlight then find some grass that is lit the same way. Grass does differ in tone, so you may have to manually choose to "overexpose" a bit or "underexpose" a bit. That's fair enough. If you're shoting in a snow scene you'll have to "overexpose" quite a lot, because all that bright white snow will cause the camera's metering to want to dim it down to 18% grey. Of course, you actually want the snow to be captured as brilliant (but not overexposed!) white. If you shoot with autoexposure you will likely need to dial in a couple of stops of +EC to tell the camera you want the whites kept white.
Apart from the tone of the bird altering, which should not change your exposure settings in any way, the exact same thing goes for the background, which will most likely dominate the meter reading more than the bird in any case. If a bird is flying level with the top of the treeline, sometimes against a blue sky, sometimes against the dark trees, you don't want the exposure to keep bobbing up and down with the bird. If the bird is lit constantly then the exposure for the bird should not change at all, regardless of what the background is doing. Suppose the bird is flying over ground and heading for a lake, with bright specular reflections all over it. Should the exposure for the bird suddenly change simply because we have a new, brighter background? I don't believe so. The bird may get a bit of extra light underneath, but the top of the bird, where the light originates from, will be getting no more and no less light than before. You want to fix the exposure for the bird. Nothing else.
You'll only come unstuck with manual exposure if the light changes (clouds rolling in and out again) or the bird is ducking and diving in and out of shade. You can then choose whether to adjust your manual settings to suit the new conditions or take your chances with auto exposure of some kind, and manual exposure compensation.
If all else fails, and your are struggling with metering, for whatever reason, try the good old manual fallback of the SUNNY 16 RULE. It's all explained here - http://medfmt.8k.com/mf/sunny.html. You can, of course trade off shutter speed, aperture and ISO to maintain the correct overall exposure and get the shutter speed you need to control motion and the aperture you need to conrol DOF. So, for example, in sunny conditions, instead of f/16, 100 ISO, 1/100 you might choose f/8, 400 ISO, 1/1600 for the same exposure.
Thanks again for that. I do have a 40D and at the moment I use the custom presets for exposure compensation (0, +1, +2 with all other settings the same) so using it like you suggest would be a similar thing but more accurate than me guessing.Good to hear. In the right conditions (stable lighting) manual exposure simplifies everything. Just set it and forget it (until the light changes).
I've just had a thought. If you have a camera like the 40D you could even save some different manual settings in your C1, C2, C3 custom presets. C1 could be for brilliant sunshine, C2 for deep shade, and maybe C3 for regular cloudy. When you get to a location you could set them up precisely to suit the exact conditions at the scene.
Actually, you're not wrong - they are "easy" (yeah, fulmars are a doddle!Pah!! eezy peezy stuff.
") ) - but I think they prove that the 40D and all focus points isn't an entirely lost cause.
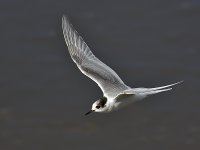
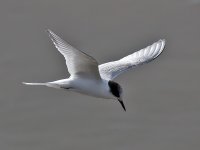
) - but I think they prove that the 40D and all focus points isn't an entirely lost cause.Let's see what this weekend brings..!Where are the Terns?
As I thought, many thanks again Tim.The only thing to watch for when you first meter to get your manual settings is to ensure you fill the frame with the meter target, or choose a metering mode like partial or spot, to make it easier to aim at exactly what you need. Once you're set up and moving the camera around the meter will bob about but the camera will obey your manual settings.
Here are the Terns Paul, not sure if it is the right type thoughPah!! eezy peezy stuff. Where are the Terns? B
(nice shots though)
Here are the Terns Paul, not sure if it is the right type though
)As an aside - this recent influx of black terns must be pretty much unprecedented, I'd have thought. They're everywhere...
I did used to have a Weston something or other, courtesy of my dad, but never really used it and now I can't find it. I think the last time I saw it was maybe 20+ years ago. So I did a bit of digging on the internet, Googling for "Weston Master V calibration". From what I found it seems that (a) there is a "zero" adjustment screw on the back, so maybe that needs looking at; (b) there is a calibration service for them - so I guess they can go out of whack.Now, turning to tdodd's eloquent exposé on manual exposure. On reading it the cogs started turning and I remembered that somewhere I have a Weston Mater V exposure meter with incident light cone. So this afternoon I dug it out and used it to test the theory. First, I set the ASA speed rating (which I know(?) equates to current ISO ratings), ascertained suitable shutter speed/aperture by both incident and relected light (almost exactly the same) and set them on my 20D. Then I tried some test shots of reasonably neutral subjects - brickwork and garden greenery. Results? Anything between 1 and 2 stops over-exposed as indicated on the camera scale and verified by blown highlights "flashing" in the image and of course, the histogram. Not sensible I thought - am I on the wrong track with ASA/ISO being the same? Checked that they are by research on the net and now back to square one! I do like the idea of "setting and forgetting" as tdodd says so what can be the problem, I ask? Incidentally, the lens in use is Canon 100-400 IS Zoom.
Anyone have any views please?
Adrian
Yep, that was to be my next suggestion: is the light meter still accurate?