• Welcome to BirdForum, the internet's largest birding community with thousands of members from all over the world. The forums are dedicated to wild birds, birding, binoculars and equipment and all that goes with it.

    Please register for an account to take part in the discussions in the forum, post your pictures in the gallery and more.
ZEISS DTI thermal imaging cameras. For more discoveries at night, and during the day.

Nippon Kogaku 7X35 CF Porro Needs Tighter Diopter Eyepiece Adjustment? (1 Viewer)

joejeweler

Well-known member
United States
I thought i might ask if anyone is familiar with adding a bit of friction to a Nippon Kogaku 7X35 Porro's Right eyepiece.(Diopter adjustment)

I own a 2nd example of this 7X35 model, as well as a 8X30 example,......and both of those are noticably stiffer when making the diopter adjustment.

The 7X35 in question has virtually no friction in the eyepiece, and could easily move off any setting while in use.

Before i go in, i was hoping someone might know if the eyepiece friction adjustment is obtained with a screw somewhere, or use of a heavier specific grease on threads on this eyepiece?

Any help would be appreciated, as this porro is VERY sharp (best of the 3 in this size area), and the glass is clear and clean with no haze or any problems. My other 7X35 has some spiderwebbing internally although not seen while viewing, but is not quite as sharp.

My 8X30 also has clean and clear glass with no haze,.....BUT,....it just never seems to get sharp to my eyes! There is no doubling of image, so collimation can't be it. But i was always dissappointed with it. A gem it is not, and not quite sure how it might have passed QC initially?

Anyway,.....any help on adjusting the friction of the eyepiece would be appreciated, as this particular Nippon Kogaku 7X35 is a GEM in my mind,.....where it counts in sharpness. Nice and bright also.....

thanks,
Joe T
 
Last edited:
Joe,

You might want to have Nicolas Crista do the work, particularly if you really like the instrument. He's right around the corner from you, works quickly, and doesn't charge much. NRC Optics

He refurbished my 8x30 Nippon Kogaku a few years back.

Ed
 
Joe,

You might want to have Nicolas Crista do the work, particularly if you really like the instrument. He's right around the corner from you, works quickly, and doesn't charge much. NRC Optics

He refurbished my 8x30 Nippon Kogaku a few years back.

Ed

Hi Ed,....i'll keep Nicolas in mind,....as you say he's pretty close just 1 state over.

However, considering the ONLY thing needed on this is a bit more friction on the diopter adjusting eyepiece,....i'd really like to avoid shipping charges both ways, and whatever fees might be charged.

.....especially if it's something i should be able to handle. I was a bench jeweler/diamond setter for 35 years,....with some clock and pocket watch repair thrown in,....so i'm not really afraid to get something like this done.

Maybe 20 years ago i also ran a few vintage binos (uncoated lenses vintage Zeiss was one i recall) though a prism/internal lens clean without a hitch. Not a full CLA, but just to enough to get them serviceable.

However, it's been awhile and was seeking out what the friction control mechinism was on these, so i could get any needed parts ahead of time.

Anyway,.....once i dig out my jewelers screwdrivers and put some fresh tips on them,......i'll give it a go first.
 
Joe,

There is no friction adjustment mechanism for these diopter rings. In the old days people usually improvised external fixes like rubber bands.

There's not much to getting as far inside as you need to if you want to try some kind of internal fix like slathering some gooey stuff between the diopter ring and the outside of the eyepiece sleeve beneath it. Just loosen the three grub screws and then remove the ring. Obviously you don't want to increase the friction of the entire eyepiece tube since that would cause the focusing to stiffen up.

Henry
 
Last edited:
You need the correct grease to recover the stiction of the control. Damping grease for tone arm cueing levers is the correct grade but expensive.
The other option is chainsaw chain lube, a good quality product is like treacle in low temperatures.
 
Joe,

There is no friction adjustment mechanism for these diopter rings. In the old days people usually improvised external fixes like rubber bands.

There's not much to getting as far inside as you need to if you want to try some kind of internal fix like slathering some gooey stuff between the diopter ring and the outside of the eyepiece sleeve beneath it. Just loosen the three grub screws and then remove the ring. Obviously you don't want to increase the friction of the entire eyepiece tube since that would cause the focusing to stiffen up.

Henry

You need the correct grease to recover the stiction of the control. Damping grease for tone arm cueing levers is the correct grade but expensive.
The other option is chainsaw chain lube, a good quality product is like treacle in low temperatures.


Thanks guys,.....sometime over the next week or so i'll get this attended to,....and let you know what i arrived at. I'm usually pretty good at getting things to work the way i want,.....so i'll update when i "get-er-done".

cheers,
 
Joe,

There is no friction adjustment mechanism for these diopter rings. In the old days people usually improvised external fixes like rubber bands.

There's not much to getting as far inside as you need to if you want to try some kind of internal fix like slathering some gooey stuff between the diopter ring and the outside of the eyepiece sleeve beneath it. Just loosen the three grub screws and then remove the ring. Obviously you don't want to increase the friction of the entire eyepiece tube since that would cause the focusing to stiffen up.

Henry

You need the correct grease to recover the stiction of the control. Damping grease for tone arm cueing levers is the correct grade but expensive.
The other option is chainsaw chain lube, a good quality product is like treacle in low temperatures.


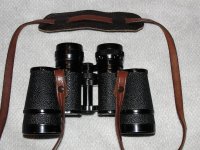
Well, after thinking it over a few weeks I decided to finally get the diopter friction adjustment level up to where it should be on my Nippon Kogaku/Nikon 7x35 (J-B7) 7.3 degree FOV poro binoculars.

As you may recall in my initial inquiry in this thread, there was virtually NO friction maintained in the right eyepiece ocular adjustment. It was very easy for the adjustment to change on it's own from normal use.

However, I didn't want to "cobb it up" using a rubber band/o-ring, or gooey stuff between the diopter ring and the outside surface of the eyepiece sleeve. Over time rubber will wear at the finish, and will look unprofessional to say the least.

I believe the solution I arrived at is very near what might be expected from a repair shop or factory, and I'll relay how I went about it in case others might have the same problem and wish to try to address it on their own. My aim was to correct the lack of friction of the diopter setting, without requiring disassembly of the entire upper section and exposing the internals to dust.

Firstly, had these needed an internal cleaning or collimation, I would have sent them out for a CLA and had the diopter adjustment attended to at that time. However, since the internals are VERY clean, the collimation spot on, and the focus wheel functioning as it should.....I decided to give it a shot myself.

I already had a set of jeweler's watchmaking screwdrivers, and trued up the edges of one of them to closely fit the 3 small screws holding the ocular cover in place. I turned the ocular ring "down (-)" all the way clockwise until it stopped, and took note of where the indexing marks lined up,....in order to get me in the ballpark when reassembling.

Loosening the 3 screws just enough to remove the outer cover tube, I then cleaned up any old and dried lubricant wherever I found it. This included inside the removed tube, and along the threading where I could get at it.

I worked the ocular carefully with my fingers to avoid touching the lens, and I found that if I raised the main central focus adjustment (counter-clockwise) to increase the spacing between the prism cover plate and ocular cross bridge, that i could then further unscrew the ocular tube (clockwise), in order to expose the lower 3-4 threads of the ocular tube. The threading actually releases at the end, and the tube drops down a few more millimeters to expose a bit more of the threading.

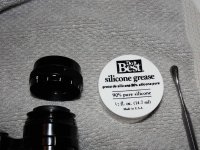
I wiped off any remaining old grease (a thumbnail removed some hardened dried grease easily), and carefully applied a "fill" of new grease. I thought the 90% silicone grease available at my local hardware store (used in plumbing applications) had just the tackyness I needed to increase friction of the ocular adjustment,......and it turned out about as good as I could have hoped! P E R F E C T!!!!

I didn't want to use a heavy petroleum grease, as I thought over time they can move around more, and possibly evaporate a film onto the lenses with the binoculars stored in the case. I also couldn't recall a petroleum grease with the needed "stickiness" of the heavy silicone grease.

Anyway, once the 3-4 lower threads were "filled" with silicone grease, I used a pinky finger to remove any excess grease, and wiped it into a few napkins and got rid of them right away. (less chance to smear a lens with grease!)

What you want is just the thread grooves filled with the tacky grease. Any extra is just going to make a mess later when re-assembling. A few Q-Tips were used also to get it all looking very neat with no globs of grease showing.

Once I was satisfied the lower thread grooves were silicone grease filled, and any extra cleaned away, I used my left thumbnail to lightly push up on the ocular tube, in order engage the threaded parts. A small screwdriver in my right hand pushed against the slight hump of the beginning of the exposed threads, to start the reassembly.

After a few turns were made, the top of the ocular tube could again be accessed (it had been recessed below the surface when accessing the lower 4 threads). I continued to turn the exposed ocular tube counter-clockwise until it stopped at it's highest point. This exposed the upper threads of the ocular, and I cleaned up the threads and added silicone grease as I had done on the lower section.

Then I turned the ocular clockwise to lower it (still with outer cover tube removed), to a point where the upper threads were buried and no longer visible, and cleaned up what slight grease squeeze-out had occurred on both ends.

To get the final ocular adjustment set to "0" and aligned with the indexing line, I positioned the previously removed outer cover in place, and lightly tightened the 3 small screws to see where I was. You will need to make a final adjustment soon, so no need to tighten them down fully at this point.

I used a precision straight edge placed across 2 sides of the fixed (left side) ocular, and turned the right adjustable ocular until it made contact with the same straight edge. After the straight edge made contact with both outer ocular surfaces equally (2 points on each ocular), I then loosened the 3 cover screws.

The final step is to turn the now loosened outer cover to line up the index line with the "0", and carefully tighten the 3 screws to lock the cover in place. They are small screws, so be careful and don't strip the holes!!!

It only took about 45 minutes to complete the task, and now the adjustment is as it should be. Just enough resistance to stay in place during use, but easy to change the diopter setting if necessary.

The tacky silicone grease made a HUGE difference in the feel and functioning of this adjustment,......just be careful to stay clear of the lenses, and remove ALL of the squeeze out.

Neatness counts....... :)

Pics below:

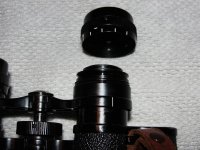
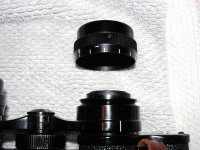
1st picture upper left shows cover off, and central focus adjustment at highest setting to allow the ocular to thread downward as shown in...........

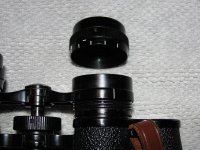
.....2nd picture from left. The ocular has been unscrewed and the threads exposed at the bottom to allow for cleaning, and application of the "tacky" silicone grease.

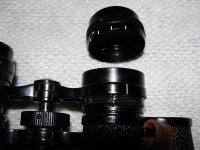
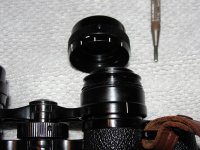
3rd picture from left the new grease applied to LOWER threads, ready to use left thumb to lift the threaded section and use small screwdriver to re-engage the threads and twist the ocular upward to bury the bottom threads and expose the upper threads.

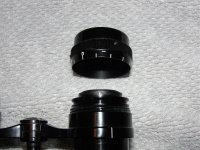
4th picture the UPPER threads are exposed, cleaned up, and new grease applied. Ready for final assembly and adjustment of the indexing.

5th picture shows the silicone grease used. Cost was about $4.50 at a local hardware store, and is used in plumbing to lubricate threads on valves. Virtually impossible for water to degrade, and has a high heat resistance to wandering.
 

Attachments

  • Nippon Kogaku 7x35 Binocular Repair 054.jpgsmall.jpg
    Nippon Kogaku 7x35 Binocular Repair 054.jpgsmall.jpg
    144.3 KB · Views: 170
  • Nippon Kogaku 7x35 Binocular Repair 055.jpgsmall.jpg
    Nippon Kogaku 7x35 Binocular Repair 055.jpgsmall.jpg
    156 KB · Views: 157
  • Nippon Kogaku 7x35 Binocular Repair 057.jpgsmall.jpg
    Nippon Kogaku 7x35 Binocular Repair 057.jpgsmall.jpg
    135.1 KB · Views: 185
  • Nippon Kogaku 7x35 Binocular Repair 059.jpg
    Nippon Kogaku 7x35 Binocular Repair 059.jpg
    201.5 KB · Views: 164
  • Nippon Kogaku 7x35 Binocular Repair 060.jpgsmall.jpg
    Nippon Kogaku 7x35 Binocular Repair 060.jpgsmall.jpg
    196.3 KB · Views: 176
Last edited:
A few more pics and details:

1st from left shows the threading from both top and bottom areas now buried within the tube, and any grease squeeze-out removed and cover ready to go back on.

Middle picture shows alignment of the indexing to "0". A straight edge was used to balance both oculars (as described in previous post), but not shown. (that neck strap central pad one of many I've cut over the years from a half side of cow hide. Makes for a comfy carry, unless you go to a harness)

The last picture at far right shows why it was necessary to raise the central focus to allow the lower threaded area to be cleaned up and re-greased. In this position not much can be done on the lower (buried) threads.

In closing, I suspect a lot of binoculars can have their ocular adjustments tightened up like this. It certainly proved to be pretty straight forward, and within the capabilities of a lot of folks. The silicone grease was about $4.50 locally, and could do hundreds of jobs I suspect. No additional squeeze out occurred after initial cleanup, and I worked the ocular adjustment maybe 50 times to be sure. This stuff stays put!

cheers,
Joe T
 

Attachments

  • Nippon Kogaku 7x35 Binocular Repair 061.jpgsmall.jpg
    Nippon Kogaku 7x35 Binocular Repair 061.jpgsmall.jpg
    168.1 KB · Views: 122
  • Nippon Kogaku 7x35 Binocular Repair 065.jpgsmall.jpg
    Nippon Kogaku 7x35 Binocular Repair 065.jpgsmall.jpg
    242.5 KB · Views: 134
  • Nippon Kogaku 7x35 Binocular Repair 050.jpgsmall.jpg
    Nippon Kogaku 7x35 Binocular Repair 050.jpgsmall.jpg
    110.1 KB · Views: 216
Last edited:
Very nice work, Joe! I'm sure you were more careful and precise than the original assembler.

The only problem I see with your methods is the use of a straight edge to reset the diopter ring to "0". That will not necessarily work because the focal planes of the objective lenses may not exactly coinside. There are two reasons for that. Firstly, the actual focal lengths of the objectives may not be perfectly identical. Then, even if the focal lengths are the same this binocular was collimated using threaded double eccentric objective rings so that the objectives of most samples are mounted at slightly different distances from from the eyepieces. A quick check of an old 8x30 E shows about 1 diopter change from rotating an eccentric ring about 1/2 turn. For those reason I think it's better to set the diopter to "0" optically by using one eye to focus a target centered in the left eyepiece, then move the target to the center of the right eyepiece and focus with the same eye using the diopter ring.

Henry

I actually considered there might be a difference in their actual focal lengths, but doing as you described after the procedure visually confirmed I must be very close, as I can see no difference in sharpness between sides when set to "0" diopter adjustment. (where is where I set my binoculars while using).

And of course, indexing the diopter ring "visually" presupposes that YOUR eyes focus individually to the same point! ;) What's a "0" setting for some might be slightly different to another person's eyes.

I figured that unless I had a mechanical indexing device available to set the diopter adjustment to "absolute zero" ( in optical terms),......setting it visually is close enough for me. :t:

BTW, as mentioned previously I did take note of the adjustment line up prior to getting started, and where I ended up was within a mm or so of where they were,....if that.

I enjoyed the challenge,....simple as it turned out to be. Hope others can avoid the rubber band route as this gives the precision "feel" these deserve. A very sharp porro indeed, now functionally capable.

It always amazes me how good they "got it" so many years ago, and how many more dollars it takes to get a roof design to the same optical level.
 
Last edited:
Warning! This thread is more than 11 years ago old.
It's likely that no further discussion is required, in which case we recommend starting a new thread. If however you feel your response is required you can still do so.

Users who are viewing this thread

Back
Top