


-
Welcome to BirdForum, the internet's largest birding community with thousands of members from all over the world. The forums are dedicated to wild birds, birding, binoculars and equipment and all that goes with it.
Please register for an account to take part in the discussions in the forum, post your pictures in the gallery and more.

You are using an out of date browser. It may not display this or other websites correctly.
You should upgrade or use an alternative browser.
You should upgrade or use an alternative browser.
Fixing vignetting (1 Viewer)
- Thread starter breffni
- Start date
More options
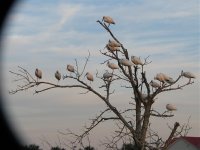
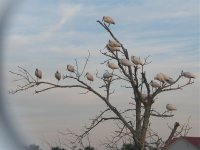
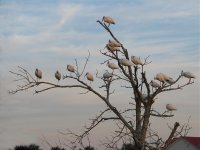
Who Replied?Sure - here is an example - i cropped out as much as possible but want to retain all of the tree so need to get rid of the black edge and replace it with sky. A procedure is given here but when i follow it, it greys out everything...
http://www.covingtoninnovations.com/dslr/vignetting.html
http://www.covingtoninnovations.com/dslr/vignetting.html
Attachments
Last edited:
john-henry
Well-known member
Easiest and quickest way for his one is to use the clone tool, set opacity to 80%, select a soft brush from the brush palette, carefully pick clear areas in the pic that match what you want to clone and brush out the vignette, you'll probably have to brush the same spot twice due to the opacity being less than 100%.
shouldn't take more than a few minutes
John
PS the reason you're getting this type of vigneting is the camera is not held square to the scopes' eyepiece, I should check your adapter alignment.
shouldn't take more than a few minutes
John
PS the reason you're getting this type of vigneting is the camera is not held square to the scopes' eyepiece, I should check your adapter alignment.
Last edited:
JohnJos
Well-known member
I agree with John, use the clone tool. It's called 'clone brush' in Paint Shop Pro and I think it's an invaluable tool. Select an area that is close to what the vignetted area should look like and the paint in the area. It won't be like the vignetting was never there but it can be made to look quite close. Good luck. Also, look over the digiscoping adapters forum if what you have is not working for you. Some very innovative contraptions are listed in those posts.
erniehatt
Well-known member
I agree with John, use the clone tool. It's called 'clone brush' in Paint Shop Pro and I think it's an invaluable tool. Select an area that is close to what the vignetted area should look like and the paint in the area. It won't be like the vignetting was never there but it can be made to look quite close. Good luck. Also, look over the digiscoping adapters forum if what you have is not working for you. Some very innovative contraptions are listed in those posts.
Another way to fix it if it is not too heavy, is to use the highlight/Shadow tool in Photoshop CS, CS2, CS3. Ernie
Barred Wobbler
Well-known member
erniehatt
Well-known member
Looking at the images, the highlight/shadow wont work, the edges are to sharp, it only works when you have slight shadowing. Alan is correct.
It seems that your main problem is the alighnment of the camera to the eyepiece depicted by the vignetting on one side, are you trying to hand hold it together. The best way to fix vignetting is before the image is taken not after. Ernie
It seems that your main problem is the alighnment of the camera to the eyepiece depicted by the vignetting on one side, are you trying to hand hold it together. The best way to fix vignetting is before the image is taken not after. Ernie
Paul Corfield
Well-known member
If you shoot in RAW then there is a way to do it in Photoshop in the RAW conversion stage as there is a slider to correct the vignette if any is present. Not sure if you can do that in Elements though.
Paul.
Paul.
Thanks everyone, especially Alan.
The shot was taken with a canon powershot S5, nice camera but no raw support - if i had just taken the teleconverter off it would have been fine but i was too lazy and in too much of a hurry and figured i could crop it - to get it again i would have to fly back to the USA.
Unfortunately photoshop elements does not have the clone tool - so it looks like i'll have to upgrade.
Here are some more shots from that charleston trip: http://www.flickr.com/photos/breffni
Last edited:
Barred Wobbler
Well-known member
No need to upgrade. Your Elements has the clone tool you need.
Look on the menu thing (I don't know what it's called) that holds various icons on the screen. Near the bottom on the left hand column of icons (just above a hand symbol) is an icon that looks a bit like the date stamp they use on library books. This is your clone tool. It alternates with the Pattern stamp, so if you use it and get a pattern appearing instead of the copied image, just press Alt while clicking on the icon and it should change to back to Clone.
Put the cursor over the area of the photo you want to copy from and press Alt while clicking the mouse. This is now the sample point. Move the cursor to the bit you want to repair and click again. The new bit of image will appear. Use different sample points to build the repair - you don't want a section of your image to look like it's just been cut and pasted.
Good luck.
PS if the "menu thing" isn't there go to the pull-downs along the top of the screen and click on "Window". On the pull-down menu click "Show Tools" and it will appear.
Another Edit:
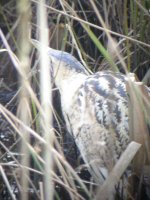
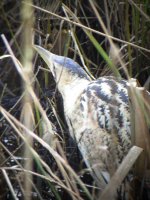
Just to show the shenanigans you can get up to with the clone tool here is a photo of my first bittern, taken 5 years ago when my Coolpix was still brand-new. I took a host of photos, but there were soo many people in the hide the place was rolling like a ship and with a dull day and slow shutter speed I only could keep three or four photos that were recognisable. There was a distinctly unhelpful reed in the way of the bird's eye, so desparate measures were called for.
Look on the menu thing (I don't know what it's called) that holds various icons on the screen. Near the bottom on the left hand column of icons (just above a hand symbol) is an icon that looks a bit like the date stamp they use on library books. This is your clone tool. It alternates with the Pattern stamp, so if you use it and get a pattern appearing instead of the copied image, just press Alt while clicking on the icon and it should change to back to Clone.
Put the cursor over the area of the photo you want to copy from and press Alt while clicking the mouse. This is now the sample point. Move the cursor to the bit you want to repair and click again. The new bit of image will appear. Use different sample points to build the repair - you don't want a section of your image to look like it's just been cut and pasted.
Good luck.
PS if the "menu thing" isn't there go to the pull-downs along the top of the screen and click on "Window". On the pull-down menu click "Show Tools" and it will appear.
Another Edit:
Just to show the shenanigans you can get up to with the clone tool here is a photo of my first bittern, taken 5 years ago when my Coolpix was still brand-new. I took a host of photos, but there were soo many people in the hide the place was rolling like a ship and with a dull day and slow shutter speed I only could keep three or four photos that were recognisable. There was a distinctly unhelpful reed in the way of the bird's eye, so desparate measures were called for.
Attachments
Last edited:
Thanks - that works like a dream - i even managed to put two shots side by side and clone from one to the other (situation like your bittern) - i have hundreds of shots which can benefit (shenanagins bedamned!)
You dont have any solutions for where the reed in front of the bittern would be nearer the camera and so produce a light diffuse fuzz by any chance? I tried various colour remove/replace methods but no joy...
You dont have any solutions for where the reed in front of the bittern would be nearer the camera and so produce a light diffuse fuzz by any chance? I tried various colour remove/replace methods but no joy...
Barred Wobbler
Well-known member
I didn't use another photo as a source for the bittern pic - but I know what you mean (what's there are the before and after shots), I just got in close with the clone tool and used whatever was to hand in the photo and a bit of artistic license to paint a new bit of background, some reeds and a bit of beak and feather.
If you want to introduce something that appears out of focus you could try using a softer brush on the clone tool with a reduced opacity and if necessary use the blur tool, but that can be a bit clumsy if you smudge it.
I don't normally mess with photos this way, preferring the lightest touch editorially that I can get away with, but the fact that this was the best shot I had of by first bittern got the better of me and I had a bit of creative fun. It was win or bust and I think it worked.
Last edited:
Users who are viewing this thread
Total: 2 (members: 0, guests: 2)