


-
Welcome to BirdForum, the internet's largest birding community with thousands of members from all over the world. The forums are dedicated to wild birds, birding, binoculars and equipment and all that goes with it.
Please register for an account to take part in the discussions in the forum, post your pictures in the gallery and more.

You are using an out of date browser. It may not display this or other websites correctly.
You should upgrade or use an alternative browser.
You should upgrade or use an alternative browser.
Binocular Repairs and Cleaning (1 Viewer)
- Thread starter OPTIC_NUT
- Start date
More options
Who Replied?WJC
Well-known member
Very helpful tips, thanks
Can`t wait to get going...
Getting into it will take care of that!
Don't get discouraged; take it slowly.
Bill
Another thought on replacing prisms after cleaning, on some binoculars you will see a little blob of adhesive at the sides of the prism, holding it in place. This is obviously not a good sign in respect of the prism being easy to seat back in place as it indicates it is subject to movement. I have found that this almost always requires the need to tweak the prism to get vertical alignment when replacing it. I would be a bit surprised if this was the case with your Kowa, but you will easily be able to spot it if it is. I really like the old prism cradle set up like that used on the US pattern WW11 7x50s and the older Audubon, makes life much easier, everything just fits back where it should.
Thanks for starting this thread should go to Optic-Nut, his idea, and I think it has turned out to be useful.
Thanks for starting this thread should go to Optic-Nut, his idea, and I think it has turned out to be useful.
Last edited:
WJC
Well-known member
Bencw wrote: "I really like the old prism cradle set up like that used on the US pattern WW11 7x50s"
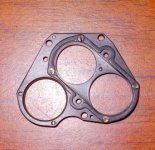
We called it a "collar." With some of the later models, the screws on the corner sat inside a tiny cam. Once turned to sit against the prism, it could be tightened in place and the prism was held, firmly. This model shows the location of the "prism posts," which held the prism "shields" in place. Today, most Porros don't have them, but they keep unwanted light out of the cone.
Bill
Attachments
Last edited:
WJC
Well-known member
The WW2 Wollensacks are like that with a ribbed cone for light supression.
It's a bear removing the whole 'cartridge' (hint: threaded collar under ocular), but then you can
mostly clean the prisms without moving them.
Over time, light moisture and the tiniest of particulates get between the facing prisms. When THAT happens, you must take the cluster apart.
Bill
Yep, that's the piece of kit Bill, thanks. I serviced an old Swift Audubon a while back, they have a similar collar, before I put it all back, I fitted clean prism shields, blacked all the inside of the body, including the inside of the prism plates and also blacked the little chrome nuts that hold the lanyard fixings inside. Before it was good but a bit dirty and suffered with stray light, I expected it to be a bit better after, but it was astoundingly better, stray light eliminated, and superb clarity. Worth the effort if you have an old Audubon.
WJC
Well-known member
Yep, that's the piece of kit Bill, thanks. I serviced an old Swift Audubon a while back, they have a similar collar, before I put it all back, I fitted clean prism shields, blacked all the inside of the body, including the inside of the prism plates and also blacked the little chrome nuts that hold the lanyard fixings inside. Before it was good but a bit dirty and suffered with stray light, I expected it to be a bit better after, but it was astoundingly better, stray light eliminated, and superb clarity. Worth the effort if you have an old Audubon.
Before I bought a 8x32 SE as my #1 birding bino, the Audubon was my goto instrument. I also used the 10x50 Audubon. However, Swift had to pay $30k a year to use the Audubon name, and Hop thought that was just too much. Soooo, the 10x became the Kestrel . . . 0 dollars was much cheaper.
Cheers,
Bill
PS Do you know Simon Spiers?
Over time, light moisture and the tiniest of particulates get between the facing prisms. When THAT happens, you must take the cluster apart.
Or a bad case of mold. Had to take apart a pair. Many Wollensacks no doubt saw South Pacific use.
In the end, they don't clean up as sharp as the best of Nippon, especially 1947-1958.
removed and cleaned Kowa upper prisms
I finally plucked up the courage today and cleaned the Kowa 10X50's huge upper prisms. The gunge was mostly on the top surfaces.
There were two little "dings" made at the factory in the lips of the recesses and both prisms went back in exactly the way they were before. I have a favourite testing treetop that has appeared double so many times, but not this time!
I used turpentine to get the worst stuff off and then ethanol with lens cloth from my local lab tech support guy.
Some dust specs I can live with and the result is stunning. I am over the moon.
I am halfway there building my Seyfried collimator -- some tweaking necessary as there is separation between the crosses as I shift from left to right. The quest for the perfect parallel!
Also, I wonder how one eliminates the apparent movement between the crosses that happens when the eye moves?
WJC
Well-known member
I finally plucked up the courage today and cleaned the Kowa 10X50's huge upper prisms. The gunge was mostly on the top surfaces.
There were two little "dings" made at the factory in the lips of the recesses and both prisms went back in exactly the way they were before. I have a favourite testing treetop that has appeared double so many times, but not this time!
I used turpentine to get the worst stuff off and then ethanol with lens cloth from my local lab tech support guy.
Some dust specs I can live with and the result is stunning. I am over the moon.
I am halfway there building my Seyfried collimator -- some tweaking necessary as there is separation between the crosses as I shift from left to right. The quest for the perfect parallel!
Also, I wonder how one eliminates the apparent movement between the crosses that happens when the eye moves?
"Perfect" and "Binoculars" shouldn't be in the same sentence. Also, Jan's collimator (Edmund Scientific, the British Army's MK 1, and others) only addresses "conditional alignment." IF you're the only one using it, it is far more than adequate. If others are to use it (different IPDs), all bets are off. There are dozens of articles on the net to tell you how to "collimate" your bino; all but one are wrong!!! The one that's right is 31 pages long; a page and a half would do.
Bill
Last edited:
I am halfway there building my Seyfried collimator -- some tweaking necessary as there is separation between the crosses as I shift from left to right. The quest for the perfect parallel!
Also, I wonder how one eliminates the apparent movement between the crosses that happens when the eye moves?
Hi, pleased your cleaning went well, as Bill said, you won't get the collimator perfect, conditional alignment at best, but good enough. As long as you have the scope and light box fixed firmly in the "guide rails" so they don't jiggle about when you move the scope and box, the reticle's should line up, if there is slack, try sticking a felt strip along inside of the rails to hold everything tight. As far as your own eye when you look through each side, you just have to judge you are positioning your head in about the same place, you will get used to it.
Good luck.
collimating when there are no adjusting screws on the prism housing
Now that I have made a collimating device, I opened up my two project binos, a Nikon 7x35 and a Zeiss 8x30W and found no adjustible prism plate, of the kind that is found on my Kowa.
It appears that the bottom prisms are fairly solidly fixed in place, and that the top ones need to be moved.
So, assuming that the main job is to have the prisms at 90degrees, does one then move them forwards and backwards in tiny increments, or is everything up to moving the eccentric rings?
Sorry for such stupid questions
Hi, not a stupid question at all. If you look through one side of the binocular at say a door edge or a straight post, providing the image is straight the prism are ok. do the same with the other tube. If the image is slanting at all on one side, or both, then you need to adjust that prism to get it at 90 degrees, by just nudging sideways one way or the other until right. If they both show a straight upright image, but looking through them you get a double image, either a bit above or to one side, then you need to adjust just by moving the eccentric rings. adjust the side where the image appears furthest from being center, usually higher.
I've been stripping and re-greasing some very old ones, and what I discovered with the
Ofuna opera glasses seems to hold for my 7x35 and 7x50 and especially independent-focus
work as well:
--when the grease is hardened or seized, a brief trip just the edge of 'hot to the touch',
about 130-140F, will turn glue/tar to a slow peanut-buttter texture, and you can ease the piece
out. After that, WD40 to clean, and I regrease with all-season motorcycle/snowmobile bearing grease.
It is touchy....you don't want to go to 170---200-+. Bad things can happen elsewhere. Modern plastic soften at 150F,
for example, and you could re-harden to a worse state on your lens rings.
I freed up an IF pair of "Liberty Precision" 7x50s and cleaned them last night. So smooth to focus now.
Amazingly sharp and strangely bright (maybe they are so old they grew coating where they didn't have it).
The hand-ground glass sometimes seems sharper than modern spherical.
Freeing up hinges is tricky. It can take a little heat and WD40 and 50 cycles and a repeat the next day.
...to avoid taking the hinge apart, that is. Strong-arming the hinge without pre-heating wrecked a pair.
So rule: just a little hot works wonders.
Last edited:
Hi, not a stupid question at all. If you look through one side of the binocular at say a door edge or a straight post, providing the image is straight the prism are ok. do the same with the other tube. If the image is slanting at all on one side, or both, then you need to adjust that prism to get it at 90 degrees, by just nudging sideways one way or the other until right. If they both show a straight upright image, but looking through them you get a double image, either a bit above or to one side, then you need to adjust just by moving the eccentric rings. adjust the side where the image appears furthest from being center, usually higher.
Thanks, Bencw
Car repairs have kept me from this job for the last month.
But last night I tried your advice on some very badly aligned 8x30W Jenoptems and they are now good enough for me. Clouds permitting I could just see Jupiter early this morning and did not see a double image when removing the instrument from my eyes.
I am still working on my bino clamp and will send a pic some time
A few recent findings:
---Bon Ami works even better than toothpaste on crust and mold webs.
---Windex can remove tear-crust and mold residue that isopropyl and acetone have a hard time with.
(it still has water, so I prefer 91% IPA or acetone, though, and to mop up after Windex)
---Bon Ami works even better than toothpaste on crust and mold webs.
---Windex can remove tear-crust and mold residue that isopropyl and acetone have a hard time with.
(it still has water, so I prefer 91% IPA or acetone, though, and to mop up after Windex)
Recent discovery:
I was trying to remove a particularly tricky layer of leatherette
from a pair of Micronta 7x35s. WD40 didn't help undermine the
remaining stuck-on material. Using a composite saw to make a
narrow little chisel from a $3 screwdriver helped, but the going was
still tough (and scratchy).
So I bought a little "Liquid Wrench" with the assumpition that it is like
epoxy stripper; undermining tough adhesive and tar.
It is...in spades.
I applied just a little, and after a minute, all kinds of stuff came loose
under the chisel. And then...leatherette 3-4 inches away came loose too.
Happy but alarmed, I got rid of the excess with paper towel and finished up.
Yesterday, I tried a very small bit of Liquid Wrench on some baked/frozen Nikon 9x35s,
at the focuser. Similar results: things freed up, activity happens inches away from there.
There is little odor or evaporation, but that also means you are not sure what it's up to,
and that it can keep working a long time.
So....this is a valuable tool, but it has to be used sparingly, and excess mopped off
right away. It could 'run underground' and strip off things you aren't ready for.
Forewarned, I was able to keep the Liquid Wrench from reaching the leather on the
Nikons. This is potent stuff, but only to be used in little dabs. I'd recommend
putting a little in a bottlecap and daubing bits over with a Q-Tip.
Last edited:
Users who are viewing this thread
Total: 2 (members: 0, guests: 2)