


-
Welcome to BirdForum, the internet's largest birding community with thousands of members from all over the world. The forums are dedicated to wild birds, birding, binoculars and equipment and all that goes with it.
Please register for an account to take part in the discussions in the forum, post your pictures in the gallery and more.

You are using an out of date browser. It may not display this or other websites correctly.
You should upgrade or use an alternative browser.
You should upgrade or use an alternative browser.
External makeover? (1 Viewer)
- Thread starter Etiennef
- Start date
More options
Who Replied?

I vote for the red, looks great !
Jerry
Definitely! Great look red, "silver" and then that black hinge!
Etiennef
Well-known member
Status as of today:
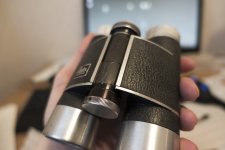
My idea about using "aluminum black" failed. It just does not do a good job on this kind of wear to the anodizing. Nor did it have any effect on the surface that still had OK anodizing (see first pic).
It would probably have looked good if I had sandpapered the whole surface, but that was not practical for the reasons stated earlier...
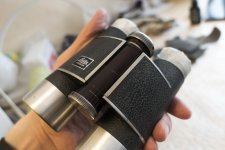
Anyhow, plan B was to use a black marker. The marker I came across had a slight red shine to it in certain light, which in this case is actually quite good! It almost perfectly matches the color of the focus wheel (see second pic). It will probably also work well with the red leather.
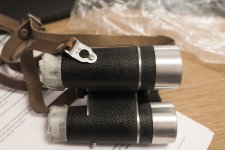
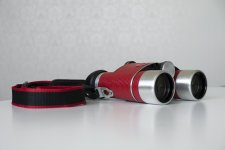
Today I also received an item that I ordered from Latvia. It was a camera strap for a 'Kiev 88' that had attachments that seemed to match the lugs on these early Trinovids.
I can tell you that it fits absolutely perfectly (see last pic), and this particular attachment will now allow me to fit any standard strap to the binocular.
-
Now it's time for "skinning" the binocular... :eek!:
My idea about using "aluminum black" failed. It just does not do a good job on this kind of wear to the anodizing. Nor did it have any effect on the surface that still had OK anodizing (see first pic).
It would probably have looked good if I had sandpapered the whole surface, but that was not practical for the reasons stated earlier...
Anyhow, plan B was to use a black marker. The marker I came across had a slight red shine to it in certain light, which in this case is actually quite good! It almost perfectly matches the color of the focus wheel (see second pic). It will probably also work well with the red leather.
Today I also received an item that I ordered from Latvia. It was a camera strap for a 'Kiev 88' that had attachments that seemed to match the lugs on these early Trinovids.
I can tell you that it fits absolutely perfectly (see last pic), and this particular attachment will now allow me to fit any standard strap to the binocular.
-
Now it's time for "skinning" the binocular... :eek!:
Attachments
Etiennef
Well-known member
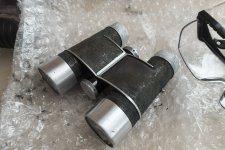
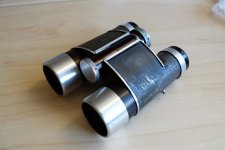
In case anyone wonders what a Trinovid looks like without the leather, this is it.
Currently I'm working on getting rid of all the old adhesive. You can see where I started in the picture. Apparently, they were not short on glue in 1960's Germany...
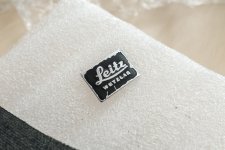
I was also a bit curious about how the square logo was attached. I have never seen a Trinovid missing the square logo, only round ones. So I was wondering if it perhaps was soldered in place or something like that. But it was just glued.
Currently I'm working on getting rid of all the old adhesive. You can see where I started in the picture. Apparently, they were not short on glue in 1960's Germany...
I was also a bit curious about how the square logo was attached. I have never seen a Trinovid missing the square logo, only round ones. So I was wondering if it perhaps was soldered in place or something like that. But it was just glued.
Attachments
gunut
Registered Offender
I wonder what changed between their porro binoculars and the trinovids...I have 4 of their older porro prism binoculars one that needs the skin changed.....but Id say 75% of the used ones you see for sale have the skin falling off.....you don't see that at all on their trinovids or newer models.....bad glue??bad skin???....
BTW....as good as your is coming....Ill have you reskin my 8x30 porro when your done with your trinovid....:smoke:
BTW....as good as your is coming....Ill have you reskin my 8x30 porro when your done with your trinovid....:smoke:
Etiennef
Well-known member
The eye cups just unscrew, and then you can easily remove the trim.
I guess they designed them this way for easy removal/exchange of eye cups. But I have to say it's a bit strange to have the product serial number on a part that can be so easily removed...
I guess they designed them this way for easy removal/exchange of eye cups. But I have to say it's a bit strange to have the product serial number on a part that can be so easily removed...
Last edited:
Etiennef
Well-known member
Sorry for not updating this thread for quite some time. This project came to more or less a standstill after my daughter was born in April. Suddenly it did not seem so interesting to spend time on this.
Anyhow, I decided it was to devote some of my spare time (which is not that much any more") ) to get some progress on this.
) to get some progress on this.
So, this is what the bino looked like after I cleaned it best I could. Some of the old adhesive came off easily, some needed some extra effort, and some was so hard to get rid off that I left it on the bino. You can get it off, but it requires so much effort, and I reasoned that if it's that hard to get off, it won't cause me any problems if i leave it in place.
-
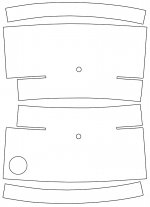
To easily get the new leather cut into the proper shape I scanned the old sheets, adjusted them somewhat for shrinkage and deformation, and printed it on the back of the leather sheet (on the sheet that protects the adhesive).
It's not perfect, but it at least allows me to get an approximate outline. The new leather also allows for some deformation, so it's possible to tweak the shape a little bit after application.
I have a quite a lot of red leather. My plan was to do a first test, just to get a feel for how the leather is to cut, apply, etc, and then see what needs to be adjusted. After that I'll do a second batch.
Results will be uploaded soon! :gh:
Anyhow, I decided it was to devote some of my spare time (which is not that much any more
) to get some progress on this. So, this is what the bino looked like after I cleaned it best I could. Some of the old adhesive came off easily, some needed some extra effort, and some was so hard to get rid off that I left it on the bino. You can get it off, but it requires so much effort, and I reasoned that if it's that hard to get off, it won't cause me any problems if i leave it in place.
-
To easily get the new leather cut into the proper shape I scanned the old sheets, adjusted them somewhat for shrinkage and deformation, and printed it on the back of the leather sheet (on the sheet that protects the adhesive).
It's not perfect, but it at least allows me to get an approximate outline. The new leather also allows for some deformation, so it's possible to tweak the shape a little bit after application.
I have a quite a lot of red leather. My plan was to do a first test, just to get a feel for how the leather is to cut, apply, etc, and then see what needs to be adjusted. After that I'll do a second batch.
Results will be uploaded soon! :gh:
Attachments
Etiennef
Well-known member
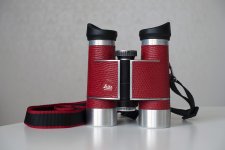
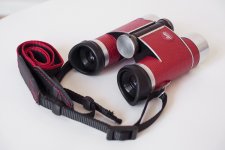
Here is the "nearly final" result!
Some minor improvements for a second attempt, sometime in the future:
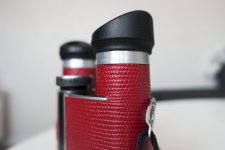
1. Find a better way to get the edges more even. Some lines can be cut straight, but some need to have perfectly smooth curvature to look straight when wrapped. An example of this is around the oculars (see second pic).
2. Fix the logo so it is more flush with the surface of the leather. The previous logo was slightly curved. The new one I have is flat and slightly thicker. I don't plan on trying to bend it, but going over the back with a curved file could do a big difference. I also need a proper hole punch to get the circle in the leather perfectly even.
3. The winged eye cups are currently just pushed down over the old eye cups (see last pic). This is "OK", but they have a tendency to slip up or down. A proper cut out of the inside of the winged eye cups would probably eliminate this. A nicer option would of course be to go for my original idea and use old rubber eye cups. But then I need to come across such, or or just wait until I upgrade my other Trinovid.
-
Overall I'm pleased so far. I'm actually considering repeating the procedure with some other kind of leather. Both yellow and bright green could probably look good!
Some minor improvements for a second attempt, sometime in the future:
1. Find a better way to get the edges more even. Some lines can be cut straight, but some need to have perfectly smooth curvature to look straight when wrapped. An example of this is around the oculars (see second pic).
2. Fix the logo so it is more flush with the surface of the leather. The previous logo was slightly curved. The new one I have is flat and slightly thicker. I don't plan on trying to bend it, but going over the back with a curved file could do a big difference. I also need a proper hole punch to get the circle in the leather perfectly even.
3. The winged eye cups are currently just pushed down over the old eye cups (see last pic). This is "OK", but they have a tendency to slip up or down. A proper cut out of the inside of the winged eye cups would probably eliminate this. A nicer option would of course be to go for my original idea and use old rubber eye cups. But then I need to come across such, or or just wait until I upgrade my other Trinovid.
-
Overall I'm pleased so far. I'm actually considering repeating the procedure with some other kind of leather. Both yellow and bright green could probably look good!
Attachments
CloseFocus
Well-known member
Nice job! I like the red and silver combination, and the textured leather was a good choice.
Etiennef
Well-known member
Nice job! I like the red and silver combination, and the textured leather was a good choice.
Thanks,
The textured leather actually looks better than I initially thought. My initial fear was that it would be "too much", but it works.
Thanks for showing.
Will you blacken the aluminium?
I was not planning on it, but perhaps I'll consider this for the next attempt.
By the way, if someone knows a source for self-adhesive leather in internering colors, other than Cameramill and Aki-Asahi, please let me know.
Here is the "nearly final" result!
............
VERY nice result, indeed. Congratulations! The winged eye-cups look a bit odd, maybe. But then, they give these binoculars an extra touch.
I'd suggest painting the focus wheel glossy black. Right now, it is the one part that looks like it is a used piece.
And finally, congratulations to your daughter! Definitely a great reason for shifting priorities. :t:
Etiennef
Well-known member
The winged eye-cups look a bit odd, maybe. But then, they give these binoculars an extra touch.
Thanks!
They winged eye cups add a bit to the uniqueness, and I have to say that I think they look nicer than the original hard ones - at least with the new clothes on! The original rubberised ones would probably look good as well.
However, I must say they regardless of how they look, the winged eye cups are definitely the most comfortable ones.
CloseFocus
Well-known member
Thanks,
By the way, if someone knows a source for self-adhesive leather in internering colors, other than Cameramill and Aki-Asahi, please let me know.
I ordered a square of leather from Aki-Asahi, but never got it.
.............., the winged eye cups are definitely the most comfortable ones.
That is, if you don't need glasses for looking through them. :-C
Etiennef
Well-known member
That is, if you don't need glasses for looking through them. :-C
Ah yes, that's true... :/
When I ordered it was sent as registered and tracked mail, so if the postal service lost it I would guess it would be easy o request a new one, or?I ordered a square of leather from Aki-Asahi, but never got it.
Similar threads
- Replies
- 11
- Views
- 1K
Users who are viewing this thread
Total: 2 (members: 0, guests: 2)