• Welcome to BirdForum, the internet's largest birding community with thousands of members from all over the world. The forums are dedicated to wild birds, birding, binoculars and equipment and all that goes with it.

    Please register for an account to take part in the discussions in the forum, post your pictures in the gallery and more.
ZEISS DTI thermal imaging cameras. For more discoveries at night, and during the day.

Before and after image editing (1 Viewer)

Roy C

Occasional bird snapper
With any type of photography it is always best if you can get everything right in-camera if you can but with bird photography this is sometimes very difficult. Fortunately in this digital age there are lots of things we can do to try and get the best out of a shot by image editing procedures. The old saying “you cannot make a silk purse out of a sow’s ear” still holds good but with a good piece of software and a decent monitor you can get pretty darn close IMHO. With something like photoshop you can manipulate an image right down to single pixel level by zooming in at up to 1000% and more therefore given time almost anything is possible providing the shot is not a complete duffer to start with.

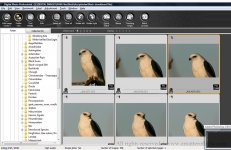
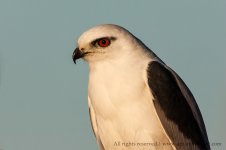
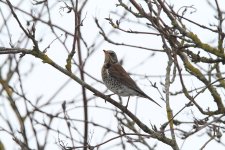
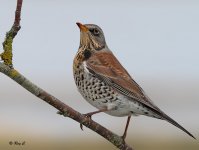
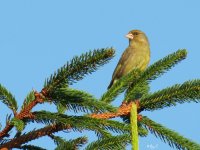
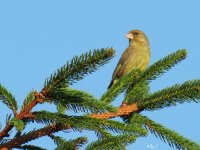
The example I have here is not particularly good and I am sure plenty of people could do a lot better but I hope it illustrate to the processing novice the type of thing that is possible. The first shot is the original full frame image that has just been converted from the RAW and re-sized for the web – the second image is what I came up with after playing around a bit (note this is a old image and editing software and processing abilities are always improving so today I would use a different approach altogether for replacing the background).
Cropping, removing clutter, selective enhancements such as noise reduction, sharpening, colour and contrast are all bog standard practices used by the bird tog and are accepted practices. Replacing the background is not so common and I believe that adding any element to an image is one enhancement that should always be declared (as opposed to removing things).

Now I realise that a lot of folk cannot be bothered or are not prepared to spend too much time in front of a PC but for those that are prepared to go this route I hope that this may be food for thought.
 

Attachments

  • fieldfare original.jpg
    fieldfare original.jpg
    182.1 KB · Views: 308
  • fieldfare5 toned.jpg
    fieldfare5 toned.jpg
    150.6 KB · Views: 330
Thanks for the post Roy - for me the PP is as enjoyable as taking the photo. I get a HUGE kick out of improving the initial photo.

Still a newbie at PP at the mo, but I am a very willing learner, so all tips are very much appreciated.

Paul
 
It is not that I can't be bothered to 'enhance' my photos afterwards but to me digital manipulation takes all the fun out of taking that one image you wanted. Even though what you have done there is impressive to me I find it no fun to manipulate any of my photos only a quick unsharp mask which i can see does nothing but I still do it out of habit
 
It is not that I can't be bothered to 'enhance' my photos afterwards but to me digital manipulation takes all the fun out of taking that one image you wanted. Even though what you have done there is impressive to me I find it no fun to manipulate any of my photos only a quick unsharp mask which i can see does nothing but I still do it out of habit
As I stated I know there are folks who are not interested in this type of thing so this is aimed at those that could be interested, it all comes down to what you are trying to acheive with your photography. This thread is not aimed at people who are satisfied with what they get straight from the Camera and are not interested in image processing. Mind you if you shoot in RAW then further processing is mandatory.
The number of images one sees on the web that could be significantly improved with as little as a 30 second fix in photoshop always amazes me but at the end of the day as long as you are satisfied with you images that is all that matters. It is obvious from your post that you are not interested in post processing so I am surprised that you even bothered to read the thread let alone reply to it.

BTW I wish I was good enough to be able to get everything right straight from the Camera but I know I am not, you obviously are so well done you :t:
 
Here is another example of a very simple and quick fix that can improve an image significantly IMHO. BTW this was taken hand held at 1260mm with a little point and shoot so not great IQ. The original with the light coloured branch in the foreground would make it a binner but just a minute or so taking out the offending branch now makes it a reasonable image for me although I guess a lot of folks would be inclined to bin it anyway - it all comes down to what you are satisfied with.
 

Attachments

  • green1 x 1260mm.jpg
    green1 x 1260mm.jpg
    204.7 KB · Views: 222
  • green1-x-1260mmv3.jpg
    green1-x-1260mmv3.jpg
    199.3 KB · Views: 225
BTW I wish I was good enough to be able to get everything right straight from the Camera but I know I am not, you obviously are so well done you :t:

Cannot tell if being sarcastic or not :king:

My bad if I came off as anything but helpful, however this method is a decent one if that is the path someone would wish to down to with their photography. I have nothing wrong with it and it gives off good results.
 
Cannot tell if being sarcastic or not :king:

My bad if I came off as anything but helpful, however this method is a decent one if that is the path someone would wish to down to with their photography. I have nothing wrong with it and it gives off good results.
No not being sarcastic, I am just not good enough to be able to get the images I want without a bit of standard processing - I wish I was.
 
I'm with in terms of striving to get the best results in camera, but then doing what's necessary afterwards to a photo.
Quite a while back I was lucky to see and grab what may be a once in a lifetime photo for me. I have no qualms in spending the 30 minutes needed to (learn how to and then) remove some offending branches. It's not an award winning shot, but it is very special for me.

I've just recently gone back over my collection of 5-star photos cleaning up the noise in them - now I have a quick, convenient technique I feel my photos are a little better and that urge to overspend on equipment dies away again!

(Edit: attached the wrong Before photo. I didn't somehow bring it into focus!)
 

Attachments

  • Spotted Owlet- (GraemeS)-2.jpg
    Spotted Owlet- (GraemeS)-2.jpg
    475 KB · Views: 229
  • Spotted Owlet-1 (GraemeS).jpg
    Spotted Owlet-1 (GraemeS).jpg
    417 KB · Views: 235
Last edited:
I'm with in terms of striving to get the best results in camera, but then doing what's necessary afterwards to a photo.
Quite a while back I was lucky to see and grab what may be a once in a lifetime photo for me. I have no qualms in spending the 30 minutes needed to (learn how to and then) remove some offending branches. It's not an award winning shot, but it is very special for me.

I've just recently gone back over my collection of 5-star photos cleaning up the noise in them - now I have a quick, convenient technique I feel my photos are a little better and that urge to overspend on equipment dies away again!

(Edit: attached the wrong Before photo. I didn't somehow bring it into focus!)
Yes, applying things like noise reduction selectively and not globally is a bog standard part of the bird photographers work-flow and so very easy to do. I would not dream of applying NR, sharpening, shadows/highlights, contrast or almost anything else without first duplicating the image and then applying a layer mask if needed. It is amazing how many folk seem to be afraid of layer masks and yet one could teach a 10 year old how to do it in a couple of minutes it is that easy!
As far as noise reduction goes I have been applying it over the background for years now if only to create a pleasing blur. Of all the enhancements selective noise reduction is probably the simplest to deal with, not only can you do it with the likes of a layer mask but for folks without the applicable software you to do this you can buy NR software like Noise Ninja which has a built-in masking feature. Another very simple method is simply to paint some Gaussian blur over the background.
When it comes to reducing noise over the bird itself things become a little more complicated as the last thing you want to do is to reduce detail in the bird. Digital noise comes in several forms but can broadly be divided into Luminance or Chroma Noise, Chroma noise is relatively easy to deal with but it is not so easy with Luminance noise as removing too much of it can result in that horrible plasticy look. This is where good NR software comes into play. Everyone has their favourite piece of NR software, I have used not only the built-in stuff in lightroom, photoshop but also Neat image, Noise Ninja and Noiseware but my current choice is Topaz DeNoise which is a plug-in for photoshop and Lightroom. There is a host of features including separate controls for Highlights, shadows, different colours and correcting black levels as well as detail and banding.
Having said all that if I have an image with lot of bad noise in the bird itself I will tend to bin the shot unless it was a record shot of a rarity.
 
I'm not sure about others, but personally I have traditionally found selective editing to be more trouble than it's worth not through difficulty in the process itself, but difficulty in getting the end result to look good without noticeable artifacts.

In bird photography that has always meant blurring of the bird's periphery; essentially I've struggled to find a masking technique that was (a) precise enough to mask fine feather detail and (b) quick enough for me to be bothered with.

Practice has helped and now I have my technique that I'm content with.
Incidentally, whilst I don't consider myself a 'pixel peeper', I do value above almost all else the ability to see detail in birds' feathers, including zooming in to see it.
 
I'm not sure about others, but personally I have traditionally found selective editing to be more trouble than it's worth not through difficulty in the process itself, but difficulty in getting the end result to look good without noticeable artifacts.
This is what always amazes me as people seem afraid of using layer masks and yet it is unbelievable easy - as previously stated I guarantee anyone could learn the technique in less that one minute when showed how. Once you grasp the idea of layer masks then selective editing becomes absolute second nature and it is no more difficult than applying edits globally.
In order to selectively edit you need a single mouse click to duplicate the image and then a single mouse click to create the mask after applying the edit - this takes an extra 20 seconds at most.

Selective editing itself cause no more digital artifacts than if you applied the edit globally so I am not sure what you are trying to get at here - in fact because you are only applying the edit to a selective part of the image it will cause less destruction to the overall image.
 
The issue is when fine feathers or hair extend past the body of the bird/animal. It is time consuming to apply the mask to the feather region whilst avoiding the background, in my experience. The artifacts I mentioned are blurred out feathers/hairs or noisy regions between these feathers/hairs.

Now that I have taught myself a method for doing it, using an auto-mask brush, the process of applying selective masks is quick and easy. But it still takes me 5 or so minutes to carefully go round the outside of the bird with the brush. More if there's a mossy branch etc.

My point was just that there is a learning curve to acheiving attractive selective edits, beyond the process of creating a mask. I think it is a real barrier that takes time to overcome, but I whole-heartedly agree that it is worth that investment and once learned, the process can be done quickly, easily and makes a massive improvement to the final photo. Everyone should consider learning.
 
The issue is when fine feathers or hair extend past the body of the bird/animal. It is time consuming to apply the mask to the feather region whilst avoiding the background, in my experience. The artifacts I mentioned are blurred out feathers/hairs or noisy regions between these feathers/hairs.
Making cut-out masks of complex subjects against busy backgrounds while still retaining fine detail like feathers and hair which protrude past the body of the bird used to be difficult and time consuming but the much improved Refine Edge command first seen in CS5 now makes the job easy and quick.
All you have to do is to make a very quick selection (with the quick selection tool) no need to be very precise at this stage. You then create a pixel mask and run the refine mask command. Using the Edge detection algorithm in conjunction with the refine radius tool you can get super results in no time – this can be further refined with the adjust edge controls and finally the decontaminate colour control. Once you get use to this routine great result can be obtained in no time. For the bird photographer who wants to create selections while retaining very fine feather detail it has never been easier or quicker with the new refine edge command.
I hope this helps for more info just google CS5 refine edge and there are loads of tutorials out there.
 
Great posts Roy and interesting discussion.

I will look into doing selective noise reduction myself next time I am processing images, as I often find myself wanting more NR on the background but not on the bird.

Also, Roy you are selling CS5 to me quite well from your post - I am still on CS4, and was wondering if it was worth the investment.
 
Hi Roy - I got myself CS5 some time back and have not really got my head around it. I was wondering if you fancy showing me/us your CS5 workflow. I am struggling with it at the mo.

I use a few sharpening/workflow actions that I found on the net, but would really like to do it myself, so I can understand what these actions are actually doing.

Regards Paul
 
Great stuff Roy! I have used a few of the tips you gave me in the past which are very simple but effective. Cs5 is a great piece of software but I do find it very complicated for my little brain to understand|:S| however once you do grasp some of the basics it can make a huge difference. I have a long way to go yet but reading these posts certainly help to going some way to improving an image when for whatever reason when the image straight from the camera is not as good as you would like.:t:

Steve
 
Hi Roy, it is amazing what you have done in the first picture, but i have a question for you about the cropping.

What is the difference in sizes of the images now? or do you crop and intropolate at the same time?

If it is just straight dropping, obviously great for the web, but what would happen with printing?

Sorry, just interested as it is quite a large crop (or appears so).
Hi Ashley, yes this is obviously a big crop as can be seen from the original and only really suitable for web use or a relatively small print. I crop straight from the RAW in DPP and then send to CS5 for finishing, finally resizing for the web. As for printing I find I can get good results by Up-Res up to 200% of the native res absolute max. So if the heavy crop ended up say just 1500 pixels on the long side, by Up-Res to 3000 pixels you could get a reasonable 10 inch print. There are various way to up res but I get good results by using the 120% up resing method.
 
I am not too comfortable about removing the clutter but on the matter of sharpening and adjustment of white balance etc I do accept this neccesity, out in the wild our own on the spot view is made by our eyes and brains adjusting and compensating for the lighting conditions over a period of at least a few seconds, what the camera does is to take an image of one instant in time and the end result might not be right for our viewing back at home and some sharpening a adjustment may be needed to recreate the image (or something close to it) of what we ourselves saw originally. This part of the reason why it is often easier to identify butterflies and moths from books that use painting rather than photographs for illustrations (simply that the painting can often better represent what the eye sees over a period of a few seconds or minutes). It also perhaps explains why technically perfectly exposed and focused original phographs can appear to be more surreal and less accurate than a slightly less technically perfect original photograph.
 
Last edited:
There are two things here IMHO and there is a possibility of endless discussions.

Authentic bird photography and digital manipulation.

The available technology today is really fantastic to be able to turn a mediocre image into something more aesthetically pleasing. However, there is a difference. Of course we need to accept that everyone has a different reason for photographing in the first place. When sharing images we should all be honest about what we did to achieve the final look (and Roy suggests that too, which is great), remembering that on the web it is easy to impress others with 800 pixel images, which may not be as nice when viewed at full resolution.

I belong to the first lot, the authentic photographers. While I am very proficient with Photoshop and can do as much as Roy has and at times will do some extra work to salvage an image that is ALMOST as I want it, I will get as much right in camera as I can and post process as little as possible. This is because I want to know that I am constantly developing my field skills to attain my images to my satisfaction and also I hate spending time in front of a computer. Period. :)

To me bird photography is about photography and not digitally enhancing (over enhancing that is) images; the maximum I like to do if needed is add a little canvas, or remove a small patch of crap if I cannot exclude during the capture, because it is not always possible. IMHO a good photographer should be able to achieve as much as possible in camera and rely as little as possible on post processing. That means get the exposure as good as possible in the first instance (which is the very basic of good digital photography). Naturally, there are some very basic enhancements that should be carried out to optimize a RAW file.


Digitally manipulating backgrounds; removing branches etc takes it to a digital "art" level and this is where it is hard to draw a line. Is it digital art if we remove a branch or clone out a spot? Or is it when we add a wing or replace the background or some other image elements? It is a difficult line to draw and I am not interested in going too far into the digital enhancements of images as 99% of my shots are just like how I took them; environment and all. I strive to compose in camera taking into account the surrounds at the time the bird lands on a perch. Mind you, I don't shoot from hides, I don't do set-ups. I stalk and use calls sometimes to entice a bird to come into range and try to crop as little during the post processing as possible - that is regardless of the number of megapixels available! To give you an example what photography means to me, here are two images. One shows the RAW image sitting in DPP and the other the one I post processed. BTW the image was taken with stacked 2x and 1.4x converters using my 500mm f/4L IS lens and a 1D2n body handheld, ISO800, f/16, 1/1000th, +1/3EC at the time of capture. The DPP shot shows f/11, because the camera only recognizes one TC, the 2x in this instance. I was about 10m from the kite. It was a wild bird and I worked quite hard to get that close! :)

Hope I made some sense without offending anyone. :) Cheers
 

Attachments

  • Birdforum1.jpg
    Birdforum1.jpg
    272.4 KB · Views: 71
  • Black-shouldered-Kite_AGL4278.jpg
    Black-shouldered-Kite_AGL4278.jpg
    297.8 KB · Views: 80
Last edited:
Warning! This thread is more than 12 years ago old.
It's likely that no further discussion is required, in which case we recommend starting a new thread. If however you feel your response is required you can still do so.

Users who are viewing this thread

Back
Top