• Welcome to BirdForum, the internet's largest birding community with thousands of members from all over the world. The forums are dedicated to wild birds, birding, binoculars and equipment and all that goes with it.

    Please register for an account to take part in the discussions in the forum, post your pictures in the gallery and more.
ZEISS DTI thermal imaging cameras. For more discoveries at night, and during the day.

Nikon ED82 Digiscoping adaptor based on Martijn's brilliant idea posted few days ago. (1 Viewer)

Malc

Brilliant redesign. :clap:

Have you had a chance to try it out switching between your eyepieces?

I think being able to adjust camera distance from scope lens is a great way of having to deal with different eye relief.

Look forward to seeing plenty pictures.

John
 
"Have you had a chance to try it out switching between your eyepieces?"

Yes John, very easy, have put marks on the long arm, so I know where the sliding platform shoud be for each eyepiece.

Very easy to set up too, the camera fixing bolt is in a slot on the platform, so the camera can be moved from side to side, which allows you to centralize the camera on the eyepiece in the horizontal plane. The vertical plane is pre fixed with the stop under the long arm. Then just move the platform nearer or further away from the eyepiece, to get the least vignetting. :-O

Have sent you email today John

Malc
 
Last edited:
Feathered one, great modifications, thanks for sharing, can you describe how you fixed the stop to the pinch collar?
John
 
This could get complicated, another John, :hi: ok if I refer to you as Narawood ??

Yes the stop bracket fixes under the pinch collar with two small screws, carefull to drill the holes off centre, otherwise you will hit the long arm pivot bolt inside the pinch collar.

Are you going to make an adaptor ?? If you are I can post a material list and some dimensions.

Malc
 
Hi Malc, of course narawood is OK,
Yes I really like this adaptor and was planning to make one, your offer of the materials list and dimensions would be a great help, really appreciated, thanks for your reply. Just email me.
Narawood
 
Narawood

It will have to be later tommorrow B4 I can post the material list, if its,s ok with you, I will post it here, just in case anyone else decides to make one.

Malc
 
This is all very encouraging. I refuse to spend lots of $ for a freaking adaptor. Totally ridiculous some of the prices, even for the SRB adaptor. I'll have to hit the hardware store and see what I can scrounge together. Thanks a lot to you and everyone else who is doing-it-yourself!
 
And your adaptor works well. (And the sight on my scope is a red spot device)

Nice kestrel images Malc. Particularly at that distance. It must be a great adapter. Neil.
ps if I had a kestrel sit still for 10 minutes in Hong Kong I would take about 30 - 50 images at all zooms of the camera, Jpegs and Raw, iso 100 and iso 50 and if still time change to higher magnification eyepiece. But that's just me. I haven't seen one perched at all in 2 years.
 
For anyone that wants to make the adaptor, this may help (or put you off ?)


Materials required

For the long arm 16mm x 16mm square section aluminium B&Q bar code 232637500708

For the slider 10mm x 20mm U section aluminium B&Q bar code 232630509708

End plugs for the 16mm box section B&Q

For the pinch collar Hardwood 20mm thick

1 off 6mm bolt 60mm long (cut off the head) B&Q code number #411 for the long arm attachment to the pinch collar

1 off 6mm bolt 50mm long (cut off the head) B&Q code number #410 for the pinch collar tightening clamp.

1 off 6mm bolt 65mm long with a square shank under the head so bolt doesn’t twist B&Q code number #302 for the slider clamp to the long arm.

2 off 6mm wing nuts B&Q
1 off 6mm nut B&Q
6mm washers B&Q

2 off 3mm countersunk bolts and nuts B&Q for attaching the slider to the camera platform and also to attach the slider to the cable release bracket.

Aluminium sheet to make the cable release bracket, the camera support plate, and the stop plate

2 small screws to attach the stop plate to the pinch collar.

A bolt to attach the camera tripod thread to the camera support plate

Method
The pinch collar is the hardest part to make, the centre hole has to be as accurate as possible, and at right angles to the face of the wood. The bolt that attaches the long arm, has its head cut off and discarded.. A 6mm hole is drilled into the pinch collar, and the cut end of the bolt is glued with araldite into the hole. The bolt that tightens the pinch collar onto the scope, also has it’s head cut off. Again a 6mm hole is drilled into the pinch collar, this time drill all the way through the wood, so the drill exits at the bottom of the pinch collar. This is so you can introduce the araldite to glue the bolt in from the bottom, otherwise if you try to get the glue in from the top, you may glue the pinch collar gap you had sawn, together !!

I think the rest of the construction will be apparent by looking at the pictures below, which also give the dimensions of the parts to make.

Any problems please ask, I will try to help.

Malc
 

Attachments

  • pinch-collar.jpg
    pinch-collar.jpg
    185 KB · Views: 180
  • long-arm.jpg
    long-arm.jpg
    177.7 KB · Views: 157
  • slider.jpg
    slider.jpg
    180 KB · Views: 135
  • camera-plate.jpg
    camera-plate.jpg
    194.5 KB · Views: 163
Last edited:
And more pictures of the plans, and finished adaptor.

Malc
 

Attachments

  • stop-plate.jpg
    stop-plate.jpg
    175 KB · Views: 152
  • release-bracket.jpg
    release-bracket.jpg
    195.4 KB · Views: 157
  • adaptor-1.jpg
    adaptor-1.jpg
    190.9 KB · Views: 193
  • adaptor-2.jpg
    adaptor-2.jpg
    179.2 KB · Views: 157
Neil posted
"Nice kestrel images Malc. Particularly at that distance. It must be a great adapter. Neil.
ps if I had a kestrel sit still for 10 minutes in Hong Kong I would take about 30 - 50 images at all zooms of the camera, Jpegs and Raw, iso 100 and iso 50 and if still time change to higher magnification eyepiece. But that's just me. I haven't seen one perched at all in 2 years"
....................................................................................................
Neil
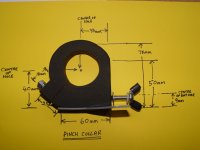
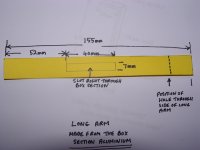
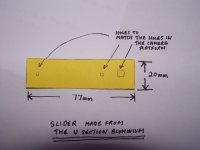
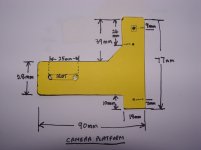
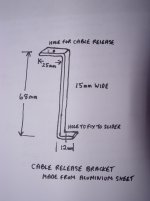
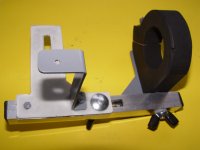
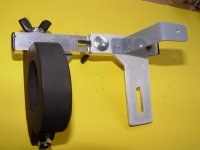
I only have the adaptors I have made, so cannot compare them with others. This one is quite strong and rigid, probably the box section arm, and tightening with wing bolts helps in that respect.
It was about four minutes the Kestrel sat for me, the first picture I took was a hurried one, fear of it flying off, was uppermost in my mind. Needless to say that picture was rubbish !
The pictures after that were a lot better, and yes I had time to try different settings, even changed eypieces from the 30X DS to the 25-75 mc11 zoom. The zoom ones were not as good as the 30X.

Having just gone down to the local marsh to try out the new adaptor, having got the Kestrel, I packed up the gear, and rushed home to see what I had got. A good start for the new adaptor, proves it is ok.
It seems really strange having the eyepiece and camera lens exposed, got so used to the tube adaptor, with nothing showing. Soon found out the problem of flare on the exposed lenses, so made the clip on cover to fix over the lenses (picture on earlier posting in this thread).

Can't believe you have not had a Kestrel perched in the last two years, all the time you spend birdwatching. Do you have many Kestrel in HK ?
Our Kestrels must be a lazy variant, often see them perched.

Malc
 
Malc

Good of you to post detailed plans of how to construct. Don't know how you and Martijn managed to come up with these designs. Well done to you both.
I'll look forward to seeing more pictures like the kestrel.
Neil I've had similar problems with sparrowhawks, get one in my garden every time I go to get my camera it disappears. Think I'll have to set up a hide and just wait!!
John
 
Purchased a Nikon ED82a scope with 30x eye piece last week! just found your plans for the home made adaptor and would like to say "Thanks" will be making one next week! :t:
 
charlierocky said:
Purchased a Nikon ED82a scope with 30x eye piece last week! just found your plans for the home made adaptor and would like to say "Thanks" will be making one next week! :t:

Hiya Charlierocky

:clap:

Let us know how you get on making the adaptor, perhaps some pictures of it when finished ?
The hardest part to make is the wooden pinch collar, so take your time with that. It is important to get the hole in the middle accurate.

Malc
 
anyone using the Wide DS30x eyepiece for digiscoping ?

would like to know what is the exact size in diameter without the rubber cup of our eyepiece ?

need the size so can send it to Ian at srb-griturn for my adapter with fuji F30
 
I may have mentioned this elsewhere but with these little silver/chrome digicams you have to watch out for stray light bouncing around inside the eyecup . If you have the sun over your shoulder it can get bad as the sun can even hit the eyepiece. A tube extending back to the camerabody would eliminate this.Neil.
 
Warning! This thread is more than 17 years ago old.
It's likely that no further discussion is required, in which case we recommend starting a new thread. If however you feel your response is required you can still do so.

Users who are viewing this thread

Back
Top