• Welcome to BirdForum, the internet's largest birding community with thousands of members from all over the world. The forums are dedicated to wild birds, birding, binoculars and equipment and all that goes with it.

    Please register for an account to take part in the discussions in the forum, post your pictures in the gallery and more.
ZEISS DTI thermal imaging cameras. For more discoveries at night, and during the day.

Cleaning up images taken at high iso (1 Viewer)

steve55

Yellow Hammer
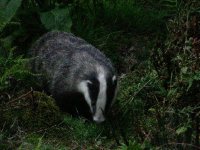
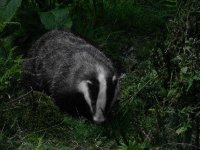
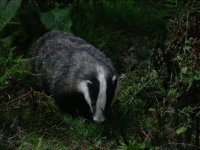
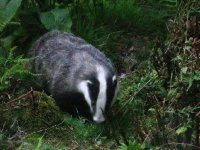
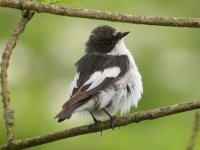
ok went out yesterday evening and ended up with the bellow image.

was using coolpix 4500 + 3xed teleconverter @ 800 iso in aperture priority mode with no flash

there's a lot of noise in this image which ive managed to clean up on the badger itself using photoshop 7.0 (ive masked off the area very quickly and roughly) using the hue/saturation controls to manually select the noise colours then decrease the saturation to around -75.

Im just struggling to enhance the vegetation and would appreciate any suggestions on the best way to do this.

Thank you for any suggestions in advance


Cheers
Steve
 

Attachments

  • badger1.jpg
    badger1.jpg
    109.5 KB · Views: 254
  • badger2.jpg
    badger2.jpg
    104.4 KB · Views: 241
Steve

You will find several threads on here about noise reduction programs, many of them freebie downloads. I like to use Neat Image. I find it very easy. Some prefer one or two other programs. It's really a question of what you get on with best. It is also possible to get free or pay for plugins for Photoshop.

Robert
 
No idea if the attached is "better", but a quick once-over with Picture Cooler has cleaned up the vegetation a wee bit...

In the kind of light you were in though I think you're going to struggle to find a really effective software fix.
 

Attachments

  • filtered_badger1.JPG
    filtered_badger1.JPG
    141 KB · Views: 207
Picture Cooler is my preferrred program as well at present. NeatImage used to be my mainstay, but it requires a photo where the subject is a different colour from the background.

Keith's advice is what I'd say too!
 
I use Noise Ninja ( http://www.picturecode.com/index.htm ), which is easy to use and reasonably priced ($35 for standalone version which can read and write jpgs and tifs), $10 more to add the plugin version). I like it better than the Paint Shop Pro version 9's builtin digital camera noise removal tool because I find Noise Ninja is easier to use.
 
IanF said:
NeatImage used to be my mainstay, but it requires a photo where the subject is a different colour from the background.

You were using the auto profile method which will blur photos without a large plain area. If you have also downloaded and installed the noise profiles for your model of camera you can apply these instead for photos that don't have a main subject and a plain background. Dead simply, on the second tab don't click the auto profile option but on the right you will find an open profile button and you apply one of your camera profiles to match the resolution and ASA setting.

Robert
 
I've had a go at a couple of ways to enhance the photo, but the one you've posted has far too many compression artefacts to work with effectively. Any chance I could have a play with the original?
 

Attachments

  • badger1.jpg
    badger1.jpg
    132.2 KB · Views: 168
Thanks for that Robert :t:

I was still using version 2.2!

I have downloaded version 5 and the profile for my camera. Results are looking very good so far.
 

Attachments

  • DSCN9771b_filtered.jpg
    DSCN9771b_filtered.jpg
    85.8 KB · Views: 183
esmondb said:
I've had a go at a couple of ways to enhance the photo, but the one you've posted has far too many compression artefacts to work with effectively. Any chance I could have a play with the original?

if you im me your email ill send it

cant post it. file too big
 
Lol! It wasn't too bad to start with. I'd been using Picture Cooler on the photos I had taken today to reduce file size for web use when I caught up with this thread. NeatImage produced a slightly better version when I tried it following Robert's suggestion. I may just revert to that instead.
 
LOL - so you have come back to the fold Ian. I just could not understand why people hated it so much. I've only been using for the past five to six weeks.

Robert
 
The only proviso is that I have four different digital cameras and with NeatImage I guess you need to download the profile for each model. Picture Cooler you just use as it is.

Having been a devotee of NeatImage for many years, prior to Picture Cooler, I'm much happier with using it - even so far as maybe paying for it!
 
I use the 300D profile for my new 20D seems to work OK. There were a number of 20D profiles and the one I picked would not play with the freebie version. I have not got around to downloading any the others yet. I may just stick to using the 300D it does the trick.

Robert
 
Even though the same make and models of camera will have similar noise-profiles, you would do the absolute best by creating your own noise profile for your particular CCD or CMOS chip. Some manufactured batches of CCD and CMOS chips are better than others. Even different ones cut from the same wafer can differ in their noise profiles. The noise levels might also change as the chip ages too. Many things can alter a noise profile, even strong RF interference if you are shooting images near powerful radio transmission towers.

Use the simple instructions at the NeatImage website on this page: http://www.neatimage.com/ug5/E-Device-noise-profiles/2-Building-profile-for-specific-device-mode.htm

They have a downloadable calibration-target chart to use ( http://www.neatimage.com/testtarget.html ). This method comes in handy for any noise-reduction software you have. I've used the same method with Noise Ninja and the DCNR filter in Paint Shop Pro to build camera-specific noise profiles. You need nothing more than your monitor and that calibration graphic. If using your monitor, it's easy to lower the brightness of it in a dark room to get noise-profiles for those really long exposures too. When photographing a calibration-target graphic direct from your monitor, make sure you defocus your camera just a bit so that the phosphor dots on your screen are not mistaken for "noise".

Also, depending on your camera's temperature, it too will effect your noise profile. High temperatures mean more noise. If you have a batch of photos taken on a hot sunny day, you might want to make profiles for that condition (and conversely, after taking lots of photos outside during the winter). This is one reason why I'll never understand the "pro"(?) black camera bodies that everyone wants. It only adds to the noise in digital cameras. Give me a silver digital camera body that will reflect as much heat radiation as possible, any old day. I'm not out to impress others with equipment, I'm out to impress with the photographs I can take. If they were really "pro" photographers they'd know better than to want a black digital camera body. One of the present-day oxymorons I guess -- pro-black is extra-noise-black.
 
Warning! This thread is more than 19 years ago old.
It's likely that no further discussion is required, in which case we recommend starting a new thread. If however you feel your response is required you can still do so.

Users who are viewing this thread

Back
Top