• Welcome to BirdForum, the internet's largest birding community with thousands of members from all over the world. The forums are dedicated to wild birds, birding, binoculars and equipment and all that goes with it.

    Please register for an account to take part in the discussions in the forum, post your pictures in the gallery and more.
ZEISS DTI thermal imaging cameras. For more discoveries at night, and during the day.

First Photos - Canon T4i + Sigma 100-300 f/4 (1 Viewer)

Rapala

Well-known member
I just received the Canon T4i and Sigma 100-300 f/4. Right out of the box I find the AF on the Sigma extremely fast and the zoom/focus rings very smooth. For being over 3 pounds the lens is very well balanced and solid. The Canon's controls are easy to use and I've taken a few pictures so far. All shots were handheld and taken in Manual. I've been keeping the shutter speed at 1/1000 or higher to eliminate shake. For birds in trees and brush I've been using the center AF point, and for BIF I've used auto focus points. The images were shot in large JPEG format, (Not quite sure about how to process RAW yet) and are crops of the original. I set the ISO to a max of 1600- thoughts? AF mode is set to Al Focus- is Al Servo suitable for perched birds as well as well as moving birds?

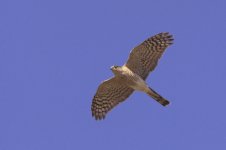
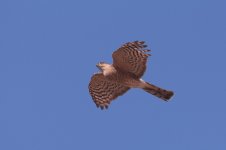
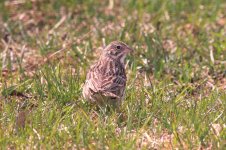
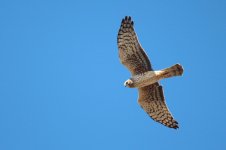
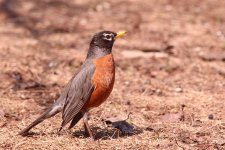
I have attached a couple of my first (and best) photos so far. EXIF information is below. Both pictures have been resized to the maximum size that BirdForum will upload. I will post more photos for critique when I have time.

In the photo of the Robin I noticed very strange bokeh, with grainy horizontal lines. I do have a UV filter on for protection- is this the cause of it? I have seen great photos taken with this lens, so I'm unsure what the cause of it is. Thoughts on both?

Northern Harrier- 1/1250 f/5.6 ISO 320

Robin- 1/1250 f/5.6 ISO 400

Thanks

(If any of you are seeing links from certain phrases to strange items on shopping sites I apologize- some sort of virus is on my computer: It's getting taken care of.)
 

Attachments

  • Northern Harrier.jpg
    Northern Harrier.jpg
    126.8 KB · Views: 198
  • Robin.jpg
    Robin.jpg
    321.6 KB · Views: 234
Last edited:
I'd guess the background on the Robin is just down to the light and the texture of the ground, perhaps a lower angle still may have created a more pleasing bokeh? Highly doubt it has anything to do with the filter! Otherwise look pretty good to me!
 
Thank you Joe. Does anyone have any comments on the settings I used? I plan to go to Whitefish Point soon, so I will soon have more photos for critique.
 
A few more from today. I have switched to Al Servo AF instead of Al Focus. These photos have minor edits in Photoshop in brightness, saturation, and hue. All are 30%-40% crops. I'm still seeing double in the bokeh- any ideas? Thanks for any input on my progress
#1- 1/1000 f/7.1 ISO 250
#2- 1/1000 f/7.1 ISO 200
#3- 1/1250 f/5.6 ISO 125
#4- 1/1250 f/5.6 ISO 125
#5- 1/1000 f/5.6 ISO 320
 

Attachments

  • IMG_0422.JPG
    IMG_0422.JPG
    132.6 KB · Views: 98
  • IMG_0456.JPG
    IMG_0456.JPG
    100.9 KB · Views: 84
  • IMG_0599.JPG
    IMG_0599.JPG
    157.5 KB · Views: 104
  • IMG_0600.JPG
    IMG_0600.JPG
    143.4 KB · Views: 72
  • IMG_0694.JPG
    IMG_0694.JPG
    345.5 KB · Views: 99
Last edited:
A few recent photos from Seney NWR;
1. 1/640 f/5.6 ISO 1600
2. 1/640 f/5.6 ISO 1600
3. 1/800 f/5.6 ISO 250
 

Attachments

  • Crane resize.jpg
    Crane resize.jpg
    108.5 KB · Views: 70
  • crane use resize.jpg
    crane use resize.jpg
    196 KB · Views: 58
  • Goose resize.jpg
    Goose resize.jpg
    133 KB · Views: 71
Thank you anij

So far I have been shooting exclusively in large fine JPEGs. To shoot in RAW (I understand it yields better quality), do I need a program such as Adobe Lightroom to process the the photos rather than a photoshop program such as PhotoImpact Pro or CS2 (Yes, the freebie they released. I'd rather determine what I'd really use and need before paying for a more recent program)?

Also, when cropping images what ratio should I crop with (ie- 4x6, 5x7, 8x10) so that I can resize it for printing as well as posting on the web?
 
Last edited:
Thank you anij

So far I have been shooting exclusively in large fine JPEGs. To shoot in RAW (I understand it yields better quality), do I need a program such as Adobe Lightroom to process the the photos rather than a photoshop program such as PhotoImpact Pro or CS2 (Yes, the freebie they released. I'd rather determine what I'd really use and need before paying for a more recent program)?

Also, when cropping images what ratio should I crop with (ie- 4x6, 5x7, 8x10) so that I can resize it for printing as well as posting on the web?

You should have gotten a program (DVD that came together with your camera) that allows to process RAW formats, but IMO it is not worth the efforts and the time. Now I have point and shot camera, but I used to use SLR. I did shot RAW but only in an exceptional circumstances like for example to photograph meteor showers or red hot lava entering the ocean.

I am not sure what do you mean under your second question. When I crop my images in Adobe I do not think about ratio, I only think about the composition and/or about bringing my subject in. You could post any image on the WEB. Some sites will restrict the resolutions, some will not, but image resolution has nothing to do with the ratio.

Printing? Why to print images now, when you could share them on the NET? I used to travel to exotic, remote places, I took thousands of the images on film camera, and spent so much money to print them... But back then I had no digital camera. Now when I do, I practically stopped printing pictures at all. Still, if you want to print your pictures crops has nothing to do with the size of printed images.
 
If you don't mind using Linux darktable is quite a good free program for dealing with raws. It will take about 5 hours to install and learn to use but then it is fine.
 
If you're looking to frame your prints for display, printing in sizes that will fit in standard frames is rather important. It's always possible to buy/make custom frames, or to cut custom matting that will fit an odd-size photo into a standard frames, but that gets to be a big pain when you have a whole gallery wall to fill.

Here's a list of frame sizes you can probably find your local art store (in the USA), and you can certainly find online:
http://www.frameusa.com/blog/most-popular-picture-frame-sizes/

Notice how if you do the division, the ratios are all over the place, but many fall into one of these groups:
-perfect square (1:1)
-close to 35mm film (3:2)
-close to compact camera sensors (4:3)

So, the easiest way to ensure your photos are frame-ready is to use one of those three aspect ratios. Most photo-editing software has an option to guide your cropping to preserve the previous aspect ratio: if your photo starts out 3:2, the cropped version will also be 3:2.

Unfortunately, the most affordable frames are usually the ones that don't exactly fit the ratios above. (5x7, 8x10, 11x14...). If you're on a budget, it's a good idea to leave your cropping extra "loose" until you've decided what frame to use. If you're using an online printing service, their website will usually allow you to adjust the cropping for each print size of each image.

Don't forget to leave some space around the subject so the edge of the photo can be covered by the edge of the frame/mat.
 
Several more from a trip to the southwest over the summer (AZ, NM, up to CO). Most photos (except for the Mexican Jay portrait) have local sharpening done to the bird. Noise reduction has been done to the background of all except the ducks, and a lesser amount of reduction done to the actual bird. Shadow/Highlights, Color Balance, Levels, and Contrast have been adjusted on most as well.

How do I apply my name to a photo and save it to apply the same to multiple pictures, so that it's in the same spot, same opacity, and color on every photo? I've seen some photographers here on BF with this on their photos and I was wondering how to do it. I have CS2 BTW. Thanks
 

Attachments

  • Brown-Crested Flycatcher.jpg
    Brown-Crested Flycatcher.jpg
    132.7 KB · Views: 42
  • Crissal Thrasher.jpg
    Crissal Thrasher.jpg
    152.3 KB · Views: 44
  • crissal thrasher2.jpg
    crissal thrasher2.jpg
    122.1 KB · Views: 37
  • mallard bath.jpg
    mallard bath.jpg
    331.7 KB · Views: 33
  • Mallard.jpg
    Mallard.jpg
    347.9 KB · Views: 35
The two Sanderling photos in this set were shot in RAW and processed in DxO Optics. The rest were shot in JPEG.
 

Attachments

  • Mexican Jay.jpg
    Mexican Jay.jpg
    278.4 KB · Views: 68
  • red-eyed vireo.jpg
    red-eyed vireo.jpg
    265.2 KB · Views: 51
  • Sanderling group.jpg
    Sanderling group.jpg
    172.3 KB · Views: 67
  • Sanderling.jpg
    Sanderling.jpg
    238.6 KB · Views: 61
Warning! This thread is more than 9 years ago old.
It's likely that no further discussion is required, in which case we recommend starting a new thread. If however you feel your response is required you can still do so.

Users who are viewing this thread

Back
Top