• Welcome to BirdForum, the internet's largest birding community with thousands of members from all over the world. The forums are dedicated to wild birds, birding, binoculars and equipment and all that goes with it.

    Please register for an account to take part in the discussions in the forum, post your pictures in the gallery and more.
ZEISS DTI thermal imaging cameras. For more discoveries at night, and during the day.

Difficulty in getting really fine detail in the feathers (1 Viewer)

RyanEustace

Ecology Student
I have been looking at alot of photos on the gallerys , and some of the portrait ones are amazing , the really fine criss cross of the pattern of the small feathers , how is this acheived , i noticed alot of them are done with 500mm-600mm lens, is that the key , being really close and also if there using lens like that they have a tripod so i imagine that helps against camera shake , im using a 400mm f5.6 which is no slouch in the field of sharpness but getting the really fine detail im struggling with, any suggestions ?
 
Your lens is certainly capable of capturing very fine detail Ryan - it is one of the sharpest around with great IQ.To capture really good detail you need to get as close as you can to the bird and for hand held shots, make sure that you have a good shutter speed to eliminate camera shake - at least 1/500 sec but this varies with different people depend on the technique used, some people require 1/1000 sec or faster while other can get away with less than 1/500 sec. With a good tripod and head you can get away with much slower shutter speeds. The 400/5.6 can be used wide open at f5.6. so that helps with the shutter speed.

I see you took the reed bunting shot at ISO 200 and 1/500 sec, you may be better trying ISO 400 which will give you 1/1000 sec. For what it is worth I rarely went below ISO 400 when I had the 400/5.6.

Do you shoot in RAW? and do you crop your shots?, most shots you see with the cracking feather details are where the bird is large in the frame. Processing also plays a part in producing the finished article.

Hope this helps.

p.s. using 500 or 600mm focal length does not in its self give the fine detail but the bird will be larger in the frame if shot from the same distance as say, a 400mm lens. With a 400mm lens it just means that you have to get a bit closer to get the same amount of detail.
 
Last edited:
I think it takes serveral things to combine together if you want that fine feather detail. Here are some thoughts, in no particular order....

- Fill the frame as much as you can. Get closer. No, closer.
- If you can't get close then get longer glass. That doesn't necessarily mean adding a teleconverter, because you then lose a stop of light and that may bring other challenges.
- Low ISO = low noise = low NR = higher sharpness. Find good light.
- Contrasty light coming in from the side will increase microcontrast and improve perceived sharpness. Flat, dull light will mean flat, dull images. Sure, you can tweak them, but you can't magic up shadows and highlights where none exist in the first place. A catchlight in the eye is always a big plus too.
- Lens focus must be mm perfect. If you view at 100% you will find the DOF to be very small. If you shoot hand held or you focus on the eye and the bird moves, or you do, it could lose you the shot. If your body has AF microadjustment then confirm your AF is optimised. If you have a tripod and a docile subject then you might even try Live View and manual focus at 10X, or Live AF if your body supports it - I see you have a 50D, so these options are available to you.
- Naturally you don't want camera shake, so a good tripod and head is best, but IS will help and a high shutter speed is always nice. But a high shutter speed might require a wide open aperture and/or a high ISO, so a tripod is the better solution.
- Subject blur should not be discounted, so a high shutter speed is still useful. or flash, but again you will need good light for best results, whether supplied by nature or batteries.
- Skilled post processing can help too, to deal with noise and sharpening the subject and background independently. Sharpening after downsizing should be the final post processing step, and should be tailored to the output medium (screen or print) and final size.

So a few of those things are in conflict - you want to stop down for lens sharpness and DOF, but not so much that you get diffraction softening, but you also want a decent shutter speed to avoid shake and blur, but you want to keep the ISO low to reduce noise. The best solutions to that lot is good light, a tripod, and filling the frame as much as you can. The more magnification you achieve (larger the sbject captured at the sensor) at the point of capture the more detail you will have and the less cropping and/or magnification you will need to apply later. You'll also find that noise will be less significant in relation to the size of the details captured.

I thought of something else but have forgotten it again. I'll update when I remember.

EDIT : I've remembered the other point - When you shrink an image down to web size it is simply not possible to retain the detail that you originally captured. The pixel density of a typical monitor - probably between 100-132 pixels per inch - can not contain enough detail for close scrutiny. Instead of producing, for example, an 800x533 image for viewing from 12" it would be better to produce a 1600x1067 image for viewing from 24". That way you retain far more detail in the image and those with sharp eyesight will be able to see it.

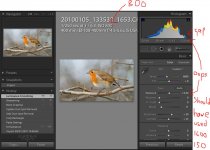
EDIT 2 : And another one - Shoot raw and expose to the right. Then sort out the look of the thing in post. e.g. If you are shooting at, for example, 1/500, f/5.6, 400 ISO for a "correct" exposure, but still have a large gap on the right of the histogram, you will be better off raising the ISO to 800 for the capture, and then pulling the exposure down by a stop in post. Heck, if you have enough room to go up to 1600 ISO then do it. You will get more shadow detail and lower noise, once you pull things back down. Use the histogram, look for blinkies, ETTR. Unless you have a 1 series then don't use intermediate ISOs. Stick to 100, 200, 400, 800 etc..

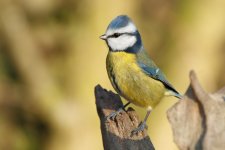
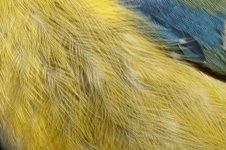
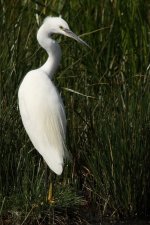
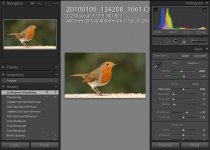
Here is a shot from a couple of days ago. It is nothing special, but serves as an example of the benefits of (mostly) filling the frame. It was shot hand held with my 7D and 100-400 zoom lens. Despite my efforts to focus on the eye (or did I just aim for the body?) it looks like I just missed it, but the feather detail captured in some areas is significant. BTW, according to the EXIF for this shot I was 3.29m away. At 400mm and f/8 on my 7D the DOF for this shot, when viewed at 100%, is calculated as just 5mm, because that is equivalent to viewing the whole image enlarged to 40" across. Calculator here - http://www.cambridgeincolour.com/tutorials/DOF-calculator.htm. That is why only some feathers look sharp and others quickly drift to softness. The DOF is wafer thin, and some of it may be wasted in thin air in front of the bird.
 

Attachments

  • 20100104_132113_1600_LR.jpg
    20100104_132113_1600_LR.jpg
    148.5 KB · Views: 417
  • 20100104_132113_1600_LR-2.jpg
    20100104_132113_1600_LR-2.jpg
    195.3 KB · Views: 360
Last edited:
using a tripod is a must really, to get good detail.getting close to the subject by either a portable hide or good field craft.
sit in the garden or park even better a wildlife wetlands center were birds are use to people and practice there.
you have a good camera and lens there, that are capable of getting excellent shots.
hope this helps??
 
Tim, that's a fantastic write up - thanks. Also thanks to Dave and Roy for their excellent contributions. I've got nothing to add, just wanted to say thanks.

Neil
 
Tim , that edit 2 i dont understand , i plan on shooting raw , and ive heard about exposing to the right , could you further explain ??? , if i increase my iso to 800,1600 isnt there going to be a heck of alot of noise?
 
Last edited:
Cheers, Neil.

Here's an example with my 50D, 100-400, Kenko 1.4X, shot wide open (f/8) at 560mm, 1/400, 100 ISO, from a tripod and focused using Live View. This is the full frame and a 100% crop....

Sure, I didn't fill the frame, but shooting in strong light, from a tripod, at 100 ISO, has given me a very clean file that stands up well to sharpening, without the handicap of noise.

(another p.s. - don't penny pinch on your file size when saving to JPEG. Take JPEG compression too far and your IQ will suffer.)

EDIT : A little tweak with WB and a minor adjustment to exposure and highlights and cropped to 50% I think it looks OK.
 

Attachments

  • 20090823_110912_2481_DPP2.JPG
    20090823_110912_2481_DPP2.JPG
    264.2 KB · Views: 207
  • 20090823_110912_2481_DPP_crop2.JPG
    20090823_110912_2481_DPP_crop2.JPG
    193.2 KB · Views: 268
  • 20090823_110912_2481_DPP3.JPG
    20090823_110912_2481_DPP3.JPG
    261.8 KB · Views: 230
Last edited:
Tim , that edit 2 i dont understand , i plan on shooting raw , and ive heard about exposing to the right , could you further explain ??? , if i increase my iso to 800,1600 isnt there going to be a heck of alot of noise?
Consider it this way.....

Firstly, let me define "EXPOSURE" as the actual amount of light that is allowed to reach the sensor, while "exposure" is the more common use of the term to mean the totality of the light as recorded after amplification by the application of an ISO boost.

The EXPOSURE that the sensor sees is only influenced by the size of the aperture and the duration that the shutter is open. Changing the ISO does not change how many physical photons are recorded by the sensor. The only thing that changes the real EXPOSURE (the photons collected) is varying either shutter speed or aperture (or the actual light intensity itself).

In very non-scientific terms, what you are doing when you keep the EXPOSURE the same but increase the ISO is that you improve the noise performance of the elctronics within the sensor circuitry. Don't ask me how or why, but that's what happens. So if you have room to increase your ISO, without reducing the EXPOSURE to compensate then you will improve your captured signal that creates your actual exposure. Obviously if you go too far you will end up causing overexposure, even if the sensor was nowhere near saturation point, so you don't want to go mad, but if you have room to increase the ISO, without reducing the EXPOSURE then you can and should do it.

What would be very bad, for noise, is to increase the ISO and to reduce the EXPOSURE to compensate. So, the best approach is to set the slowest shutter speed you can get away with to control shake/blur, the optimum aperture to achieve the DOF you need, and the highest full stop ISO that you then need in order to expose to the right. There simply is no value in using a lower ISO and ending up with a non-ETTR exposure as a result.
 
So basically to expose to the right , just up my iso if i can get away with it without blowing highlights , then when i process it in lightroom i should get back the quality???
 
So basically to expose to the right , just up my iso if i can get away with it without blowing highlights , then when i process it in lightroom i should get back the quality???
In simple terms, yes, but don't let the ISO be the driving force of your decision making. The creative controls are shutter speed, to control motion, and aperture, to control DOF. You then use a suitable ISO as necessary to get the brightest exposure you can, without clipping important highlight details.

As an example, suppose you are shooting a dark or mid-toned bird in amongst some green foliage. There are no (important) bright tones anywhere in the scene. Maybe there is some sky in the background but it does not interest you and you will crop it out later. You can ignore the sky. It is irrelevant.

Now, a "correct" exposure for your brown bird in green foliage is very much centred around the mid tones, or perhaps a little below middle. If the scene was lit by sunlight you might pick an exposure of 1/800, f/8, 200 ISO. (that is equal to a "Sunny 16" exposure) But there are no bright tones so your histogram peaks a little below centre and there is nothing at all in the brightest 2 stops. That is an awful lot of unused data that you could make use of. You don't want to reduce your shutter speed because you want to protect yourself from shake/blur. You don't want to open up your aperture because you need some extra DOF. However, there is no reason you cannot increase your ISO to 400 or even 800, in this scenario.

The resulting image will look way too bright, initially, but in your raw processor - Lightroom, DPP, whatever, you will reduce the exposure by 2 stops (or whatever looks good). In so doing you will reduce noise and you will have more image data to play with. The article I sent you about ETTR explains that.

Of course, you are not compelled to raise the ISO, but it is an approach that should help. As I also said in the PM, it would be worse for IQ to underexpose and then brighten later on, because in so doing you will have limited the amount of data you have to work with and will make any noise become more visible.

Here are four example of shots that were all pretty bang on, just nudging a hint of clipping, easily recoverable if required. In the fifth one it looks like I could/should have bumped ISO to 1600.
 

Attachments

  • 20100108_010257.JPG
    20100108_010257.JPG
    80.3 KB · Views: 255
  • 20100108_080737.JPG
    20100108_080737.JPG
    81.5 KB · Views: 215
  • 20100108_080905.JPG
    20100108_080905.JPG
    81.5 KB · Views: 172
  • 20100108_080935.JPG
    20100108_080935.JPG
    79.3 KB · Views: 218
  • 20100108_081330.JPG
    20100108_081330.JPG
    95.2 KB · Views: 239
Last edited:
You're welcome :)

Another thought - I mentioned high shutter speeds, for hand holding, but how high? Well you may be familiar with either of two rules of thumb for minimum hand held shutter speed....

- Shutter speed must be at least 1 / focal length, so you should not shoot a 400mm unstabilised lens at less than 1/400, when hand holding;

- Shutter speed must be at least 1 / (focal length x crop factor), so you should not shoot a 400mm unstabilised lens on a 50D at less than 1/640.

Those are good rules of thumb, but some people are able to shoot at slower speeds, while others may need even faster speeds in order to achieve shake free images.

But actually there is more to it than that. The speed you need also depends on how large you intend to make your images for final display, and whether you crop them in software before producing the finished article. What really matters is your enlargement factor. The more you enlarge/magnify your images the more easily the flaws will be revealed. Those flaws can include shake, blur, noise, misfocus, insufficient DOF, diffraction - a whole bunch of stuff.

The original rule of thumb worked well for shooting 35mm film and printing to around 10x8 or perhaps 12x8 as a maximum. The rule applies equally to images shot on a full frame DSLR, because the sensor is the same size as the film and to get a 12x8 print will require the same degree of enlargement : approx 8X.

When you shoot with an APS-C body you end up with a significantly smaller image from the sensor - 1.6X smaller. Thus to get a 12x8 print from an APS-C body requires the image to be enlarged by a factor 1.6X greater and the captured image will need to be 1.6X sharper. That means that shake and blur need to be 1.6X less, and the easiest way to accomplish that is to raise shutter speed by 1.6X to compensate. You'll also find that your focusing needs to be 1.6X more accurate too, and you might find you need sharper lenses as well. That's why you are better off shooting at 1/640 with a crop camera in order to match the sharpness from a full frame camera at 1/400.

But it doesn't end there. What if all you need is a web shot to be displayed at a pysical size of just 6x4 on a screen? Well you've just halved the size of your problem. If you needed 1/640 to make a sharp 12x8 you will probably get away with 1/320 for a web sized image, so long as you don't crop your original. If you do crop your original then you end up with a smaller image to start with, so whether you need a 6x4, a 12x8 or something else, you'll find you may need to shoot with a different minimum shutter speed again.

Finally, when you pixel peep at 100%, you are creating a virtual image that might easily be 40" across, and maybe a lot more. If you want your individual pixels to look sharp at 100% then you'll be looking to use a shutter speed of something like....

1 / (focal length x crop factor x 4)

which means shooting at 1/2500 for a 400mm lens on a crop body. That may start to run you into issues with aperture and/or ISO, if you pursue that approach. This is where tools such as stabilised lenses and tripods can really help out. How much easier to shoot from a tripod at 1/320 than hand held at 1/2500. That will buy you three stops of extra EXPOSURE, which might mean shooting at 200 ISO instead of 1600 ISO. That will help IQ enormously.

This is another reason why you should aim to fill the frame as much as you can. The larger the subject captured at the sensor the less cropping you will need to do later and the less pressure you put on your IQ and your own skills, because you will end up enlarging the image less to create your final piece of work. This actually goes on further, to support the recommendatoin to get closer. The closer you are the shorter the lens you can use. The shorter the lens you can use the lower you can set your shutter speed. The lower the shutter speed you need, the lower the ISO you need etc. etc.. Of course, there are other issues when changing subject distance and focal length, such as perspective and subject isolation from the background, so sometimes it is better to shoot from farther away, but then you really need that long glass to do the work for you, rather than cropping until there is nearly nothing left of the image you recorded.

EDIT : If your 50D images don't look pin sharp at 100% then don't feel like you have failed. If your image looks sharp at 50% then you should consider that to be an excellent achievement. Even at 33%, from a 50D, that will be an image of 1584x 1056 pixels, which will pretty much fill most people's monitors. That's still a big (almost huge) enlargement, and if it looks sharp at 33% then you will have succeeded in producing a fine piece of work, as far as sharpness is concerned, at least :).
 
Last edited:
Ryan, just one small thing with your particular lens - hand holding a non IS 400mm lens means that you MUST have a fast shutter speed and the only way to acheive this is to up the ISO until you get a speed you require (assuming you are shooting wide open) If this means a bit more noise than so be it, you can control noise but not image blur through Camera shake.

Of course we would all like to take our shots at ISO 100 but in my experience of using the 400/5.6 (over three years and probably 80,000 + shots) I rarely got below ISO 400 when hand holding as the light was just not good enough. It will cost you nothing to try some shots at ISO 400 and 1/1000 sec instead of ISO 200 and 1/500 sec - you never know you may well be pleasantly surprised at the results ;)

As previously stated your particular lens is capable of capturing very fine detail, even when hand holding but you must be Close to the bird and have a fast shutter speed.

BTW I agree entirely with Tim about Exposing to the right, as long as the important parts are not entirely blown, then it is far better to overexpose rather than underexpose IMO.

EDIT:
I would not get too hung up about taking super detailed close-ups Ryan, while they may look impressive their artistic merit is often very marginal. If you look at the shots of some of the very best bird photographers around the world you will see that they very rarely display close-up images. I know for sure that my main failing is making the bird too large in the frame but I am more of a birder than a photograher and my artistic levels are almost zero!
 
Last edited:
Don't forget to calibrate your PC Monitor too, i spent 12 months adjusting photo's on my PC and people kept saying nice composition etc but the processing lets its down ie over-sharpened, too much saturation etc but to me they looked fine and my mate looked at them on my PC and agreed they were fine.
Until my wife bought me a Spyder 3 Pro and after calibrating my monitor the problem was solved (amazing the difference a few tweaks does)
Also I have Glaucoma so crap eyes anyway but make sure you get regular eyesight checks (everyone) my condition crept up on me and too late to sort anything but eye specialist says they can help if diagnosed sooner so get your eyes checked 1st!
Cheers
 
Wow

Thanks people awesome info i'm blown away slightly baffled a little eager for some day light and a hell of a lot more understanding of what i'm doing!
Cheers

karpman
 
Your lens is certainly capable of capturing very fine detail Ryan - it is one of the sharpest around with great IQ.To capture really good detail you need to get as close as you can to the bird..

I took the attached picture when I was about five feet away from the bird (In RAW), then did a slight amount of post processing and cropped it. I am very much a beginner, and am using a Canon 450D with an ef-s 55-250mm lens, so I think you're right that getting as close as you can is important for capturing fine details.
 

Attachments

  • feathertexturecrop.JPG
    feathertexturecrop.JPG
    212.7 KB · Views: 234
When you shrink an image down to web size it is simply not possible to retain the detail that you originally captured. The pixel density of a typical monitor - probably between 100-132 pixels per inch - can not contain enough detail for close scrutiny. Instead of producing, for example, an 800x533 image for viewing from 12" it would be better to produce a 1600x1067 image for viewing from 24". That way you retain far more detail in the image and those with sharp eyesight will be able to see it.
I just found this tutorial about the issues caused by downsizing, especially when it comes to losing detail and creating false details....

http://www.cambridgeincolour.com/tutorials/image-resize-for-web.htm
 
Warning! This thread is more than 14 years ago old.
It's likely that no further discussion is required, in which case we recommend starting a new thread. If however you feel your response is required you can still do so.

Users who are viewing this thread

Back
Top