• Welcome to BirdForum, the internet's largest birding community with thousands of members from all over the world. The forums are dedicated to wild birds, birding, binoculars and equipment and all that goes with it.

    Please register for an account to take part in the discussions in the forum, post your pictures in the gallery and more.
ZEISS DTI thermal imaging cameras. For more discoveries at night, and during the day.

SX40 Super Zoom (3 Viewers)

Whites in bright sunlight almost always need to some -Ev Andy but the same bird in duller conditions will often need a fair bit of + Ev to render them white (in flat light the Camera will often render the whites 18% grey unless you dial in some +Ev). Light conditions, metering mode and size of bird in the frame compared with the background all contribute to the Camera getting it wrong if you do not dial-in any exp.comp.
The best way to see this is if you take a shot of a pure white wall in good light making sure the wall fills the frame - without any Ev comp the wall will look grey and not white.
My preferred method is to meter off something around 18% grey in tone (medium coloured grass is good) and then transfer the resulting figs into manual mode - that way metering will be right unless the ambient light changes.

Thank you for that very detailed explanation Roy. That's what I like to think of affectionately as 'Gentleman's' photography! I just wish I had the know-how/patience which I never had back in the good old days of the Asahi Pentax Spotmatic F/Zenit E, and I'll certainly never master now ;)

I'm just grateful for the digital age - Frame it up, take a chance and hand my inadequacies over to Photoshop to deal with (other image processing software packages are available)....

Speaking of which...

1) Does anybody have a set of Neat Image profiles for the SX40 because I haven't got a clue how to create them myself.

2) Can anyone recommend a half decent, inexpensive adaptor and UV Filter.

Cheers,

Andy
 
I'm just grateful for the digital age - Frame it up, take a chance and hand my inadequacies over to Photoshop to deal with (other image processing software packages are available)....
I also rely heavily on CS5 Andy (I spend far more time image editing than I do out in the field shooting :eek!: ) but the real biggie for me with digital is that you can happily fire off as many shots as you like without worrying about the cost - for bird photography with a DSLR if I go out and take,say, 400 shots I am happy to throw 395 in to 'dusty bin' as long as I get a few nailed shots LOL.
 
Last edited:
I also rely heavily on CS5 Andy (I spend far more time image editing than I do out in the field shooting :eek!: ) but the real biggie for me with digital is that you can happily fire off as many shots as you like without worrying about the cost - for bird photography with a DSLR if I go out and take,say, 400 shots I am happy to throw 395 in to 'dusty bin' as long as I get a few nailed shots LOL.

I must admit Roy, that I much prefer to use Nikon's ViewNX 2 to anything else I've tried. It's wonderfully simple but incredibly effective. Neat Image is a must for dealing with noise and occasional use of PS Elements for it's 'Dust & Scratches' filtering for the odd dead pixels. Lightroom 2 I try to avoid unless absolutely neccessary. With so many bits and pieces to play with, I find you can easily take an image to its best and then back out the other side without realising!

Cheers,

Andy.
My usual flow is to convert RAW's in DPP and send to CS5 as a 16 bit tiff for finishing (prefer the DPP conversion to ACR)- I guess with jpeg's only with the SX40 I am going to have to change my flow to suit. The trouble is with jpeg's that being a lossy type to much processing can easily destroy the image!. With my usual flow converting to a 8 bit jpeg is usually the very last thing I do.
I used to use neat image for noise and still have it but much prefer Topaz DeNoise myself these days - I guess we all have are fav's. Only time I ever used the dust and scratches filter is for cleaning up very old family history photos.
 
Last edited:
I have switched my workflow almost entirely to ACDSee Pro5 these days, where I use the built in RAW converter etc (I just hope no significant noise removal is necessary, that is a weak point). However, with jpg from the superzoom camera, I used to either make a finished product right away in PS7 (yes that old workhorse) or if I thought that I might revisit later, save as PSD.

Niels
 
However, with jpg from the superzoom camera, I used to either make a finished product right away in PS7 (yes that old workhorse) or if I thought that I might revisit later, save as PSD.
Niels
For the SX40 I am thinking along the lines of reducing the in-camera sharpening,colour and contrast so I can apply to my own liking in post. Interesting about saving as a PSD Niels, I know you can save the layers using this format - is this why you do it?
 
Yes, and because it is a loss-less format with much smaller files than TIFF. In other words, the loss happens once (when the camera saves first time), but if the compression is not too great you can do something with the jpg afterwards, and you want to make sure you don't compound the problem with again saving as jpg followed by another save as jpg etc.

Regarding the settings in camera: I have had the assumption that shooting at max zoom would (which was 99.9% of my shots) would make the image a little softer than mid zoom, and letting the camera do a good deal of sharpening/contrast before the reduction to 8 bit happened would probably give the best results. That did look like it was true when I combined my old Nikon Coolpic 4500 with a TC3ED -- I am not sure I ever made a test of how it worked best on the Pana FZ18 when I switched to that one. I used to keep vibrancy/colors at neutral if I recall correctly.

Niels
I did not think that PSD files were a lot smaller than Tiff's which is what I was going to do with selective shots - I will have to look into this.
The 4500 takes me right back to my first ever digital Camera - great little Camera and wonderful how you could swivel the body.
 
I did not think that PSD files were a lot smaller than Tiff's which is what I was going to do with selective shots - I will have to look into this.

OMG!! This is exciting! I've just tried working through an image in PSD and the difference is staggering (I can only imagine that working with RAW is something similar). This will revolutionise the way I do things in future!

Nice one Niels B :)

Andy
 
OMG!! This is exciting! I've just tried working through an image in PSD and the difference is staggering (I can only imagine that working with RAW is something similar). This will revolutionise the way I do things in future!

Nice one Niels B :)

Andy
Editing in any lossless format helps Andy, be it RAW, Tiff, PSD or whatever.
No need to imagine about working with RAW as with Photoshop or Elements you can open a jpeg as a RAW . This will give you all the same non-destructive photo adjustments that you have available for processing raw files-- white balance, exposure, fill light, brightness, contrast, sharpening, noise reduction, red eye removal, straightening, and so on. This process automatically makes the image a 16 bit one so you have to remember to switch back to 8 bits before finally saving as a jpeg.
 
I just had a "flying" visit to LA for 2 days and spent a lot of time hanging around the pier at Santa Monica. I also fulfilled a dream to stay in the Hotel California too.
I was able to sit around on the pier on the plentiful benches they have set up and snap the people strolling around.
One thing I've found with the SX40HS is that it's better to under-expose than over-expose , so I set -.67 a lot of the time to hold detail. This is especially true in the strong sunlight of California. In Hong Kong I set -.33.
As the pier was very crowded, having the long zoom made it easier to isolate the interesting people ( I hope none are members of this site).
I put a video taken with the SX40 around the pier up here http://www.flickr.com/photos/7892550@N03/7418912964/in/photostream with the appropriate music track.
Neil

Hong Kong,
China.
June 2012
 

Attachments

  • couple pier LA sx40hs IMG_2702.jpg
    couple pier LA sx40hs IMG_2702.jpg
    123.5 KB · Views: 118
  • girl photograph pier LA sx40hs IMG_2508.jpg
    girl photograph pier LA sx40hs IMG_2508.jpg
    143.8 KB · Views: 154
  • people pier LA sx40hs IMG_2744.jpg
    people pier LA sx40hs IMG_2744.jpg
    115.9 KB · Views: 121
  • people beach LA sx40hs IMG_3034.jpg
    people beach LA sx40hs IMG_3034.jpg
    172.8 KB · Views: 120
  • gull pier LA sx40hs IMG_2594.jpg
    gull pier LA sx40hs IMG_2594.jpg
    72.1 KB · Views: 141
Last edited:
I just had a "flying" visit to LA for 2 days and spent a lot of time hanging around the pier at Santa Monica. I also fulfilled a dream to stay in the Hotel California too.
I was able to sit around on the pier on the plentiful benches they have set up and snap the people strolling around.
One thing I've found with the SX40HS is that it's better to under-expose than over-expose , so I set -.67 a lot of the time to hold detail. This is especially true in the strong sunlight of California.
June 2012
Well done on the dream Neil :t:, who was it that sang that song 'Hotel California' was the Eagles wasn't it. Nice pics BTW.
Only had my SX40 for a day or so and while I find the metering OK for general shots I am still trying to work out what is best for reasonably close-up small birds against a light BG in dreary old UK - I have tried evaluative, centre weighted and spot and so far I am having to dial-in quite a lot of +Ev and it is still underexposing in most cases, mind you it is very poor light and I am guessing the small sensor comes into its own in good light (we want some California sunshine)
Here is a typical example of the metering - garbage shot I know and this is just a unprocessed crop that was shot in centre weighted avg Ev + 1 1/3 and the bird is still well underexposed. So much different than what I am used to with the 7D. To be fair I should try it in good light - I will get there in the end :-O
 

Attachments

  • blue1.jpg
    blue1.jpg
    117.2 KB · Views: 199
Last edited:
Roy, on the assumption that you will usually be shooting at full stretch, so the aperture will not be changed by zooming, might it not be better in cases such as this to spot (or partial) meter off the sky and set a manual exposure to place the sky close to clipping point on the histogram? That would be my approach with a DSLR, so why not with a bridge? It eliminates the uncertainty of trying to second guess how the camera will interpret the scene and how much EC you'll end up needing.

With all my Canon DSLRs, whilst shooting raw (JPEG may be different) I find spot metering highlights (such as a backlit sky) at +3 gives me a perfect ETTR result. I don't have a bridge camera, but if I did I would probably continue the same techniques as with my DSLR, where possible. All you need to do is to establish whereabouts on the meter the clipping point is for the SX40. The major fly in that ointment would be the variable aperture whilst zooming, but that limitation is lifted on occasions when you're always zoomed to the max, which I imagine would be much of the time for birds.

Of course, without the backlit challenge I suspect that Av/Tv/P modes with most metering patterns will do very well and will allow freedom to adjust focal length without worrying about the consequences of varying aperture values.
 
I just had a "flying" visit to LA for 2 days and spent a lot of time hanging around the pier at Santa Monica. I also fulfilled a dream to stay in the Hotel California too.
I was able to sit around on the pier on the plentiful benches they have set up and snap the people strolling around.
One thing I've found with the SX40HS is that it's better to under-expose than over-expose , so I set -.67 a lot of the time to hold detail. This is especially true in the strong sunlight of California. In Hong Kong I set -.33.
As the pier was very crowded, having the long zoom made it easier to isolate the interesting people ( I hope none are members of this site).
I put a video taken with the SX40 around the pier up here http://www.flickr.com/photos/7892550@N03/7418912964/in/photostream with the appropriate music track.

Nice vibrant shots there Neil! Loving the video! Nothing, and yet everything going on at once.
 
Roy, on the assumption that you will usually be shooting at full stretch, so the aperture will not be changed by zooming, might it not be better in cases such as this to spot (or partial) meter off the sky and set a manual exposure to place the sky close to clipping point on the histogram? That would be my approach with a DSLR, so why not with a bridge? It eliminates the uncertainty of trying to second guess how the camera will interpret the scene and how much EC you'll end up needing.

With all my Canon DSLRs, whilst shooting raw (JPEG may be different) I find spot metering highlights (such as a backlit sky) at +3 gives me a perfect ETTR result. I don't have a bridge camera, but if I did I would probably continue the same techniques as with my DSLR, where possible. All you need to do is to establish whereabouts on the meter the clipping point is for the SX40. The major fly in that ointment would be the variable aperture whilst zooming, but that limitation is lifted on occasions when you're always zoomed to the max, which I imagine would be much of the time for birds.

Of course, without the backlit challenge I suspect that Av/Tv/P modes with most metering patterns will do very well and will allow freedom to adjust focal length without worrying about the consequences of varying aperture values.
Yep, I think you are right Tim :t: back to good old manual metering I think. I have never tried the +3 method so will give it a go. I will be at max zoom so aperture will not change.

While on the subject of zoom I notice that the SX40 is no different to DSLR zooms with regards to actual focal lengths in that they only reach their stated full zoom when shooting at infinity - I can compare shots I took with the 7D + 400 prime (effectively 640mm) from the same spot and target as the SX40 at full zoom (840mm) and there is very little in it as far as far as actual focal length goes. The SX40 seem to be at 700mm at best from around 4 mtrs.
 
Roy, on the assumption that you will usually be shooting at full stretch, so the aperture will not be changed by zooming, might it not be better in cases such as this to spot (or partial) meter off the sky and set a manual exposure to place the sky close to clipping point on the histogram? That would be my approach with a DSLR, so why not with a bridge? It eliminates the uncertainty of trying to second guess how the camera will interpret the scene and how much EC you'll end up needing.

With all my Canon DSLRs, whilst shooting raw (JPEG may be different) I find spot metering highlights (such as a backlit sky) at +3 gives me a perfect ETTR result. I don't have a bridge camera, but if I did I would probably continue the same techniques as with my DSLR, where possible. All you need to do is to establish whereabouts on the meter the clipping point is for the SX40. The major fly in that ointment would be the variable aperture whilst zooming, but that limitation is lifted on occasions when you're always zoomed to the max, which I imagine would be much of the time for birds.

Of course, without the backlit challenge I suspect that Av/Tv/P modes with most metering patterns will do very well and will allow freedom to adjust focal length without worrying about the consequences of varying aperture values.

Tim,

Okay. As someone who wants to simply whip out a bridge camera, have it set up about right and fire off a few shots when the opportunity arises (with a minimum of fuss), would you suggest that a setting of +3 would be a 'standard' setting for shots against a backlit sky (or at least a good place to start)? At a push, would this be equally effective with a nice blue sky as a dull grey sky?

I'm thinking I could lock this in to C1 or C2 and select it with a quick turn of the mode dial when needed.

Apologies for my lack of knowledge and especially for not having a clue what a clipping point is |:$|

Andy.
 
You'll have to find out which meter position is correct for the SX40, bearing in mind it has a smaller sensor, possibly different meter calibration and only shoots to JPEG. +3 works well for all my DSLRs when shooting RAW. Even at +3, raw allows me a little leeway for highlight recovery if I'm lazy or get my metering wrong.

I would suspect that +3 might be too much for the SX40, but since I don't have one I don't know the limit for that camera. Owners will have to perform their own tests to see at which point clipping starts to appear. The answer may also be influenced on camera settings for things like picture style (if the camera has that), and settings for contrast, saturation and sharpening. The more aggressive/punchy the settings the higher the chance you'll have to dial it back a little.

As well as using the histogram, if the camera has a "blinkies" feature to show highlight alerts then turn that on and you can keep turning up the exposure until the important highlights start to clip. When you see that happen then decrease exposure by 1/3 and you should be safe.

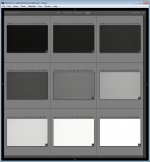
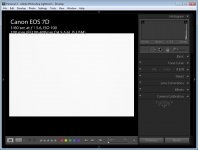
The first attached photo shows how middle grey (meter at 0) looks from my 7D compared to exposures at between -4 and +4 stops from that baseline, when imported into Lightroom. The second photo shows the resulting histogram for the +3 exposure, well towards the right hand side of the histogram, but just short of clipping point. The idea would be to see which metering value achieves a similar histogram for the SX40 when aimed at a bright sky or white sheet of paper.


EDIT : Sorry, missed a bit. A blue sky is not the same as a grey sky for the purposes of metering. With a grey sky the clouds act as a giant softbox, turning the whole sky into your light source. As such, the sky will usually be the brightest part of the scene and it would be correct to nudge the brightest parts of the sky well over to the right of the histogram. With a blue sky it would be reasonable to assume that you also have bright sunshine on your subject. That means that the whole sky is not the main source of light, but rather the sun, which you do not include in the frame. A white bird would appear much brighter than a blue sky when front lit by the sun, so metering the blue sky at +3 or close to it would probably be very foolish. You also don't really want to turn a beautiful blue sky into something approaching burnt out white. It is a bit of a judgement call, depending on the angle of the sun, how hazy the sky and the tone of the birds and one size does not fit all for blue skies.

Even when faced with grey skies, they are not necessarily uniformly grey, and sometimes you can have visible sunshine behind you and dark grey skies ahead, in which case you are no longer in a backlit situation. You really have to read the scene and the light and work out what is going on and how to handle it. The bottom line is that you want to expose brightly, so as to capture plenty of image data, but not go so far that you blow out important areas of the subject and scene. The first thing to do is to figure out which is (likely to be) brighter - the subject or the background - and then figure out how to set the exposure for that scenario. In the world of digital photography, expose for the highlights and develop for the shadows.

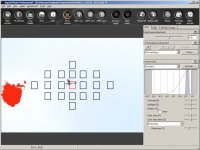
EDIT 2 : I've added a third image, which is just a demo shot taken this afternoon to show the results of metering at +3 from a bright grey sky with a flying subject in the frame. The spot meter was pretty much where the aircraft is in the shot, although I metered at that point in advance of the aircraft's arrival. I knew I did not want to shoot the aircraft by the time it got to the really bright bit of the sky or I would have had to dial back my exposure to hold the sky down. However, the inclusion of the brighter part of the sky shows how close I was to clipping, without actually going quite that far in the important part of the frame. Of course it's a completely rubbish photo, but it demonstrates the fine control you can have over the exposure if you have the time to get dialed in before your subject turns up. I often find this a far easier way to operate than to leave the results open to the variables of autoexposure and estimating how much EC is required. It also means that I know where I stand prior to shutter release rather than firing off a shot, chimping, adjusting and firing a second shot, by which time I might have missed the opportunity altogether.
 

Attachments

  • 20110412_171648_000.jpg
    20110412_171648_000.jpg
    112.2 KB · Views: 74
  • 20110412_173743_000.jpg
    20110412_173743_000.jpg
    90 KB · Views: 81
  • 20120623_145248_000.jpg
    20120623_145248_000.jpg
    106.7 KB · Views: 75
Last edited:
Tim, I have just tried manual and it is much better!!. I could not metering of the sky/highlights and Ev+3 because the Camera was maxing out at 1/1600 sec at my chosen aperture for some reason (something to do with the mode and aperture I guess). Anyway I metered off a roof opposite which I know to be around 18% grey and it was so much better. The Camera seems to give very varying metering in normal mode so for the likes of birds manual is the way to go for me.
 
Here are a few samples shots taken this morning in harsh lighting conditions (strong backlight). All shots in manual mode and are heavily cropped.
These conditions were a good test for the Camera and overall it did reasonably well. So far my pros and cons for the Camera (when comparing with a DSLR) are:

Pros
Lightweight
Good burst speed
Very good IS system (4.5 stops) can easily handhold full zoom at around 1/400 sec.
Better than expected noise levels at ISO 400 and ISO 800 (easily manageable)
Download speed from card very quick (when compared with 24mb RAW's)
Surprisingly good IQ for such a tiny sensor

Cons
AF in low light or poor contrast.
Chromatic aberration (CA) on high contrast
Shutter lag
Max focal length at close(ish) shooting distances is nowhere near 840mm IMHO
Metering seems a bit variable (but manual solves it).
Takes a bit more processing to get everything right.
Keep on hitting the wrong button because of it small size

I have still got a heck of a lot more to learn about the Camera but all in all a remarkable little Camera for the money (cost less than a Canon converter!!!) and a excellent little walkabout for record bird shots I am sure.
 

Attachments

  • sample1.jpg
    sample1.jpg
    170.4 KB · Views: 176
  • sample2.jpg
    sample2.jpg
    178.9 KB · Views: 185
  • sample3.jpg
    sample3.jpg
    173.5 KB · Views: 208
  • sample4.jpg
    sample4.jpg
    161.3 KB · Views: 174
Last edited:
Warning! This thread is more than 10 years ago old.
It's likely that no further discussion is required, in which case we recommend starting a new thread. If however you feel your response is required you can still do so.

Users who are viewing this thread

Back
Top