• Welcome to BirdForum, the internet's largest birding community with thousands of members from all over the world. The forums are dedicated to wild birds, birding, binoculars and equipment and all that goes with it.

    Please register for an account to take part in the discussions in the forum, post your pictures in the gallery and more.
ZEISS DTI thermal imaging cameras. For more discoveries at night, and during the day.

First Images (1 Viewer)

Marian9

Member
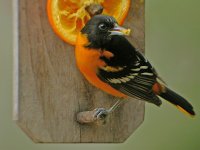
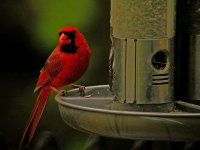
This forum is simply essential to anyone interested in learning the basics of digiscoping. I joined before purchasing any equipment. Using the input from so many knowledgeable people I was able to assemble an outfit that has the potential to produce really great images, that is, once I truly understand the concepts and can implement them effectively. The attached thumbnails illustrate my first attempts.

The photos were taken using a Nikon 4500, Zeiss ST DiaScope T*FL 85mm w/20-60X ocular and Cheang UDA (MUDA)CLA adapter & mechanical shutter release. The digiscoping unit is attached to a Bogen/Manfrotto Tripod- #3021BN with the Micro fluid, Quick Release panning Head- #3130.

The Cheang adapter is really outstanding, beautiful workmanship- it immediately solved my first problem of coupling the camera to the scope- Mr Cheang was extremely helpful and immediately answered all my inquiries. Once my bank solved all its transfer problems I received the adapter & all parts within 6 days after Mr Cheang received the funds. All transfer delays originated with my bank not his instructions or his bank.

The major problem I have is the most common- obtaining a sharp image. The images were taken with the camera set- Aperature priority, AF-S ISO-100, Fine (2272x1704) & macro (yellow flower)

All photos were under-exposed- The cardinal was extremely under-exposed (used Photo Elements v3 to lighten the background which resulted in very serious distortion). Applying the unsharp mask only enhanced the distortion.

I am trying to use Manual focus and the scope to focus the image but the image on the monitor is difficult to see. When I invoke Manual mode the macro to infinity bar is solid and does not change as I focus the scope. Should this bar change as I bring the image into and out of focus? I assume the purpose of this bar is to indicate the focus range and that it will change color or give some other indication if the focusing ability of the camera is out of range. Is my assumption correct.

Any suggestions will be most appreciated.
 

Attachments

  • mBO513e.jpg
    mBO513e.jpg
    167.9 KB · Views: 268
  • NOCA4.jpg
    NOCA4.jpg
    163 KB · Views: 258
  • BLJA3.jpg
    BLJA3.jpg
    188.3 KB · Views: 290
Very good,Marian(may I tactfully suggest that you use small casing and not capital letters,it does jump out at one!!!).The first image could perhaps use a very gentle highlight.The 3rd image is quite good,Very clear .The 2cnd one is very dark,and highlighting it may quite possibly blow the colours.But keep trying,this is a very good first effort.Digiscoping is not easy,one needs a very steady set up,and too much zoom can ruin the shot,but you have done very well.Hopefully someone else with a little more expertise may come along and add a comment.
 
christineredgate said:
Very good,Marian(may I tactfully suggest that you use small casing and not capital letters,it does jump out at one!!!).The first image could perhaps use a very gentle highlight.The 3rd image is quite good,Very clear .The 2cnd one is very dark,and highlighting it may quite possibly blow the colours.But keep trying,this is a very good first effort.Digiscoping is not easy,one needs a very steady set up,and too much zoom can ruin the shot,but you have done very well.Hopefully someone else with a little more expertise may come along and add a comment.


Thank you for your comments and suggestions.

I am not sure what happened to the original post but I did not use capitals except for beginning sentences etc. and I deselected the bold text option before sending the post. It must have been the wayi of selected the text before changing the font. My browser window shows the text in lower case. Would appreciate any feed-back so I don't make the same mistake again. I know how annoying all cap-bold messages are.

I am not certain what you mean by highlighting- Increasing hue/saturation, contrast?

Marian
 
I've amended the font from 7 to 2 which has corrected the size problem.

The photos are all pretty good, plenty of detail and exposure looks about right if a little dark and over saturated colours. I use the CP4500 as well. Are you using the selectable autofocus brackets as well as macro mode - it makes life far easier as you can place the bracket over the bird so that the metering and focus is taken from the bird rather than the bird as a whole. I'm not sure why the photos came out underexposed here as apart from the BlueJay they're all evenly illuminated and even the BlueJay isn't that bright.

One problem that can occur is that the pop up flash may activate which leads to underexposure as it adds nothing to a digiscoped shot. I sometimes inadvertently catch the button as I'm switching on the camera activating the flash unexpectedly. It's easy enough to disable using the button on top of the left hand half of the body - just keep pressing until it shows as a lightning flash in the display as a line through it.

With the camera zoom bar, I never use it at it's maximum (4x) as results are usually soft. I usually zoom up to maximum and then push the back zoom button once or twice until it white bar drops back one notch. Anything between around 2x-3x works best.

You have to remember that the camera and scope aren't electronically connected so if using the camera in manual mode, adjusting the scope focus won't affect the bar except the view on the LCD. There's a 'focus assist' feature on the CP4500 which when activated in effect causes a grainy area on the LCD to show max area of focus. It can be a very useful way to see the focus point and how much depth of field you have to play with. A 2x LCD magnifier is a boon for viewing the LCD.


1st Digi Photos

HI MARION,FOR FIRST TIME,THEY ARE NOT BAD,BUT I THINK THE THIRD PHOTO,IS THE BEST,I LIKE IT,I WOULD LIKE TO SEE A BIGGER PHOTO OF IT,BECAUSE THE TAIL IS CHOPPED OF ABIT ONTHE SMALL PHOTO.KEEP AT IT ITS A GREAT HOBBY.CHEERS :t:
 
Thank you Ian for your comments and encouragement.

I did not use the selectable autofocus brackets for these images but did use the macro mode (yellow flower). After reading the many threads on focusing I have set the camera to use the bracketing protocol and the results are better. All three photos I submitted were markedly under-exposed due to the rainy weather we have had for the past two weeks. I shot these photos through an open window at 1/15 or slower with the lense as far open as I could get it. The images were barely visible on the computer. I used Adobe Photoelements v3 to lighten them & then applied the unmask filter. I am still learning how to use the program and have made several mistakes but once I master it the quality of the final images should improve.

I know there is no substitute for a properly exposed, in-focus/sharp iamge-
I read one of the threads that discussed how to evaluate out of focus images. I assume that if the entire image is blurry movement of the camera/tripod is the culprit. If the background or foreground is in focus but the bird is not then the point of focus was improperly chosen. The bracketing focus should help resolve this problem assuming a solid, vibration free mounting system.

Is the "focus assist" you refer to the same as using the digital zoom and then reverting to the optical zoom once the image is focused?

Again, thanks to all for your help and comments.

Marian


IanF said:
I've amended the font from 7 to 2 which has corrected the size problem.

The photos are all pretty good, plenty of detail and exposure looks about right if a little dark and over saturated colours. I use the CP4500 as well. Are you using the selectable autofocus brackets as well as macro mode - it makes life far easier as you can place the bracket over the bird so that the metering and focus is taken from the bird rather than the bird as a whole. I'm not sure why the photos came out underexposed here as apart from the BlueJay they're all evenly illuminated and even the BlueJay isn't that bright.

One problem that can occur is that the pop up flash may activate which leads to underexposure as it adds nothing to a digiscoped shot. I sometimes inadvertently catch the button as I'm switching on the camera activating the flash unexpectedly. It's easy enough to disable using the button on top of the left hand half of the body - just keep pressing until it shows as a lightning flash in the display as a line through it.

With the camera zoom bar, I never use it at it's maximum (4x) as results are usually soft. I usually zoom up to maximum and then push the back zoom button once or twice until it white bar drops back one notch. Anything between around 2x-3x works best.

You have to remember that the camera and scope aren't electronically connected so if using the camera in manual mode, adjusting the scope focus won't affect the bar except the view on the LCD. There's a 'focus assist' feature on the CP4500 which when activated in effect causes a grainy area on the LCD to show max area of focus. It can be a very useful way to see the focus point and how much depth of field you have to play with. A 2x LCD magnifier is a boon for viewing the LCD.


Marian9 said:
.......................
I know there is no substitute for a properly exposed, in-focus/sharp iamge-
I read one of the threads that discussed how to evaluate out of focus images. I assume that if the entire image is blurry movement of the camera/tripod is the culprit. If the background or foreground is in focus but the bird is not then the point of focus was improperly chosen. The bracketing focus should help resolve this problem assuming a solid, vibration free mounting system.

Is the "focus assist" you refer to the same as using the digital zoom and then reverting to the optical zoom once the image is focused?

Again, thanks to all for your help and comments.

Marian
You've nicely summed up the appraisal of focus blur on a photo. Heat haze can be another cause which usually shows as a general blur with nothing at all sharp.

I find the selectable focus brackets by far the most consistent method of ensuring the point of focus is where you want it.

The 'focus assist' I referred to is in fact called 'focus confirmation' now that I've dug out the instruction book ;)

It's a different fearure altogether from digital zoom which to be honest I don't like to use - the LCD is grainy enough as it is. 'Focus confirmation' just give a sharper image on the LCD of the area actually in focus. You need to activate it though the menus and then set up ready to take a photo. A good way to see it's affect is to look focus the scope on a object of a grass field and then adjust the scope focus and you can see the area in focus 'walk across' the LCD. Somtimes I find it very useful and other times not. It depends really on where the bird is sitting, but it's well worth having a look at as it can make life an awful lot easier.
 
IanF said:
You've nicely summed up the appraisal of focus blur on a photo. Heat haze can be another cause which usually shows as a general blur with nothing at all sharp.

I find the selectable focus brackets by far the most consistent method of ensuring the point of focus is where you want it.

The 'focus assist' I referred to is in fact called 'focus confirmation' now that I've dug out the instruction book ;)

It's a different fearure altogether from digital zoom which to be honest I don't like to use - the LCD is grainy enough as it is. 'Focus confirmation' just give a sharper image on the LCD of the area actually in focus. You need to activate it though the menus and then set up ready to take a photo. A good way to see it's affect is to look focus the scope on a object of a grass field and then adjust the scope focus and you can see the area in focus 'walk across' the LCD. Somtimes I find it very useful and other times not. It depends really on where the bird is sitting, but it's well
worth having a look at as it can make life an awful lot easier.

Thank you Ian,

I will try 'Focus confirmation' and let you know if it improves my technique. The sun is finally out and when the strong NE winds subside I will try the new settings.

Marian
 
Marian9 said:
When I invoke Manual mode the macro to infinity bar is solid and does not change as I focus the scope. Should this bar change as I bring the image into and out of focus? I assume the purpose of this bar is to indicate the focus range and that it will change color or give some other indication if the focusing ability of the camera is out of range. Is my assumption correct.
Marian,

The user interface of the CP4500 takes some time to learn. It is not the most user friendly, but once you get used to it, it is OK.

If I understood correctly, you have invoked "manual focusing" - instead of using macro. This shows an indicator bar, which is short at close focus and long at infinity focus. Well, this just fixes the camera focus and is not influenced at all by the scope. You can rotate the thumb wheel and adjust the focus manually, but it is a hassle. You get the same effect by choosing the "mountain" setting (by pressing the macro button a couple of times) and try to focus with the scope. Macro setting is activated when you choose the "flower" and zoom the objective (not focus) until the white flower becomes yellow.

Some users recommend macro setting because this keeps the zoom range "unvignetted & not too powerful". Also the macro focusing is the most accurate - but often frustratingly slow. OTOH, the CP4500s seem to have sample variation in their focusing accuracy: my 4500 keeps focusing behind the subject at autofocus - and this is why I prefer fixed camera focus ("mountain") and focusing with the scope. But many digiscopers get fantastic results with macro setting (+ those selectable focus brackets).

Best regards,

Ilkka
 
Warning! This thread is more than 18 years ago old.
It's likely that no further discussion is required, in which case we recommend starting a new thread. If however you feel your response is required you can still do so.

Users who are viewing this thread

Back
Top