• Welcome to BirdForum, the internet's largest birding community with thousands of members from all over the world. The forums are dedicated to wild birds, birding, binoculars and equipment and all that goes with it.

    Please register for an account to take part in the discussions in the forum, post your pictures in the gallery and more.
ZEISS DTI thermal imaging cameras. For more discoveries at night, and during the day.

graininess!! (1 Viewer)

There are a couple of ways in Photoshop 7.... have the image open then file-file info... and then use the drop down that is currently saying 'general' to select exif.

Alternatively, use the file browser in 'expanded view' (the file browser options are available by clicking on the tiny white arrow next to the word 'file browser') and click on a thumbnail and the exif data should appear under the seperate thumbnail of the selected image.

I also use a free exif reader avaialble from http://www.takenet.or.jp/~ryuuji/minisoft/exifread/english/
This is very quick and simple to use.
 
Sounds like you can do quite a lot with PS 7 - but I seem to recall that it has a hefty price tag....anyone know of a good providor??


Ruby
 
Ruby said:
Sounds like you can do quite a lot with PS 7 - but I seem to recall that it has a hefty price tag....anyone know of a good providor??


Ruby
It's an industry standard programme, so it's never cheap. Legitimate versions are very few and far between amongst private individuals. Photoshop Elements 2 is very similar and is far cheaper... and anyway, most photographers will use no more than 5% of Photoshop 7's abilities. Paintshop pro is another good alternative, though it's not as well supported with literature and discussion.
Regards,
Andy
 
Good input from everyone IMO. I can only really add one thing. When doing relatively agressive sharpening, try converting the image to LAB color space in Photoshop. Then select and sharpen only the luminance channel. This gives good results and tends to minimize the introduction of color noise artifiacts.

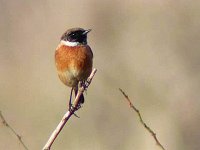
The attached file is the '"out of the camera" image with curves adjusted and sharpened in this way. No steps were taken to blur the background etc.
 

Attachments

  • stonechat1_mod.jpg
    stonechat1_mod.jpg
    47.6 KB · Views: 183
I am sorry Jay but your photo looks terrible. Maybe it is the compression because the photo is now very blocky. Perhaps you took the wrong photo to work on as I can see traces of gaussian blurring and sharpening esp. around the twig.
 
pohsp said:
I am sorry Jay but your photo looks terrible. Maybe it is the compression because the photo is now very blocky. Perhaps you took the wrong photo to work on as I can see traces of gaussian blurring and sharpening esp. around the twig.
I wouldn't be too hard on Jay, Laurence.
I only spent a few minutes re-working the images just to give a general idea as to what can de done, rather than the comprehensive work that we may do to our own images before going to print, I suspect that Jay also did a similar 'rush job' in this case.

The out-of the camera image was already severely jpeg'ed (and presented at vga, unlike svga of the first image), so unless you save at a very high level the background will look extremely blocky.
 
sparrowbirder said:
andy,how do you check the exif data on a photo is it in properties thanks andy p
As Andy said there’s all ways more than one way of doings things in Photoshop, my favorite, to retrieve the EXIF data, image size, canvases etc, has the same number of clicks as Andy’s but less movement (at my age I need to conserve my energy)
Have the image open in Photoshop and then right click image title bar.


And for moderate sharpening
Duplicate image, Filter, other, high pass and then in the layers pallet choose soft light for the blending mode
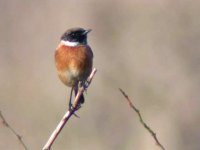
The following took no more than a few seconds (slight adjustment with curves)
 

Attachments

  • stonechat1a-60k.jpg
    stonechat1a-60k.jpg
    58.5 KB · Views: 117
pohsp said:
I am sorry Jay but your photo looks terrible. Maybe it is the compression because the photo is now very blocky. Perhaps you took the wrong photo to work on as I can see traces of gaussian blurring and sharpening esp. around the twig.

No need to be sorry, I agree. The only thing the photo can really show is that apparent detail is increased and that while noise is also increased, "color" noise is not increased as much. Unfortunately, the "unprocessed" image that was sent had obviously been significantly compressed further with JPEG. It is always dangerous modifying an image that is not of the quality of the original photo.

Maybe I'll work up a demonstration later and perhaps that is what I should have done in the first place.

The difference between sharpening in only LAB colorspace's Lightness channel or in all of RGB is not huge and in some images isn't really even perceptable. It seems less an issue with the CP5000 than with the CP995. But it is never worse in my experience so I always use the LAB method.
 
Warning! This thread is more than 21 years ago old.
It's likely that no further discussion is required, in which case we recommend starting a new thread. If however you feel your response is required you can still do so.

Users who are viewing this thread

Back
Top