• Welcome to BirdForum, the internet's largest birding community with thousands of members from all over the world. The forums are dedicated to wild birds, birding, binoculars and equipment and all that goes with it.

    Please register for an account to take part in the discussions in the forum, post your pictures in the gallery and more.
ZEISS DTI thermal imaging cameras. For more discoveries at night, and during the day.

Photoshop sharpening (1 Viewer)

Jos Stratford

Eastern Exile
Staff member
United Kingdom
For anybody out there using Photo Elements 2.0, wouldn't mind some opinions on sharpening settings - amount, radius and threshold. Though it obviously depends on the sharpness of the original, does anybody have any preferred settings? (for prints in particular, but also use on computer).

Generally I have preferred to avoid sharpening, but have recently started on some what I would consider moderate sharpening (85, 1.0, 4).
 
This is from memory (not too good this a.m.) In order as they appear in the window - 100 - .5 - 0
 
when sharpening is important

Jos Stratford said:
Generally I have preferred to avoid sharpening, but have recently started on some what I would consider moderate sharpening (85, 1.0, 4).
Just want to mention that sharpening is almost REQUIRED after you've done a resize using resample (i.e you've reduced the width/height of an entire image via resizing - not cropping). A resample usually causes a slight blurring. I often use the simple Sharpen filter (no options) in Paint Shop Pro to correct this. I think Elements has a similar simple filter.
 
KCFoggin said:
This is from memory (not too good this a.m.) In order as they appear in the window - 100 - .5 - 0

I tend to use (and have noticed from other postings here and on the web that others tend to use)

- 100 to 150

- .5 radius or maybe a bit more (like 1-3)

- 2-3 threshold or maybe a bit higher

In my experience, the middle one of these three (radius) is key because it determines over how many pixels the sharpening is applied and so a small shift makes a big difference to overall appearance. At radius 0.6 the sharpening effect is applied over 4 pixels and at radius 1.3 the effect is spread over as much as 8 pixels- so you can easily overdo it.
 
My usm settings are more in line with Jim's...after using all sorts of expensive sharpening programmes and various usm settings where you whack up the amount to 300+ but keep radius very low... I still keep going back to 150, 1.2'ish... threshold varies but i usually keep it on 0
It's hard to overdo things for a print, but easy for the web... just watch out for halos due to too much radius and feathers that look like they've been dipped in varnish.

cheers,
Andy
 
Is there a difference in the settings above(where does one find them,please?)to using the basic enhancement,where one either uses the Levels,or the one above,where one just uses the 2 sliders,Brightness and Contrast.Looks like I have not been using the correct procedure.
 
Christine

Judging by your excellent photos whatever you are doing can't be far wrong!!! What software version are you using?

Cheers

Ken
 
christineredgate said:
Is there a difference in the settings above(where does one find them,please?)to using the basic enhancement,where one either uses the Levels,or the one above,where one just uses the 2 sliders,Brightness and Contrast.Looks like I have not been using the correct procedure.


Christine

From your comment here it looks like you are talking about Enhance/Brightness/Levels - which for me is Step 1 to correct any exposure shortcomings - rather than Unsharp Mask which is in the Filter Menu and is my Step 2 to tweak sharpness.

See under Filters/Sharpening/Unsharp Mask and then try playing with the various settings above to see what effect you get.
 
Sharpening is required on all digital images, it is best applied in post-production rather than using the in-camera sharpening modes, (this is because it cannot be undone if you are shooting .jpegs) and also if you are resizing the image the sharpening will be resized too. Sharpening should be the last process you do to the image to get the best results.

If you are resizing (resampling) images it is important to use the right mode of interpolation, Bilinear if resizing down (smaller image) and bicubic if resizing up (bigger image) this is because the program has a different algorithym (processing method) for taking away or adding pixels; the wrong type of interpolation will render the image soft and it may need a lot of sharpening to get it to look ‘pin’, with this will come the other artefacts such as haloing.

I usually sharpen with a 1 pixel radius, a threshold of 4, to about 125-150%
However after some experimenting I have found that double sharpening on the same image at different settings can give better results.

Sharpening at 80% with a radius of 0.4 and 0 threshold to start, and at 80% again but at a 2 pixel radius and a threshold of 3 or 4 gives a very pleasing result for A3 prints without all the characteristics that look like oversharpening, of course this will not apply for all images and some playing with the settings will give better results.
 
Thanks,Nigel and co,yes I did go into Elements 2 and have a look,and it was the Unsharp mask,where one found those settings.I find it odd,that in a setting which says to Sharpen images,there is an "Unsharp" prog.I have made a note of the settings advised,but think I will find it simpler to stick to basic enhancement!!!.
Having re read the info,I find it difficult to enhance etc,after the image has been re-sized ,say to 800,as the image is smaller,and it is more difficult to judge the exact amount one needs to change,so one is better making changes after a re-size?.
 
Last edited:
The amount of sharpening that is required to give an acceptable and not overdone result depends on the picture resolution to start with. A pic resized to 512 horizontal resolution then sharpened with a 1.5 pixel radius will look horribly oversharpened compared with an original at 2048 horizontal resolution with the same sharpening.

For 6Mpixel images from my EOS300D, if I use sharpening at all, I tend to use 75-100%, between 0.5 and 1.5 pixel width, and threshold of zero. Anything over 2 pixel width looks obviously overdone, especially a bird against a sky background in which fringes look horrid.

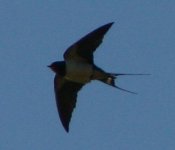
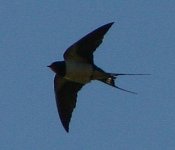
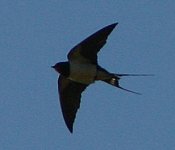
Attached are crops from the same (not very good) pic of a swallow in flight, using no sharpening, unsharp mask with radius 1.3, and unsharp mask with radius 3.0. The 3072 x 2048 original was sharpened and then cropped to produce each of these images. See how horrible the fringes become with oversharpening. For me this image looks best without any sharpening, but for many pics a small amount helps.
 

Attachments

  • Sharpex00.jpg
    Sharpex00.jpg
    24.6 KB · Views: 233
  • Sharpex01.jpg
    Sharpex01.jpg
    29.8 KB · Views: 202
  • Sharpex02.jpg
    Sharpex02.jpg
    31.2 KB · Views: 220
Another very good way of high quality Sharpening is to do it in LAB mode using just the luminance (Lightness) layer. This method will only affect the monochrome data not the colour data.
Go to Image / Mode / Lab Color and then Window / Show Channels. In the Channels palette select the Lightness channel. then choose Filter / Sharpen / Unsharp Mask.
I find that a setting of 125-150% , 1 radius and 2 threshold works well on full resolution 8-11 Megapixel images, (less will be needed on resized down images) use the Preview button to judge the effect. When you are happy with the sharpness Click OK.
Then click Image / Mode / RGB Color …….. Sharpening, completed.
 
Last edited:
Thanks Nigel

I didn't know about that way of sharpening. I will have a play around with some raw footage when I am back home from work.
 
Reader said:
Thanks Nigel

I didn't know about that way of sharpening. I will have a play around with some raw footage when I am back home from work.

If you're primarily concerned with printing I've found that it helps to slightly (very very slightly) oversharpen using 'unsharp mask', then use the noise reduction filter with a fairly low 'preserve detail' setting. This works particularly well if using a scanned 35mm image with some inherent noise.
 
Warning! This thread is more than 18 years ago old.
It's likely that no further discussion is required, in which case we recommend starting a new thread. If however you feel your response is required you can still do so.

Users who are viewing this thread

Back
Top