• Welcome to BirdForum, the internet's largest birding community with thousands of members from all over the world. The forums are dedicated to wild birds, birding, binoculars and equipment and all that goes with it.

    Please register for an account to take part in the discussions in the forum, post your pictures in the gallery and more.
ZEISS DTI thermal imaging cameras. For more discoveries at night, and during the day.

Image quality help (1 Viewer)

FrankD

Well-known member
I was not sure exactly which forum to post this in..one of digiscoping forums (as this is what method was used) or possibly the photo critique (as that is what I am looking for).

I recently purchased a Casio Exilim EX Z1000 10.1 Megapixel digital camera to begin digiscoping with my Pentax 65 mm ED Angled spotting scope. I am using a Knight Owl 20 mm EWA eyepiece with the scope.

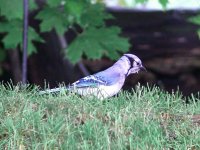
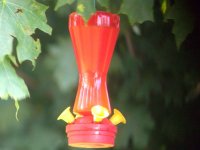
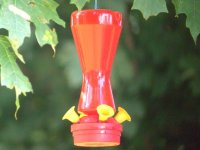
I started taking some pictures this morning and, overall, I admit to being fairly pleased with the results. About one in five pictures turns out as good as I would like but the other four turn out a bit grainy and dim. What I would like to know is the reason for this. Which one of the following could be the result?

1. The 3x optical zoom utilized on the digital camera (without the zoom the images look brighter and clearer)
2. The quality of the camera itself (fairly inexpensive for a 10 mp)
3. The fact that I am using a 65 mm spotting scope instead of an 80 mm
4. The camera's settings (I am running full auto)
5. The distance (45-60 feet on average)
6. The quality of the eyepieces on the scope
7. Something else I am not thinking of

Below is a typical representation of what I am referring to. I had to downsize it by about 1/4 in order to upload it into the forum. I can, ofcourse, used some imaging software to make it brighter and crisper but I do not know if I want to go that route every time I try to take a pic.

Thank you ahead of time for the help.
 

Attachments

  • fm3.jpg
    fm3.jpg
    57.3 KB · Views: 412
Last edited:
Hi Frank,
Looks like the camera's auto functions are making for inconsistant results, the metering section maybe telling the camera different things from shot ot shot despite almost identical scenario in front of it... I'd guess that it's increasing the ISO setting in the camera to get the exposure to what it thinks is correct, resulting in more grainy photo.

It would be interesting to see the exif data in these two shots (which seems to have been squeezed out when combining/processing these).

cheers,
Andy
 
Andy,

Thank you for the suggestion. I was hoping you would chime in. I should have been more clear in my original post. The top half of the picture was the raw image, unedited except to downsize for uploading to this forum. The bottom image is the same picture after I brightened and sharpened it with MGI Photosuite II SE.

I must apologize as the only data I remember seeing on the screen during the shot was an ISO 800. There was other info but it escapes me at the moment. Would I have better luck with an ISO 400 or 200?

Here is another shot under the same conditions at approximately the same location.
 

Attachments

  • dove.JPG
    dove.JPG
    57 KB · Views: 282
I do believe I have one problem solved. It does certainly help to fully understand your camera's capabilities. Here is a shot I took this morning (again unedited except to reduce size for uploading) with the camera's "Best Shot-High Sensitivity setting" under the same conditions as before.
 

Attachments

  • Blue Jay 623.jpg
    Blue Jay 623.jpg
    65.4 KB · Views: 355
Last edited:
Frank, it looks good, But try to do a bit of experimenting on a static subject, using verious settings, you may find you need to set some exposure compensation. If the camera has a bracket seting use it. Ernie
 
Ernie,

A suggestion based on experience. Thank you I will try a static subject now that I have the "gotta have a bird to take a picture of" out of my system. I will take several pics of the same object under various settings to see what is most appropriate. I have to admit that this digital photography, especially with the scope, is alot of fun. More than I had initially anticipated.

I feel a bit at a loss though. What is a "bracket setting"?

Thank you Ernie.
 
Hi Frank,
Bracketing is a system whereby you set the focus etc. and the camera takes usually three images, and amount below and above the original, the amount can be set, this is a good method of determining how accurate you cameras exposure settings are. All cameras do not have this setting. Another thing to try, set you cameras focus on either infinity or macro, and focus with the scope. Ernie
,
 
Ernie,

Again, thank you for the suggestions. I will try them. I spent a good deal of time taking static shots with the camera as you suggested earlier. What I found was that the higher ISO setting of 1600 produced a brighter image but when I zoomed in the image became much grainier faster. An ISO of 400 produced a slightly dimmer image but the zoom yielded a much more detailed image. I am going to play with a few more of the camera's functions as I do not think I have even begun to scratch the surface.
 
Frank I am wondering if your scope was focussed acurately?

I am a glasses wearer and have to take great care to focus the scope sharply - at max camera zoom. Before zooming out to take the photo. Sharper pictures will often have better colour.

Attached below is a bird I photographed 2 days ago, using a Fuji F10 and a 65mm Opticron scope at 20x magnification, bird about 30 - 40 feet away. I took great care to focus it as sharp as possible. I have found the slightest bit off produces very poor results. So use an Eagle Eyepiece magnifier to help me see clearly.

Hope this helps

Adrian
 

Attachments

  • 23june06_0641mcrp1_t700.jpg
    23june06_0641mcrp1_t700.jpg
    155.6 KB · Views: 347
Last edited:
Adrian,

That picture is superb. The color and detail are what I would try to strive for.

I am a bit at a loss though in terms of your question regarding my scope focusing accurately. Were you referring to a particular picture or a specific reference to one of my earlier posts?

I recently started a thread in the Digiscoping cameras subforum titled "Casio Exilim EX Z1000". Some of my latest attempts at digiscoping are included there. The last few turned out fairly well though still not at the level of what you just posted. I have played with focusing somewhat in the sense of focusing from "near to far" and then "far to near" (my eyepiece/scope combo has a fairly large sweet spot in focusing) to see which gives me the clearer picture. Is there some other method I am missing out on?

Your help is always appreciated.

Frank
 
FrankD said:
Adrian,

...I recently started a thread in the Digiscoping cameras subforum titled "Casio Exilim EX Z1000". Some of my latest attempts at digiscoping are included there. ... ... Is there some other method I am missing out on?

Frank

Hi Frank having just read that thread and seen the photos I think I can offer some helpful suggestions towards improved photos.

* Your camera looks set to bright and is burning out much of the photos detail. Use the exposure compensation and select at least -1/3 from what it is at the moment (I often use -2/3 or even -1 on my camera.)

* I thought the photos looked slightly 'smudgy/blurred', and thought this may have been due to the scope not being focussed correctly (and this could still be a part of the problem - how accurate are your eyes? ).

Four things that can cause soft non detailed photos:
1) Poor camera or scope lenses - but that shouldnt be a problem here.
2) Scope not focussed properly.
3) Not having a rock steady scope/camera combination - therefore camera shake causing the detail to blur due to movement.
4) Slow shutter speed also causing the detail to blur due to movement.

Having read your other thread I see that you are hand holding the camera to the scope - this could well be causing the majority of the problems. If you need to do this, then set your shutter speed to be as fast as you can get away with.

I hope this helps and look forward to your future posts.

Adrian
 
Adrian,

Thank you for the suggestions. I appreciate the thoughtful response.

I plan on ordering a Universal Digiscoping Adaptor tomorrow to see how much it improves the images

In regard to your comments about exposure compensation, I am at a bit of a loss. What function would this be listed at on my camera? Is there another name for it possibly? I did attempt to touch up the photos a bit first in a graphics program prior to posting them. I guess it is possible I that I used the brighten feature too much. The originals looked so dark though.

I think my eyes are fairly good. I do not wear glasses and have no trouble with my vision to speak of.

As for shutter speed, if I go the faster route then isn't it possible I will get more noise in my photos?

Thanks again.
 
I took some time this afternoon to digiscope a few pics of one of my hummingbird feeders at various ISO settings. All pictures were taken with the previously mentioned setup at a distance of about 15 yards. All shots were handheld (you will notice some blur in a few of the photos). Each picture is labeled based on the ISO setting(50, 100, 200, 400, 800, 1600). The post below this will have the 1600 ISO pic as you can only upload 5 pics per post. Any thoughts/comments would be appreciated.
 

Attachments

  • ISO50.jpg
    ISO50.jpg
    27.2 KB · Views: 240
  • ISO100.jpg
    ISO100.jpg
    29.6 KB · Views: 226
  • ISO200.jpg
    ISO200.jpg
    34.9 KB · Views: 292
  • ISO400.jpg
    ISO400.jpg
    35.9 KB · Views: 204
  • ISO800.jpg
    ISO800.jpg
    44.7 KB · Views: 274
Hi Frank - yes interesting. As the ISO goes higher the edge sharpness of the images improves greatly. ISO400 seems about the best compromise - noise V sharpness. But all the images are slightly over exposed, thus burning out detail in certain strong coloured areas. This is due to the camera circuits/sesnor being saturated.

Turning down the camera exposure compensation (or maybe it has a 'brightness' setting) would work wonders. I do not know what it may be called on your camera. Do you have a manual for it - thats the best place to start looking.
 
Adrian,

I will see if I can find the function you are referring to. The brightness setting may very well be the answer. There is also a color saturation function that might do the trick based on your comments. The digiscoping adaptor is coming tomorrow so we will have to see if that makes a noticeable difference as well.

Thank you again for the help.
 
FrankD said:
Adrian,

I will see if I can find the function you are referring to. The brightness setting may very well be the answer. There is also a color saturation function that might do the trick based on your comments. The digiscoping adaptor is coming tomorrow so we will have to see if that makes a noticeable difference as well.

Thank you again for the help.

G-day Frank, Some of the images show signs of camera shake, rig yourself a release bracket. Ernie.
 
Ernie,

Thank you for the suggestion. That may be the next step. Those pics were all handheld. Now I have the adaptor and have been using the self timer with moderate success. I need to work on the lighting, saturation and EV compensation (which I finally found) to now get more realistic pictures (higher quality). I am wondering though how much the use of a 65 mm scope (versus an 80 mm) and inexpensive, non-ED, eyepiece is affecting the quality of the final image. I am going to do some more playing after I get off work today as the new adaptor finally came in. The sad part though is the tripod head I ordered with it is now on back-order so I have to use a less than perfect alternative tripod for the time being.

Thank you again.
 
Frank regarding how much does a non ED eyepiece affect the final image. Well if you are using high magnification - the answer is probably lots. But for 10x and 20x non ED should be fine - certainly to start with.

Below is a photo I took with a very, very cheap pair of binoculars. The camera was clamped to the eyepiece, but the whole lot was handheld as steady as I could and not using a timer or cable release (but these do improve photos a lot when used well).

I forced the shutter speed as high as I could by using ISO400. The full size original looks much more impressive. But the Robin was only about 25 feet away.

http://www.t1000.co.uk/camera/robin28feb06_mead7193crp1_600tes.jpg
 
Warning! This thread is more than 18 years ago old.
It's likely that no further discussion is required, in which case we recommend starting a new thread. If however you feel your response is required you can still do so.

Users who are viewing this thread

Back
Top