• Welcome to BirdForum, the internet's largest birding community with thousands of members from all over the world. The forums are dedicated to wild birds, birding, binoculars and equipment and all that goes with it.

    Please register for an account to take part in the discussions in the forum, post your pictures in the gallery and more.
ZEISS DTI thermal imaging cameras. For more discoveries at night, and during the day.

Sharper (Head) Shots (1 Viewer)

Hi,

I am feeling slightly dejected right now regarding the results of recent trips out digi-scoping. I have been convinced that the pics to bring home and download are gonna be so sharp and clear (thats how they seem on the cp4500 monitor)
Then once uploaded to my computer, im so disappointed by how out-of-focus they appear. Ive tried lower magnification shots, ive tried a Jessops slide viewer over the LCD monitor, (which i find makes focussing of an image even harder, and so im presuming the X-Tenda view kit to be the same) ive lowered my tripod, attached a shutter release cable, learned to hold my breath for some serious lengths of time........ :eek!: .......Im fast running out of ideas now.

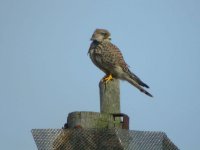
The problem seems to be, most times anyway, that i can get most of the birds body in focus, but the head always seems to be out of focus.

Is there a way of focussing in on the birds head, (im looking for a good tip on this one.... ;) ) or does it all still boil down to using an LCD magnifier on the monitor?

I am aware of the soft-focussing of the cp4500, but i know on other subjects sharp pictures can be taken. I use a Swaro ST80HD scope, so i dont think thats the problem either.

Im finding this so very frustrating. Each time i view my results on the pc im convinced i wont be going back out 'digi-ing' again. (although i dont really believe this.... ;) )

Any ideas on how i can improve in this area will be much appreciated,

thanks

tracker
 
Well, here is what I do. I still prefer to use the center focus bracket as for some reason the lighting just seems better than when using the upper and side brackets.

I adjust my tripod head so there is a bit of give to it and then I focus on the head with the center focusing bracket and then with some weight, I either bring the camera up or down just a bit to frame the bird properly.

Tracker, I've been digiscoping for a bit more than a year now and there are still days when nothing works as I had thought it would. I am beginning to think it is the nature of the beast.
 
KCFoggin said:
Well, here is what I do. I still prefer to use the center focus bracket as for some reason the lighting just seems better than when using the upper and side brackets.

I adjust my tripod head so there is a bit of give to it and then I focus on the head with the center focusing bracket and then with some weight, I either bring the camera up or down just a bit to frame the bird properly.

Tracker, I've been digiscoping for a bit more than a year now and there are still days when nothing works as I had thought it would. I am beginning to think it is the nature of the beast.

Hi KC,

That centre focus bracket, is that the red one that is used for whatever meter reading is used? Or is it a setting found somewhere else?

I think you just may be right regarding 'the nature of the beast. I think there are some areas to this hobby that im needing to just accept.

Thanks for your reply,

tracker
 
Ok, im sitting here looking at the cp4500 focussing options......should i set it to AF Area mode- AUTO, MANUAL or OFF
or S-AF Auto Focus Mode -Continuous AF or Single.....or MF- Focus Confirmation MF- On or OFF?

If you understand that, then well done......... ;)

tracker
 
Magnified viewers aren't much help with focusing. Though there is an option that will assist with LCD focusing. Its call "focus confirmation" I think and it creates a "sharpening" type of effect around areas that are in focus. I never use it, but I understand some people who manually focus do.

That you can get the bird's body in focus tells me that your problem isn't overmagnification, shake, and the like. Many advise against it, but you might consider stopping down. It will increase DOF slightly and may increase image contrast and sharpness. Don't expect much benefit at very high magnifications. It helps most when using the scope at around 20x. The price you pay is slower shutter speeds.

I use techniques similar to KCFoggins. Though I will use different "red brackets" to focus on different areas. I'll frame the bird first, then lean on the scope lever a bit to move the red bracket where I want it, half-press to freeze the focus and then remove the pressure to get my original framing back. Then snap.

I always shoot (digiscoping) with sharpening at the High setting.

Put the camera in play mode and zoom all the way in (6x) to preview your results in the field. You'll know if you are getting focus. If I have a patient bird, I always double check.

You don't mention the magnification that you use or the lens settings. You also didn't post an example. My observation, using an ATS80HD and other scopes is that even at moderate (1750-2250mm equivalents) digiscoping magnifications that image contrast and "snap" suffers as compared to a photo taken of the same subject from a few feet with no scope. At even higher magnifications, the likelihood of focusing errors and other problems increases. Some softness will always accompany the image and will need to be dealt with in post processing for the very best results.

BTW, I have an artificial "pheasant" that is covered partially with real bird feathers. I bought it at a store that sells imported fake/silk flowers. I use it as a subjective element in test images. Something like this set up in different places in your backyard might make a good practice target to develope a technique that works for you. I'm a big fan of practicing and getting your technique working for you before spending time in the field.

And finally, an image that is quite soft and blurry at full rez can be carefully treated to preserve detail as it is downsized for the web. This picture of a Kestrel and a Flicker was extremely soft and muddy.
http://www.jayandwanda.com/birds/hawks/AKestrel_GildedFlicker_6796_MMPKAZ.jpg
It was taken from a very long distance (I think I estimated 200 meters) through a disturbed atmosphere and at too great of a magnification. It will never make a nice 8x10 or even 5x7 print, but it still makes a decent web-sized image if processed carefully.
 
Last edited:
Tracker i use manual focus(set the manual setting up to infinity )then you only have to focus the scope.Try taking something that does'nt move eg chimney pot etc.all my pictures that are digiscoped have to be sharpened in photoshop sometimes quite heaverly eg 230-2.1.And as KC says some day you get good shots but often you dont.The reason the result look ok on the monitor is because the camera sharpens them.When they first appear on the monitor they are a bit soft but after a second they sharpen up,dont know why this happens.I use an extenda view and once you get use to it it brilliant,cant take pictures with out it now.Let us Know how you get on.
 
Jay Turberville said:
You don't mention the magnification that you use or the lens settings. You also didn't post an example..

Hi Jay,

Generally, i use the scope zoom set to around 30x and fluctuate the optical magnification of the camera from lowest to highest. As an example, here is a picture i took yesterday:

Focal length: 32mm, Aperture Priority, ISO 100, AF Mode: AF-S, Digital zoom:1,
Sharpening:Auto

I think your idea for practicing before going out into the field is a very good idea. I am limited living in an Apartment/flat, but still try to practice.

When i do review the picture taken, and zoom in using the digital magnification they always look so sharp, mis-leading me into thinking all is fine.

Thanks for such a detailed reply and the suggestions Jay.

Ragna said:
Tracker i use manual focus(set the manual setting up to infinity )then you only have to focus the scope.Try taking something that does'nt move eg chimney pot etc.all my pictures that are digiscoped have to be sharpened in photoshop sometimes quite heaverly eg 230-2.1.And as KC says some day you get good shots but often you dont.The reason the result look ok on the monitor is because the camera sharpens them.When they first appear on the monitor they are a bit soft but after a second they sharpen up,dont know why this happens.I use an extenda view and once you get use to it it brilliant,cant take pictures with out it now.Let us Know how you get on.

I like that suggestion, Graham, using the manual focus, and set to infinity. Like ive said before, its rather reassuring to know that even you have bad shots, but when the good one comes along, it sure is worth waiting for. Does the extenda view over-magnify the LCD monitor the same as a slide viewer? Cos i think that would take some getting used to.

I must admit, i need to take stock regarding the best setting in the focus options of this cp4500. So any further pointers will be great..... :t:

I hope the link ive included shows up. Its the first time ive added a picture like this. The piccie ive included has had no editing done to it. Its as it came once uploaded from the cam. Ive posted a few pictures from the same batch into my gallery here at BF. They had some slight editing applied.

Really appreciate your help on this, Graham and Jay,

thanks,

tracker
 

Attachments

  • Male-Stonechat.jpg
    Male-Stonechat.jpg
    25.8 KB · Views: 246
  • Female-Kestrel1.jpg
    Female-Kestrel1.jpg
    49.9 KB · Views: 248
Last edited:
tracker said:
Hi Jay,

Focal length: 32mm, Aperture Priority, ISO 100, AF Mode: AF-S, Digital zoom:1,
Sharpening:Auto
tracker

OK - so that equates to a 4600mm focal length. Hardly low magnification. I sometimes wonder if the real benefit of the CP990 is that it makes it less likely that people will use this much magnification. If I use this much magnification, I dont' expect sharp results. Not only is it pushing the limits of the optics, but it is typically used to compensate for the distance to the subject. So air conditions become a bigger factor as well. I can demonstrate such turbulence affecting fine detail at distances as short as 15 meters. So at 50 meters things can get really ugly and you are really shooting craps at 100 meters.

The Kestrel and Flicker that I posted previosly were at an equivalent of 5100mm. A bigger stretch than your 4600mm, expecially since it is a 5MP camera. I had zero expectation of coming away with a nice image. Keep it below 3000mm and I think things will improve. Use an even lower magnification if possible. Face it. 2000mm is a darned long lens. Lets not be greedy. :)

When I walk out on the trail with my rig set up, it is sitting at around 1200mm equivalent - about as low as it goes. The camera will let me zoom to 1700mm. If need more reach I'll zoom the scope to 30x and reach 2500mm equivalent or so. If I go beyond that, I expect to get lower image contrast and less sharpness - just like that shown in the images you posted. At this point I know I'm shooting just to make the record or with the idea of having a decent web-sized image or if I'm lucky, something that will look OK as a 5x7. 3000mm is probably a more reasonable cutoff point for 4MP cameras.

There is the occasional exception where the morning air is exceptionally still, but by and large I have found this 2500-3000mm equivalency to be a good indicator of diminishing returns.

I don't know if the images you posted are crops or if they have been resized. But they apear to have been re-jpegged, so the mods I did will suffer a bit. But the iamges aren't as bad as you might think. You need to understand what has happened to them. Most AT80HD images are slightly yellow (from what I've seen posted). A yellow cast is usually perceived as dull. You've pushed the limits, so you also have low contrast and probably a bit of a atmospheric fog/haze/turbulence that you need to cut through. So I adjusted the color balance to be more neutral and then adjusted the curves to try to make dark areas dark and light areas light. These two changes alone improved the look dramatically by reducing the apparent affect of the "haze" and yellow cast. And the final step which I tend to overdue was to sharpen (luminosity channel only in LAB color space) - though I did use Hue/Saturation to minimize the slight purple fringe in the Kestrel. http://www.jayandwanda.com/digiscope/tracker/Male-Stonechat.jpg
http://www.jayandwanda.com/digiscope/tracker/Female-Kestrel1.jpg

If you are going to shoot at these magnifications, you'll probably want to practice using Photoshop (or something similar) as well.
 
Hi Jay, ive not looked at the re-workings of my pictures you did, yet....im just about to. The Stonechat hadnt be touched at all. The kestrel was, slightly.

I really would like to know how you work out what length (or the equivalent) i was shooting at, when you say 4600mm. How did you know that, and whats the principle for working out for myself what the focal length is....especially when im out?

Thanks again,

tracker
 
Jay, they are pretty amazing. What Photoshop did you use?

Ive just remembered, neither of those clips i added above were edited......you got them raw.

I have tinkered with Photoshop Elements 2, and learning all the while. This you can see with my picture included here: http://www.birdforum.net/pp_gallery/data/527/5499Male-Stonechat1.jpg

Whats your appraisal of this picture, i dont mean composition or anything, but how i used Photoshop Elements 2 with it?

Much appreciated,

tracker
 
tracker said:
I really would like to know how you work out what length (or the equivalent) i was shooting at, when you say 4600mm. How did you know that, and whats the principle for working out for myself what the focal length is....especially when im out?
tracker

I used my online digiscoping calculator:
http://www.jayandwanda.com/digiscope/digiscope_calc.html

But that is hardly necessary.

Your CP4500 is about a 150mm equivalent at full zoom. So multiply that by 30x and you get 4500mm. Close enough.

In the field, you should just remember that 2x is about half of 4x or 75mm equivalent. 3x is halfway between the two, or around 112mm. Just multiply by the scope power.

Or easier still, use the camera in macro focus mode and don't zoom so far out that the flower changes from yellow to white. And don't use anything beyond 30x. That is what many people have found works well through trial and error. No calcs needed.

The idea is to figure this stuff out ahead of time so you know when you've gone past the limit of what is likely to give you good results. That is part of what practicing can help you with. You can get to know how your equipment performs while you are in a relaxed and no-stress situation.
 
Last edited:
I used Photoshop 7.0. I'm sure that the same, better or similar results can be obtained with many different programs.

I think your picture looks fine. I'd probably sharpen it a bit more. But then I'm probably guilty of tending to oversharpen. Consider this part of the creative interpretive process. Akin to printing the image.

Remember that you can't add detail that wasn't in the original. However, you can often remove information that hides or obscures detail that is in the original and you can alter how the original values are mapped across the range of possible pixels.
 
Jay, you have given me some very sound and very practical suggestions and explanations. I cant thank you enough for the time you have given me, both in this thread and others.
Your expertise is so appreciated.
Regarding the 'figuring stuff out ahead of time', i think this suggestion is so important. Im gonna spend more time allowing what ive learnt to digest and assimilate it into how i function when in the field.

Much appreciative of all your help,

Thanks again,

tracker
 
Tracker not yet read Jay's posts but i noticed you said digital zoom 1,if you've got your digital zoom on turn it off it will tell you how in the manual.if you dont its very easy to go into digital zoom and even at low digital zoom your pictures will be soft.Digital zooms on all digital cameras are rubbish dont know why the makers put them on in the first place.
 
Ragna said:
Tracker not yet read Jay's posts but i noticed you said digital zoom 1,if you've got your digital zoom on turn it off it will tell you how in the manual.if you dont its very easy to go into digital zoom and even at low digital zoom your pictures will be soft.Digital zooms on all digital cameras are rubbish dont know why the makers put them on in the first place.

Thanks for the reminder, Graham. I actually don't deliberately go into digital zoom, it must be accidental, cos ive heard it doesnt play a part in actually increasing the magnification of the shot. But i wasnt aware it could be turned off. Great suggestion, thanks.

tracker
 
Tracker,

Here's a note of the CP4500 camera settings I use. I find my best results are if I can pre-focus the scope before attaching the camera (i.e a rather static subject). The autofocus then (usualy) grabs the image ok. The main influences on end quality in these cases are light, weather and distance. I also employ an Extend-a-View magnifying loupe, and find that I can use this to refocus with the camera in place.

Shooting Menu
White Balance – Auto.
Metering – Spot.
Continuous (camera will continue to take photographs as long as the shutter release is depressed).
Best Shot Selector – Off.
Image Adjustment (Contrast) – Normal.
Saturation Control – Normal.
Image Quality – Fine.
Image Size – 2272 x 1704.
User Setting – None Set.
Image Sharpening – Normal.
Lens – Normal.
Exposure Options: AE Lock – Off, Exp +/- 0.0.
Focus Options: Autofocus Area Mode – Auto, Auto Focus Mode – Single Auto Focus, Focus Confirmation – On.
Zoom Options: Digital Telephoto – Off, Start-up Position – Off, Fixed Aperture – Off.
Speedlight Options: Variable Power – 0.
Auto Bracketing – Off.
Noise Reduction – Off.

Setup Menu
Auto Off – 30 Minutes.
Shutter Sound – Off.

Other settings
Speedlight – Manual.
Setting Exposure – Manual.
Focus Mode – Macro.
ISO – 100 or 200 (depending on the time of year and the look of the weather).

Digiscoping can be a bit of a mixed bag, often very frustrating, but you occasionally get that good result. Best of luck.

Regards,
Graham.
 
Hi Graham,

Thanks a bunch for taking the time to share this info with me.
By the looks of things, i have my cp4500 set up pretty much the same as you. I dont use Continuous shot mode yet, but will try it. Ive just adjusted my focussing mode to: AF Area Mode, Manual
S-AF: Single AF
Focus Confirmation: On
Also, ive just disabled Digital magnification.

So im looking forward to giving these new settings a run in the field.

Thanks to for your encouragement............. :t:

tracker
 
Warning! This thread is more than 20 years ago old.
It's likely that no further discussion is required, in which case we recommend starting a new thread. If however you feel your response is required you can still do so.

Users who are viewing this thread

Back
Top