• Welcome to BirdForum, the internet's largest birding community with thousands of members from all over the world. The forums are dedicated to wild birds, birding, binoculars and equipment and all that goes with it.

    Please register for an account to take part in the discussions in the forum, post your pictures in the gallery and more.
ZEISS DTI thermal imaging cameras. For more discoveries at night, and during the day.

Black & White bird exposure... (1 Viewer)

George London

Well-known member
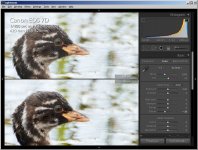
How should I expose for shots of black and white birds?

I took some pics of black grouse the other day, and other than constant battle with lack of light I struggled to get contrast/def in both white and black feathers at the same time.

They are under-exposed. I mostly got the contrast in the white feathers but some of the dark feathers are simply blacked out and as soon as definition in the blackest feathers starts showing well the white is overexposed. It's a kind of theoretical question because i never had enough light to over-expose anyway! (Or maybe I'm 'high ISO shy'. To really freeze everything i needed bare min of 500th with IS on tripod).

Understand that individual circumstances will always affect and there won't be a simple answer but any general pointers much appreciated.

I should say when the sun did (eventually...) hit them harsh shadows probably contributed to the problems. Background moor/field no sky. Was using eos 1dmkiv and canon 100 -400.

Thanks! George
 
Wish there was a professional in forum that specializes in backlit penguins.

Following the trend that says "expose to right" or over expose to bring out nuances of dynamic range of digital sensors. Would try to over expose two thirds, maybe a full stop, then as insurance bracket downward, George.

As you say, very dynamic subject to begin with. Throw celestrial and enviromental factors in there, thats a tough shoot.

Worst part is, heard many times for all black or all white birds 2-3 stops EV comp either direction may be required. Your trying to split the difference. Thats biggest reason I offer suggestion of a bit of over exposure at first, following up with lower EV comp. Multiplicity of shots to cover yourself. Best of luck.
 
I always expose for the whites and then bring the black up selectively in processing. If you try to get the blacks right in Camera then the whites will be blown.But as is pointed out above always shoot as much to the right as you dare without completely blowing the whites (RAW gives you a bit of wriggle room).
 
Very helpful indeed, thanks so much...

I am quite 'green' when it comes to processing and aware I am probably not getting nearly the best out of it so thanks for highlighting/reminding... another thing to add to the ever growing list of techniques to improve!
 
Is this your website Mr Birdman? I love it!

I have already read this article... It's great and I'm pretty excited to test it out for myself, particularly with the mkiv. So either way thanks for sharing... If you wrote it more thanks! It's annoying that I don't fully understand all of this... 'good' signal vs 'bad' signal, but I suppose that will come with time if I can put the principles of ettr combined with high ISO into practice and make it work!

Thanks again Mr B. George
 
Expose for the highlights and develop for the shadows. If you have fairly steady lighting then try shooting with manual exposure so that you can tweak the exposure for perfection and then lock it, allowing you to reframe your shot as you like without having the exposure jump around. Shoot raw so that you preserve the maximum dynamic range the camera is able to record.

Here is an example from today of a bird with black/white plumage in bright sunshine. Firstly I show it with no edits at all, with the histogram showing an exposure which is safe from clipping at both ends of the tonal scale, although the breast looks very bright and lacking detail. The second copy is the same shot at 100% with the exposure dropped by 2 stops just to show that the detail is all there. The choice of what use to make of that detail is up to the photographer. Had this been shot to JPEG the breast would have been a plain white washout.

The third example is just to illustrate identical exposure settings for a different subject, but in exactly the same lighting. Manual exposure meant the exposure was locked into place and I was basically set up to shoot pretty much any type and tone of subject which entered my "hot zone". It is a touch bright, but no detail is lost and better to ETTR and reduce brightness in post than to underexpose and increase it in post.

I could have had a magpie or a penguin in front of the camera, or a whole colony of them and the exposure would have captured everything I needed from which to craft the finished shot. If I wanted to perform no adjustments in post then maybe dropping the exposure by 1/3 stop would have been sufficient, but I'm quite happy here that I have ETTRd and lost nothing.
 

Attachments

  • 20120817_190737_000.jpg
    20120817_190737_000.jpg
    98.1 KB · Views: 141
  • 20120817_190918_000.jpg
    20120817_190918_000.jpg
    108.5 KB · Views: 112
  • 20120817_191549_000.jpg
    20120817_191549_000.jpg
    99.2 KB · Views: 133
Tim thanks very much for your response and photo examples - they are really useful.

I actually always shoot manual now simply because i figure its the easiest way to get the exposure correct (not that I'm saying it is easy, just easier!).

So when you reduce the exposure do you apply it only to the white portion of the pic? I have a lot to learn about photoshop. By the way I read with interest your advice on ETTR on an older thread - and have found it very useful indeed so thanks for that too!

George
 
Thanks for the thanks. :)

Really my post processing depends on just whatever is necessary for the aesthetic effect I want. I might pull the highlights down only or anything within the whole tonal range. If you overexpose by deliberate ETTR it can leave your blacks looking a little pale, which reduces contrast and robs the picture of punch. Often there is nothing better than deepening the blacks to give the image a bit more of a kick, so long as your highlights stay bright. Sometimes I will knock the midtones down by half a stop or so, but keep the highlights bright, thus stretching the contrast in the highlights and making the detail there more evident without dimming the entire image. Lightroom 4 give a lot of nice, easy control to do just that.

Sometimes when I know I've shot "bright" I will just let Auto Tone have at it in Lightroom and see what it makes of the scene. Sometimes it works well, sometimes it is overdone, sometimes it's just plain wrong and sometimes it gives a closer starting point from the original capture from which point I can then do my fine tuning.
 
Hmmm! I seem to have lost the ability to edit my own post. Here's an example from yesterday which was shot ETTR and the only tweaks were to sharpening and the black level. This has increased punch/contrast without messing with the highlights, which in my view were just fine.
 

Attachments

  • 20120820_184634_000.jpg
    20120820_184634_000.jpg
    120.7 KB · Views: 142
  • 20120819_113028_6769_LR.jpg
    20120819_113028_6769_LR.jpg
    215.8 KB · Views: 108
Warning! This thread is more than 12 years ago old.
It's likely that no further discussion is required, in which case we recommend starting a new thread. If however you feel your response is required you can still do so.

Users who are viewing this thread

Back
Top