• Welcome to BirdForum, the internet's largest birding community with thousands of members from all over the world. The forums are dedicated to wild birds, birding, binoculars and equipment and all that goes with it.

    Please register for an account to take part in the discussions in the forum, post your pictures in the gallery and more.
ZEISS DTI thermal imaging cameras. For more discoveries at night, and during the day.

7dmark 2 EF 300mm F/2.8 II EF IS L (1 Viewer)

kim

Well-known member
I have the 7d with the 300mm f2.8 lens which I have had for a couple of weeks. My normal lens is the 400mmf5.6. With the 300 I use a tripod and the results are so variable. Close up bird images are really fabulous with great depth of field, accurate colour and really sharp. But if I take birds further away coastal shots etc they look washed out, just not quite right. Would be so appreciative if anyone could advise where I am going wrong. Don’t have any such problems with the 400.i usually set the 7d on AV. A1servo. But am not too sure about the lens settings.
Many thanks
 
Bit baffled with that one! I have the Canon 300 F2.8 L IS Mk1 and it is simply a superb lens - your Mk2 is just even more of the same - probably the best lens available in this range.

Just a thought, what metering mode are you using? I use "Partial" metering (mostly) or "Center Weighted" and do not experience this problem (yet?!?).

P.S. If the birds are flying then remember keep the shutter speed up and turn IS off.
 
Hi John, thank you for your reply, yes I am using the same metering as you, partial mostly and shutter speed around 1000. I will upload later a couple of examples. The problem is mainly when it is sunny, and I wondered if it was something to do with it being such a wide lens compared to my 400 f5.6. . ...I always have the hood on !!!
 
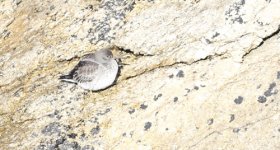
purple sand.jpg
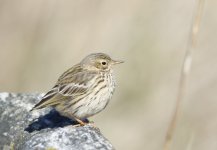
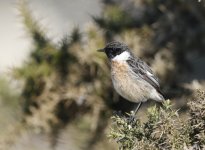
I attach 3 pics, unedited apart from crop. The furthest away was the sandpiper and the closest was the Stonechat..

Your opinion would be appreciated.

Kim
 

Attachments

  • meadow pip.jpg
    meadow pip.jpg
    107.8 KB · Views: 203
  • stonechat.jpg
    stonechat.jpg
    152.5 KB · Views: 268
View attachment 654966
I attach 3 pics, unedited apart from crop. The furthest away was the sandpiper and the closest was the Stonechat..

Your opinion would be appreciated.

Kim

I use same lens as John and never have any issues, your lens is even better. To me the first one is over exposed, how are you processing them as it would easily be corrected if shooting RAW. I think it may help if you could post the shooting info for each image.

Phil
 
The exif data should be available on each one as I used "Save as" I know the sandpiper is over exposed, it is dreadful and I took the same bird with my other lens in same conditions and it was much better.
For the SP Ex time 1/8000
Aperture 3
F2.8
iso 1000
White bal auto
M Partial
A Priority
Adobe RGB
Exposure -1
 
I have the 7d with the 300mm f2.8 lens which I have had for a couple of weeks. My normal lens is the 400mmf5.6. With the 300 I use a tripod and the results are so variable. Close up bird images are really fabulous with great depth of field, accurate colour and really sharp. But if I take birds further away coastal shots etc they look washed out, just not quite right. Would be so appreciative if anyone could advise where I am going wrong. Don’t have any such problems with the 400.i usually set the 7d on AV. A1servo. But am not too sure about the lens settings.
Many thanks
Hi Kim,

I have a friend who shoots with your exact rig (7D2 and 300/2.8 II) though almost always with the 2x TC III attached. The sharpness and clarity of images is outstanding - I'm very jelly. Where possible he shoots from a tripod or bean bag support with Mirror Locked Up and time delay, though even when shooting offhand the results are superb so it doesn't seem to make too much difference - just allows slower shutter speeds on stationary targets with lower ISO too when using the supports.

I'm only looking at your images posted in this thread on my HD screen phone (Samsung Note 3), but they just don't look sharp ? I will leave it to fellow users to help you sort settings, I just thought it would be useful to let you know that the combination is superb.

Your case will possibly come down to the IQ of the copy you have, setup (ie focus fine tune), settings, or shooting technique. Don't forget too that in a coastal setting that the longer the distance to the subject the more atmospheric haze and crud will degrade the image. I should mention too that my friend always works with the light, and aspect, and gets as close as possible, and tries to choose clear days with the best seeing.

Good luck! :) :t:


Chosun :gh:
 
How much of a crop did you use on those images? Assuming that you didn't crop very much then I would expect sharper results - perhaps there is a focus micro adjustment issue?

Naturally there is a limit to how much you can crop and still get good IQ. On subjects like Stone chats I struggle with my 800 mm!

I would suggest trying a bit (bit more?) of exposure compensation, but if those are really heavy crops then that may explain the softness of the images.

My 7D2 has expensive tastes lens-wise and it is good (but not great) with lenses like my 100-400 Mk2 - however it loves "Big Whites" and gives great results with mine which is why I am a little surprised at the soft images as your 300 F2.8 Mk2 is sharper than any telephoto that I have.

Could you post the un-cropped images so we can get an idea of the size of the subject in frame?
 
Have you done a micro-adjustment for focus on that particular lens combo?

EDIT. I notice it's got IS. Have you turned the IS off when on the tripod? My apologies if this is a daft question. Unless you use the tripod setting for AS it's more of a nuisance than a help if it's activated.
 
Last edited:
Have you done a micro-adjustment for focus on that particular lens combo?

EDIT. I notice it's got IS. Have you turned the IS off when on the tripod? My apologies if this is a daft question. Unless you use the tripod setting for AS it's more of a nuisance than a help if it's activated.
Hi, yes I did turn the IS off!! Not a daft question at all, it is the sort of daft thing I would do!!

Micro adjustment for focus??
 
Last edited:
Hi Kim,

I have a friend who shoots with your exact rig (7D2 and 300/2.8 II) though almost always with the 2x TC III attached. The sharpness and clarity of images is outstanding - I'm very jelly. Where possible he shoots from a tripod or bean bag support with Mirror Locked Up and time delay, though even when shooting offhand the results are superb so it doesn't seem to make too much difference - just allows slower shutter speeds on stationary targets with lower ISO too when using the supports.

I'm only looking at your images posted in this thread on my HD screen phone (Samsung Note 3), but they just don't look sharp ? I will leave it to fellow users to help you sort settings, I just thought it would be useful to let you know that the combination is superb.

Your case will possibly come down to the IQ of the copy you have, setup (ie focus fine tune), settings, or shooting technique. Don't forget too that in a coastal setting that the longer the distance to the subject the more atmospheric haze and crud will degrade the image. I should mention too that my friend always works with the light, and aspect, and gets as close as possible, and tries to choose clear days with the best seeing.

Good luck! :) :t:


Chosun :gh:
Thanks for your reply. I do get many superb images with this combination it is just in this particular type of setting where I have problems,,, and yes you are right I think the sea and sun created a difficult atmosphere.
It was impossible to get close to these birds as they were on rocky areas in the sea and there was a 50km gale.
 
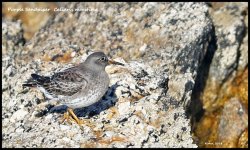
I have edited one or two and it is possible of course to improve them/ As I have said the conditions were pretty terrible, sun, wind, sea and difficult territory for an oldie to move easily about. This is an edited one
 

Attachments

  • _11A6338.jpg
    _11A6338.jpg
    378.6 KB · Views: 186
How much of a crop did you use on those images? Assuming that you didn't crop very much then I would expect sharper results - perhaps there is a focus micro adjustment issue?

Naturally there is a limit to how much you can crop and still get good IQ. On subjects like Stone chats I struggle with my 800 mm!

I would suggest trying a bit (bit more?) of exposure compensation, but if those are really heavy crops then that may explain the softness of the images.

My 7D2 has expensive tastes lens-wise and it is good (but not great) with lenses like my 100-400 Mk2 - however it loves "Big Whites" and gives great results with mine which is why I am a little surprised at the soft images as your 300 F2.8 Mk2 is sharper than any telephoto that I have.

Could you post the un-cropped images so we can get an idea of the size of the subject in frame?


Hi this is one of the originals uncropped,as you can see it was not easy territory so I could not get any closer and it was very windy.
 

Attachments

  • original.jpg
    original.jpg
    634.2 KB · Views: 97
Hi, yes I did turn the IS off!! Not a daft question at all, it is the sort of daft thing I would do!!

Micro adjustment for focus??


It could be that it was just luck that your camera and the 400 5.6 were working well together. Mine worked fine with my 400 5.6 out of the box without any adjustment.

When I bought a Sigma 150-600 Sport in 2015 I found that there was a degree of softness and further examination showed that it was back-focusing.

The 7d and 7DII allow this to be calibrated out in the camera (older models needed to be sent off for calibration).

For each lens you have (or lens and TC combo) fit the lens to the camera then go into the menu. On the last page of the AF section (in violet) the bottom item is 'AF Microadjustment'. Make sure this is 'ON'.

Then go out and with your camera preferably on a tripod set the exposure either to Manual and expose with the aperture wide open, or on AV, again with the aperture wide open.

When you click onto the Microadjustment setting it takes you to another screen, which tells you what lens you are using and then allows you to check and set the focus point either forward or backward until it coincides with the focus point in use in the camera.

Press the button 'Adjust by lens' on the second screen (by pressing 'INFO' - the 'set' button just takes you back too the previous screen).

You are then presented with a scale (or two scales in the case of a zoom lens) that allows you to adjust the focus forward or back in increments from minus 20 to plus 20, with the centre setting, zero, being no adjustment.

You can used printed focus scales and such, but for long lenses I find a barbed wire fence and a business card, or some other nice contrasty printed image works best.

The barbed wire is handy because the spaced out barbs lets you know at a glance whether your combo is right, is rear-focusing or front focusing.

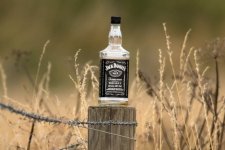
Set up near a barbed wire fence with wire on your side and looking along the fence. Pin a business card, or something else flat and contrasty to a fence post about 30m away. Last time I did it I used a Jack Daniel's bottle because it has a flat face and contrasty print.

Then it's just a matter of taking photos, remembering to defocus and refocus before each shot, of the target on each microadjustment setting from -20 to +20, or -10 to +10 (or whatever, it's up to you), then go home and look at the images on your computer.

Pick the one that looks the best, using the barbs on the fence as a guide as well as the crispness of the print and use that setting from then on. The settings are retained by the camera, so if you switch lenses it knows which settings to use for that lens (or TC).

It sounds more complicated than it is. It takes about 20 minutes in the field and ten minutes on the computer to do the job. (I found that +4 was what my Sigma needed)
 

Attachments

  • IMG_7098-+4-(best)-fbook.jpg
    IMG_7098-+4-(best)-fbook.jpg
    185.5 KB · Views: 182
Last edited:
It could be that it was just luck that your camera and the 400 5.6 were working well together. Mine worked fine with my 400 5.6 out of the box without any adjustment.

When I bought a Sigma 150-600 Sport in 2015 I found that there was a degree of softness and further examination showed that it was back-focusing.

The 7d and 7DII allow this to be calibrated out in the camera (older models needed to be sent off for calibration).

For each lens you have (or lens and TC combo) fit the lens to the camera then go into the menu. On the last page of the AF section (in violet) the bottom item is 'AF Microadjustment'. Make sure this is 'ON'.

Then go out and with your camera preferably on a tripod set the exposure either to Manual and expose with the aperture wide open, or on AV, again with the aperture wide open.

When you click onto the Microadjustment setting it takes you to another screen, which tells you what lens you are using and then allows you to check and set the focus point either forward or backward until it coincides with the focus point in use in the camera.

Press the button 'Adjust by lens' on the second screen (by pressing 'INFO' - the 'set' button just takes you back too the previous screen).

You are then presented with a scale (or two scales in the case of a zoom lens) that allows you to adjust the focus forward or back in increments from minus 20 to plus 20, with the centre setting, zero, being no adjustment.

You can used printed focus scales and such, but for long lenses I find a barbed wire fence and a business card, or some other nice contrasty printed image works best.

The barbed wire is handy because the spaced out barbs lets you know at a glance whether your combo is right, is rear-focusing or front focusing.

Set up near a barbed wire fence with wire on your side and looking along the fence. Pin a business card, or something else flat and contrasty to a fence post about 30m away. Last time I did it I used a Jack Daniel's bottle because it has a flat face and contrasty print.

Then it's just a matter of taking photos, remembering to defocus and refocus before each shot, of the target on each microadjustment setting from -20 to +20, or -10 to +10 (or whatever, it's up to you), then go home and look at the images on your computer.

Pick the one that looks the best, using the barbs on the fence as a guide as well as the crispness of the print and use that setting from then on. The settings are retained by the camera, so if you switch lenses it knows which settings to use for that lens (or TC).

It sounds more complicated than it is. It takes about 20 minutes in the field and ten minutes on the computer to do the job. (I found that +4 was what my Sigma needed)


That really is so helpful of you, thank you very much, and I am really eager to try this out as soon as I am home. At the moment I am on holiday in Brittany, France.

I shall make this my first job when I return home in 10days. Thank you again.
 
HI Kim

The biggest issue I can see if you struggle with image quality is the enormous crop (of that sandpiper in pane #13).
You will not get good quality images, even for web, if you keep your subjects that small in the frame, then crop. It appears, that there are a lot of folks online who think they can crop lots due to a camera having a high megapixel count then are surprised if they cannot get good results. I, personally, try to ensure the bird fills at least 50% of the frame, if not more. Also, again it is a very personal thing, I hate cropping, so I tend to try and minimise the shots I take where I have to crop. If I crop, I keep it as small a crop as possible to get the best possible detail and IQ in every image.

Another important thing that determines your image quality is how the file is recorded. I have learned long ago to shoot to the right of the histogram. All that exif data you have provided in pane #6 adds little value, as no one can see how well the original exposed image is by viewing the histogram. Only you can tell. Shooting to the right means you push your histogram as far right as possible during the exposure while maintaining good control of white tones by not burning them. A few small blinkies are fine, as the LCD review image is not a raw file, but a small review jpeg generated for review as far as I am aware. Essentially, your image will look overexposed, washed out, but you pull exposure back (reduce) during file conversion to how you remember the scene was and it will make a huge difference to image quality as well and you can shoot at very high ISOs and keep a good handle on digital noise. In any case, I never had issues with a few small blinkies, as once in a RAW file viewing program like ACR (Adobe Raw Converter), Lightroom (I don't use it as I don't like it) or any other that allows you to check exposure properly, will not show overexposed highlights. The only time I opt to blow highlights/whites is when I am shooting a dark subject against a white sky (overcast sky) and I want detail on the bird, not in the boring white sky.

Incidentally, I never turn IS off, even when I use a tripod or shoot faster shutter speeds. It is just one more thing to "forget" to switch on when needed and all Canon super teles work well with IS on all the time. I have an EF 500mm f/4L IS USM (first generation), which I incidentally just sold on E-bay yesterday, and the only time I have ever turned the IS off was when shooting video. That I do rarely. And guess what? At first, I usually forget to turn IS OFF!!!! :-O It's easy to forget in the heat of the moment.

I would suggest you go and buy a proper calibration tool that will give you the most accurate results.

I do take off my hat for home made alternatives, but considering you have spent thousands of pounds on this awesome lens, you ought to get the best tool for the job and it is a very small expense when you compare it to the cost of the lens itself. Even borrow one if you have friends who have it.

Happy shooting |8)|
 
That really is so helpful of you, thank you very much, and I am really eager to try this out as soon as I am home. At the moment I am on holiday in Brittany, France.

I shall make this my first job when I return home in 10days. Thank you again.
Yes, a very nice summation of an easy method for checking calibration, though you might also consider doing the job with a proper tool as suggested by Mr Birdman. This AF microadjustment is what I meant by "focus fine tune" in my post. If you use a TC you would have to have that attached too at the time of testing and calibration.

If you can make a change for the better great, but even if you make no change then at least you have confirmed the focus point and therefore eliminated one variable in the quest for better images. Good luck!


Chosun :gh:
 
Many thanks for all the helpful advice and suggestions. I think that the main problem was probably because I was just too far away, it was impossible to get any closer without falling off a cliff!! When I return home I will do as suggested and get a calibration tool.

Once again, many thanks for all your help;.
 
One other thing is on an obviously bright and sunny day why would you need 1000 iso? I'd knock mine down to 100....
 
Warning! This thread is more than 6 years ago old.
It's likely that no further discussion is required, in which case we recommend starting a new thread. If however you feel your response is required you can still do so.

Users who are viewing this thread

Back
Top