• Welcome to BirdForum, the internet's largest birding community with thousands of members from all over the world. The forums are dedicated to wild birds, birding, binoculars and equipment and all that goes with it.

    Please register for an account to take part in the discussions in the forum, post your pictures in the gallery and more.
ZEISS DTI thermal imaging cameras. For more discoveries at night, and during the day.

First day with Fuji F31fd (1 Viewer)

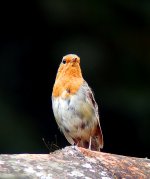
Just had a week away on holiday with the wife and kids and had no time for digiscoping but I packed the scope anyway just in case. I was glad I did as I managed a pretty nice shot of a Robin on the last day of my holiday. Didn't have time to set the camera up so it was just mounted quickly to the scope and taken on auto without zooming in or anything. Cropped and sharpened in Photoshop, nothing else done. Not had much time with the camera yet but I think it's great considering what it costs.

Paul.
 

Attachments

  • Robin.jpg
    Robin.jpg
    162.7 KB · Views: 326
Here's a photo of how I have my F31 set up. I spent a couple of hours getting the FoxFoto adapter set up dead square and did a load of test shots until I was happy. Then I sealed up all the moving parts with something called liquid metal which dries rock hard and is just like welding up all the joints. The step ring is also sealed into the adapter. Basically the only part that can move is the camera which fits on the adapter via it's tripod mount. The camera is easily set up square by gauging the sharpness of the camera vignetting ring on the screen and this just takes a second or two. Also the whole lot can be unscrewed from the DCL-28 eyepiece if I need to use the scope on it's own.

Really pleased with this set up as the Optima 60mm scope cost just £18 on ebay. It's around 20 years old but digiscoping performance combined with the DCL-28 easily compares with scopes costing £100's of pounds more. The DCL-28 was given to me as a gift so that saved me around £90. For the scope plus camera plus adapter plus step ring etc I've spent around £170. I had to modify the scope to take the eyepiece and it's permanently fixed in place so I can't swap and change eyepieces but it does everything I need it to do.

Paul.
 

Attachments

  • F31Universal_Lens_Adapter.jpg
    F31Universal_Lens_Adapter.jpg
    44.1 KB · Views: 384
I like that adapter system a lot Paul. Light and simple but looks very effective. Is the FoxFoto adapter only available from ebay?

I'm a big fan of trying to get the best results for the lowest outlay and the results you are getting look very impressive.

Ron
 
I like that adapter system a lot Paul. Light and simple but looks very effective. Is the FoxFoto adapter only available from ebay?

I'm a big fan of trying to get the best results for the lowest outlay and the results you are getting look very impressive.

Ron

There's the FoxFoto website http://www.fox-foto.com/ but when you go to the store section it takes you to another foreign website. I'm pretty sure the main seller on ebay is from the company that makes them though.

Yeah, I'm all for working on a budget too. It's amazing the results you can get for very little outlay. My first scope was a drawtube style made from two sturdy cardboard tubes with a good quality amici erecting prism and a 25mm telescope eyepiece. The 50mm objective lens came courtesy of an old telescope. The results from that scope were pretty similar to those I am getting now.

Paul.
 
Today I did a modification to my scope which was to remove the 60mm air spaced doublet objective lens and replace it with a 50mm cemented achromat I had laying around from an old scope project. The air spaced doublet was giving me too much purple fringing but since changing to the cemented achromat I'm getting no purple fringing at all. There's a slight trade off with less light getting into the camera but the fuji F31 handles that with no problems at all. I was still taking photos on ISO800 or lower at 8.30pm tonight with the sun very low. Here's a test shot taken tonight at 7.15pm on ISO400, range was around 25-30 feet. When funds allow I'll get a larger cemented achromat to replace the 50mm one.

Paul.
 

Attachments

  • Wood-Pigeon.jpg
    Wood-Pigeon.jpg
    77.3 KB · Views: 179
Hi Paul.

That's an impressive image you've posted there. I must admit you've lost me with all the technicalities but I'm enjoying your 'Blue Peter sticky backed plastic' approach to digiscoping (no offence intended.) It's a refeshing antidote to all those people spending a fortune on their Leicas and Swaros. Keep up the good work!

Ron
 
Thanks Ron, I don't think I'll ever get bored of tinkering around wth optics.

All the technical stuff means is that the objective lens at the front of the scope is generally made of two pieces of glass. Sometimes they are separated by a spacer so that there is air between them and sometimes they are glued together very precisely which makes it a cemented achromat. If they are the air spaced variety they have to be spaced apart very exactly and squarely to avoid any chromatic aberration which is the purple fringing.

Paul.
 
Thanks for the explanation, Paul. It makes sense now and definitely seems to be working for you.

Unfortunately the F30 seems a bit prone to purple fringing, although I've found it only affects the outer edges of the image where there is very high contrast, such as branches of a tree against a bright sky. Not really much of a problem under normal circumstances. Apart from that it is a great digiscoping camera, especially with its low light capabilities. I'm now using a 50mm scope so this is very useful for me.

Ron
 
I'm now the proud owner of a Fuji 31FD! I've matched it with my Leica Apo 77and Leica digi mount.

I've been out with it and have taken quite a few pictures with it in a variety of light conditions with "interesting" results. I've just been using the Auto mode at the moment but have also tried the image stabliser mode too.

I'm not sure what range digiscoping is effective to, my attempts at photographing Wood Sandpipers and other waders in bright sunlight at a range of 100yds wasn't too successful !

Any tips very welcome!

Bill.
 
Bill,
Welcome to the F31fd club. One hundred yards is stretching it a bit for a wood sandpiper particularly over water. I've been digiscoping waders returning from the north this week from 35 - 80 metres with not much success. With the high tide it's meant 9 - 12.00 o'clock over water with high heat and humidity. I've had to resort to manual focus as the cameras AF has trouble through the heat haze. At 40 metres I can get passable images for record purposes. I had a ruddy turnstone at 80 metres and I couldn't get a decent image. At sunrise I would have had a better chance before the heat built up.
For best digiscoping results on small birds 10 -30 metres is a good range. Over this and you will have trouble picking up detail on small birds. I did get a reasonable image of spoonbills at 150 yards though.
The Curlew was taken at about 35 yards and the second image from about 100 yards. I tried bracket focus too which gives better results. Neil.

Fuji F31fd plus Swarovski STS80HD scope and Sw 30x eyepiece and DCA adapter.

Mai Po Nature Reserve,
Hong Kong,
China.
Aug 2007
 

Attachments

  • curlew.groom DSCF5363.jpg
    curlew.groom DSCF5363.jpg
    106.7 KB · Views: 171
  • marsh sandpiper DSCF5449.jpg
    marsh sandpiper DSCF5449.jpg
    107.4 KB · Views: 164
I'd definitely go along with the ranges Neil recommends. I've not got any really long range bird examples apart from the Oystercather one below which I took yesterday and that was an easy 100 yards or more but I also did some other long range stuff in the last couple of days. The building in my photo below was around 1 mile away, taken in the evening on ISO 400. The Roe Deer was around 150 yards away after the sun had set and taken on ISO800. The Oystercatchers were ISO200.

The settings I favour after playing with the camera for a few weeks are -

Manual mode
6 million fine
Exposure compensation I vary between -1/3 to -1
White balance set to Shade
I vary between the 3 metering options but I generally use Multi or Spot.
Depending on the time of day I just use ISO Auto 400 or 800. With my scope if it's sunny it generally just uses 100 or sometimes 200.

Paul.
 

Attachments

  • Brownsea-Island.jpg
    Brownsea-Island.jpg
    96.5 KB · Views: 162
  • Roe-Deer-2.jpg
    Roe-Deer-2.jpg
    87.4 KB · Views: 143
  • Oystercatchers.jpg
    Oystercatchers.jpg
    72.4 KB · Views: 139
Bill,

You don't say what problems you are getting – exposure, focusing, camera shake? Is there any chance of posting a sample photo?

Have you set the camera and adapter up so that the vignette (if there is one before zooming in) has a nice sharp outline?

The camera settings I have been using recently and which seem to work for me are:

Macro mode.
6 million fine.
Aperture priority with the aperture at its widest setting (lowest f-number) achievable after zooming in to clear the vignette.
Pattern metering.
Spot focusing.
Auto white point.
Lowest ISO number which still gives a reasonably fast shutter speed.
2 second timer (normally) or final three continuous shooting (occasionally).
Perhaps exposure compensation as appropriate, although remember to reset it after the shot!

You can see some of the results in my User's Gallery.
http://birdforum.net/gallery/showgallery.php/cat/500/ppuser/53267

Ron
 
Ron,

You know you can also use first 3 continuous and timer at the same time. ;)

I must admit i hadn't thought of that. Mind you when a bird is posing for you it's a bit of a performance to set the timer then go into the menu and set the continuous shooting option before each shot. I will bear it in mind though. If only there was a User's Preferences Setting …

Ron
 
Ron,

Many thanks for yours and others' advice.

Ive copied the suggested settings from everyone and will play with them out in the field. I've read the instructions book a lot more (always helps!) and have got myself more familiar with the camera's set up menus. I'm heading to Norfolk on Sunday and hopefully will be able to do some digiscoping then.

I've attached 3 photos none are that sharp and all were taken in bright sunlight and at 75-100yds on the wader scrape at Holland on Sea, Essex (a brilliant place if you haven't been there before!). All were taken with the camera in full auto mode with no adjustments.

It's becoming very clear that it's not just a case of point and shoot but that some thought has to go in to settings on the camera to take into account light, movement and of course what you actually want to achieve from the image.

Thanks once again.
 

Attachments

  • 2007_0729HollandonSea0015.JPG
    2007_0729HollandonSea0015.JPG
    86.4 KB · Views: 141
  • 2007_0729HollandonSea0012.JPG
    2007_0729HollandonSea0012.JPG
    78.7 KB · Views: 151
  • 2007_0729HollandonSea0022.JPG
    2007_0729HollandonSea0022.JPG
    88.3 KB · Views: 118
Last edited:
I've just found something about the use of Macro Mode. If you leave Macro on as you zoom, the camera won't focus (the little Green light flashes ) after about half way in the zoom range. I found if I switched off the Macro after half way the little Green light went steady. Go figure. I've only had this camera for a year and I've just noticed this. Neil.
 
I've just found something about the use of Macro Mode. If you leave Macro on as you zoom, the camera won't focus (the little Green light flashes ) after about half way in the zoom range. I found if I switched off the Macro after half way the little Green light went steady. Go figure. I've only had this camera for a year and I've just noticed this. Neil.

Neil, I'm not sure that is correct. I have just been playing with my F30 without using the scope and have found that it is possible to use maximum zoom in Macro mode and get the solid green light, providing there is sufficient light. However, in a borderline lighting situation the green light will go solid at the widest setting but as you zoom in, the aperture is automatically stopped down and the shutter speed becomes slower to compensate. This leads to the camera shake 'hand' warning being displayed with the flashing green light as an additional warning. I'm not sure how switching out of Macro mode changes the situation but I think this is what is happening.

Try it and see if it works for you.

Ron
 
Last edited:
Warning! This thread is more than 17 years ago old.
It's likely that no further discussion is required, in which case we recommend starting a new thread. If however you feel your response is required you can still do so.

Users who are viewing this thread

Back
Top