• Welcome to BirdForum, the internet's largest birding community with thousands of members from all over the world. The forums are dedicated to wild birds, birding, binoculars and equipment and all that goes with it.

    Please register for an account to take part in the discussions in the forum, post your pictures in the gallery and more.
ZEISS DTI thermal imaging cameras. For more discoveries at night, and during the day.

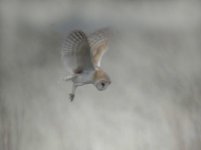
How can I use software to remove vignetting? (1 Viewer)

I had a tinker with it too and I can say 'without a shadow of a doubt' it's a great technique :t:

Thanks Mike
 
Hi Mike:
I am new to this .net and like to thank you for your advice how to remove vignetting masks etc, also new at birding and digiscoping, just started last year spring and lots to learn :)
visit my site and make suggestions please.
www.walther-loff.com
cheers
Walther.
 
Barn owl resized - vignetting

Hi,

I took yor Barn owl pic, and cloned from an area below the owl, and copied it to the vignetted areas , using a soft brush, size 171 pixels, mode normal, opacity 61%, non-qligned, in PS Elements 2, and made no other changes. Here is the result.

Richard
 

Attachments

  • barn owl resized copy.jpg
    barn owl resized copy.jpg
    17.7 KB · Views: 214
I've been lucky enough to be able to crop the vignetting out of most of my photos, but I have used the clone tool on occasion (Photoshop 7) to reasonable effect.

However, I have tried the method described by Mike above and could not get it to work at all. Maybe I was doing something wrong, I don't know. I printed off the instructions and followed them as best I could, but ended up with something that looked worse than the vignetting. Any more pointers as to what I may be doing wrong would be most welcome. I'm not quite sure what is meant by "move them carefully until I have the vignetting eliminated." Where do you move them to and how?
 
To lighten dark areas (ie. vignetting or something in shadow) try selecting the area roughly with the magic wand or the lasso tool, then Select>Feather and put in whatever setting you think you need (you could use the Grow command first). Then press Ctrl + C to copy, then Ctrl +V to paste so you now have another layer on top of your original. Go to your Layers pallet, under the word 'Layers' click on the menu (it should say Normal by default). Alter this to Screen and you should see a difference. You can now use the eraser tool to erase (with a feathered edge brush, change the opacity if neccessary) to remove parts of the top layer. When you've finished, flatten your layers.

If almost all detail is missing (ie almost black) it obviously won't work but you can get excellent results from this method on darkened areas. It takes a bit of messing around with the degree of feathering, tolerance on the magic wand, etc.

I tried it on the barn owl and it pushes the vignetting back a bit, but the top corners are just too dark and will need to have the Clone tool used on them, unless Mike's method works.

saluki
 
Mnay thanks Richard (only just seen your post, sorry) Saluki and everyone else who has helped me on this.
 
Warning! This thread is more than 21 years ago old.
It's likely that no further discussion is required, in which case we recommend starting a new thread. If however you feel your response is required you can still do so.

Users who are viewing this thread

Back
Top