• Welcome to BirdForum, the internet's largest birding community with thousands of members from all over the world. The forums are dedicated to wild birds, birding, binoculars and equipment and all that goes with it.

    Please register for an account to take part in the discussions in the forum, post your pictures in the gallery and more.
ZEISS DTI thermal imaging cameras. For more discoveries at night, and during the day.

Some digiscoping experiments with a dslr (1 Viewer)

Here's a photo showing the set up to better explain it. No lens on the camera, just extension tubes plus either a teleconverter, an eyepiece or a barlow. In either case the principle is the same, the image just projects onto the ccd of the camera and increasing the distance increases the image size.

Paul.
 

Attachments

  • example2.jpg
    example2.jpg
    84.5 KB · Views: 620
Here's a photo showing the set up to better explain it. No lens on the camera, just extension tubes plus either a teleconverter, an eyepiece or a barlow. In either case the principle is the same, the image just projects onto the ccd of the camera and increasing the distance increases the image size.

Paul.

Nice work Paul. Very interesting solution. I like the ability for close focus but I don't like losing light. How much do you lose with this setup?
Neil.
 
Hi Paul, Great work I have also wanted to digiscope with my DSLR but as of yet haven't got round to it and I think that it is a good idea for long range but for shorter distances there is surley nothing better than the SLR's and lenses. Here is a few pics I have got with my Camera recently and I also dout that digiscoping could get the same quality unless you are really good at it which lots of you are but unfortunately that isn't me.
all the best and keep up the good work,
Lee
 

Attachments

  • Robin on wire.jpg
    Robin on wire.jpg
    100.3 KB · Views: 369
  • Robin silohette 2.jpg
    Robin silohette 2.jpg
    30.7 KB · Views: 195
  • Pied Wag.jpg
    Pied Wag.jpg
    197.2 KB · Views: 320
  • Robin on post.jpg
    Robin on post.jpg
    53.5 KB · Views: 289
Nice work Paul. Very interesting solution. I like the ability for close focus but I don't like losing light. How much do you lose with this setup?
Neil.

Here's couple I took today Neil and I've included the ISO and shutter speed used. These were taken with the 2X teleconverter with the 76mm which gives me the most magnification at the moment. These are basically the whole photo shrunk down from 3000 pixels to 800 pixels for posting. Range 15m in late afternoon winter sun so the sun is low in the sky. Sun was mostly behind clouds for the first photo. I'd say ISO400 or 800 would be what I would use the most with the long extension tube. Noise levels seem pretty good on most dslr's up to ISO800 and also 1600 or 3200 on select models.

Also included a test at 80m approx range all taken at ISO200. Started with the 2X teleconverter on it's own and then 3 other photos with 3 different length tubes up to 76mm for photo 4. The teleconverter on it's own or with the 26mm tube will work at around 1/500 at ISO400 in the sunshine.


Lee, with the right set up digiscoping can easily match the quality of a lens at short range. I've certainly got no desire to go out and buy any lenses, plus remember, my scope when mounted direct to the camera is a very sharp and bright F6 768mm lens. The gallery on this site is a good example that there aren't many getting great results from their dslr's + lenses unless spending a lot of money. The only time I put a lens on my camera is for family photos. With a lens you generally need to get within the birds circle of fear which means getting lucky or sitting in a hide. With digiscoping you can hang back that little bit further and still get the results. All I hear from people with lenses is that they wish they could get more zoom. |=)|

Paul.
 

Attachments

  • Robin.jpg
    Robin.jpg
    163.8 KB · Views: 307
  • Robin2.jpg
    Robin2.jpg
    177.8 KB · Views: 352
  • test.jpg
    test.jpg
    142.3 KB · Views: 262
Paul, as I see it, you are using virtually the same methods I employ with my digiscoping, only in a different context.

1) I use extended barrels on the eyepieces. equal to your extension tube. Which reduces the focal distance, and presumably the magnification.
2) I use a 2X barlow which is much the equivalent of the 2x converter.
Given the fact that I enjoy better lighting, I feel you are loosing to much light, the best exposure in your images is when you only use the converter, but still they are very much underexposed, detail and focus is spot on.
You will probably say that you can correct this in Photoshop, I agree to a certain extent, and then the noise becomes a problem, at anything over 1 stop.
I see much better exposed images from your part of the world, from digiscopers with ps cameras
With my Panosonic FZ50 and a 2.2 teleconverter I can get good images at 769mm focal length, but I do better when I attach it to the 80mm scope.
but go ahead and enjoy your fun. Merry Christmas. Ernie
 
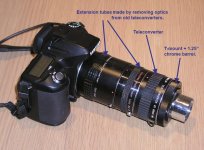
The big difference Ernie is that you are using a ps camera with a lens on and using an eyepiece on your scope. I'm using neither. I'd guess your big eyepiece lets in a lot of light. I don't have any access to low power eyepieces

I can't say that to me my photos are underexposed Ernie. On my monitor they look fine and in Photoshop I generally adjust the levels according to where Photoshop suggests the sliders should go so maybe it's simply down to the difference in the way our monitors are set.

For instance, on my monitor your photos always look too bright/over exposed and way over saturated with colour. I'm sure that's where a big part of the difference is. I'm not saying that just have a go back at your photos, that's just how they look here compared to mine. I'll have a look at my monitor calibration.

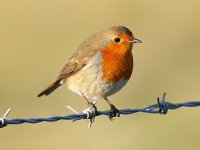
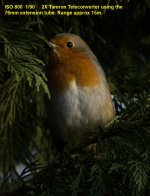
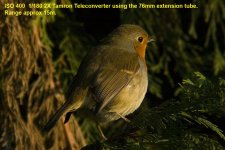
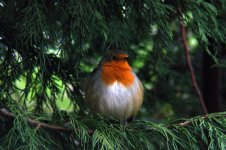
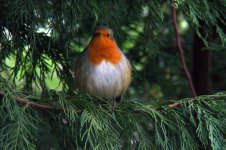
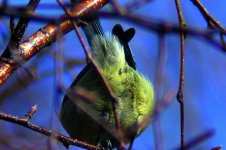
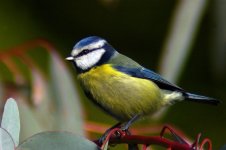
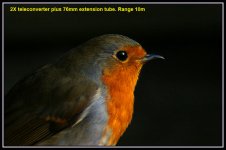
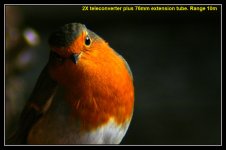
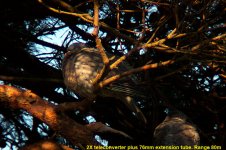
My Robin photos above in my last post are around 3400mm equivalent on a 35mm camera so I think they stand up pretty well as an experiment in magnification. It's not often you would be working in those sort of ranges. I was just doing some tests on something else at the time, saw the bird in a tree and quickly rattled off some photos without even checking how they were for exposure. At the moment I'm not trying to post photos of birds or anything else in this thread that are perfectly exposed, I'm purely trying out various methods for magnification. Once that's done then I'll concentrate on perfecting technique with a chosen set up.

I've tried my old Olympus C-5050 ps camera on this scope and only get around half the light that the dslr gets.

With a dslr you are doing everything in manual so you need to make a spot decision on conditions and quickly go for an ISO and shutter speed that you hope is correct so it's hard to get it spot on all the time, it's purely by instinct. I don't bother using the image preview after every photo so that I get good battery life, especially as it's winter here at the moment and cold weather drains them quickly. That means I may take a load of photos that need work. Shooting in RAW you can correct much more than 1 stop of light.

Take Jose's thread here as an example at the extremes of dslr digiscoping. He's down to around 1/10 sec shutter speeds with his Sony dslr using anti shake and takes excellent photos. The shutter speeds are a bit extreme but in my mind he takes some of the best photos I see posted in the birdforum gallery.

Anyway, not trying to make excuses, just posting an honest thought about the photos I post in this thread.

I'll have a go in the coming days at letting the camera automatically set the shutter speed and see what the results are.

Thanks for your comment Dave.

Paul.
 
Last edited:
Here's three examples taken on auto mode using spot metering and letting the camera work out the shutter speed. On average the speed was 1/20 at ISO800. Early morning and totally overcast so quite low light conditions. I was using the 50mm extension tube with the 2X teleconverter and range was around 20m. I did a couple with the 76mm extension tube and shutter speed dropped to 1/15 so not much difference. In Photoshop I just did auto levels and auto colour. The photos look better than the actual conditions at the time. No anti shake on this camera so pretty good considering. The actual available light to the eye was at least half what the photos show.

Paul.
 

Attachments

  • Robin3.jpg
    Robin3.jpg
    167.6 KB · Views: 292
  • Robin4.jpg
    Robin4.jpg
    138.1 KB · Views: 235
  • Robin5.jpg
    Robin5.jpg
    148 KB · Views: 302
Last edited:
Paul, we are getting off on the wrong foot here, I thank you for your comments, that is what I put my images up here for, I am not looking for nice words, I want to see if my system is working properly, as I am sure you are. The last three images are the best you have posted, much lighter than the others the detail of course is spot on.
I will have to send some images to a couple of my friends to see how they see them. they usually seem ok on mine, perhaps you are correct my system may be out, though I can´t see how that would make your images dark. My intention is not to belittle your system or the quality of your images, but to let you know how I see them, so you can improve on your experiments. My only reason for mentioning my system is to show that I do not get the loss of light that I see in your images, it´s difficult to compare I know, as we have completely different light to work with. Ernie
 
No probs Ernie, it's hard to get a point across in just text alone without using loads of emoticons to lighten the mood.

I downloaded a few of your photos and studied them in Photoshop. Your levels are spot on so I guess my monitor needs tweaking. The colours seem rich and when I chose 'Auto Colour' in Photoshop they did desaturate a little. If my monitor is too bright it will make me darken my photos to how they look ok to me but that will make them look darker for everyone else.

I enjoy your posts as they get me to look at things from different angles. I took this next series using settings on the camera I've never tried before. For these the camera is on full auto for the shutter speed with multi metering although I think spot metering would have been better. I also switched from raw to jpeg and put the camera on continuous shooting. These were all taken using the full 76mm extension tubes plus the 2X teleconverter (3400mm approx). A couple were slightly blurred as the Blue Tit was on a branch that was blowing all over the place but the continuous shooting did a pretty good job of freezing the action. Applied auto levels in Photoshop.

These are the full, uncropped images, just resized to 800 pixels wide for posting. Range varied from around 12m - 20m, ISO400, shutter speed varied between 1/250 and 1/350 so quite respectable using the 76mm extension tube.

Paul.
 

Attachments

  • Blue_Tit_1.jpg
    Blue_Tit_1.jpg
    144.9 KB · Views: 333
  • Blue_Tit_2.jpg
    Blue_Tit_2.jpg
    148.5 KB · Views: 235
  • Blue_Tit_3.jpg
    Blue_Tit_3.jpg
    143.9 KB · Views: 194
  • Blue_Tit_4.jpg
    Blue_Tit_4.jpg
    131.7 KB · Views: 392
Paul, your images are quite dark on my calibrated monitor, so you may want to have a look at your calibration.

Your approach is quite interesting and produces very sharp photographs. Since I already have the DSLR, the teleconverter and the extension tubes, I will order the hardware to attach that to my scope and give it a go.

Thanks for sharing your experiments.
 
I went to a few calibration websites and gave the monitor a good going over. Had a play with a few photos I took this afternoon and they are definitely lighter now that I've adjusted the monitor. Here's a few photos using the teleconverter with the 76mm extension tube. A couple from 10m range and one from 80m. All are uncropped, just resized from 3000 to 800 pixels wide for posting.

Paul.
 

Attachments

  • Robin7.jpg
    Robin7.jpg
    110.4 KB · Views: 288
  • Robin8.jpg
    Robin8.jpg
    88.7 KB · Views: 312
  • Wood_Pigeon.jpg
    Wood_Pigeon.jpg
    142.9 KB · Views: 242
Now your cooking Paul. The shots of the Tits are great as are the recent Robin ones.
The continuous mode is a good one to use, Spot metering seems to be the best one to use generally though Multi AF can help if there are many distracting branches around, if your camera has it, I find continuous AF to work well. Generally speaking I find the auto settings in photoshop to be of little use.Ernie
 
Last edited:
Paul, you've gone the wrong way... your photos are darker than they were.

I've got two version of the first Robin photo that I posted above. One from before I adjusted the monitor and one from after I adjusted it. The one from after I adjusted the monitor is lighter than the first.

I went to various monitor calibration websites and on all of them my monitor is perfect after adjustment, I can see every single shade of grey from black to white and my gamma is correct.

This is an example of one site I tried. See how your monitor looks http://www.photofriday.com/calibrate.php

I also used adobe gamma to set my gamma and it's perfect for grey and colour gamma.

To me my photos look correct for the time of day, actually better than it was which was late afternoon in fading winter sunshine. I just opened the first Robin photo from above and in Photoshop CS2 when I click on auto levels it doesn't change which pretty much indicates it's correct. Actually all three photos from above don't change in Photoshop CS2 when I apply auto levels. Usually I use the level sliders or curves but for these three I just did auto. With the sliders they come out pretty much the same. It must be your monitor that's out.

Paul.
 
Last edited:
Paul,
I found much improvement in the images to posted, so perhaps you could give me an opinion.
I recently bought a second monitor, they are of a different make, so I have been some difficulty in trying to match them, I think I have got them as close as I am going to get, at least I am hoping. I have posted to images, they are the same except mon1 has had no adjustments, mon2 has minimal, there is still a slight difference between them as far as I can see. which one is the closest to being correct, and what does the other need to be the same. I have a little bit of and idea, but would like to see if you opinion matches mine.
 

Attachments

  • Mon1.jpg
    Mon1.jpg
    130.6 KB · Views: 216
  • mon2.jpg
    mon2.jpg
    196.2 KB · Views: 205
Paul, one thing I forgot to mention, just because Photoshop tells you the image is correct, it doesn´t mean the screen is, it is reading the image not the monitor. Ernie
 
Mon2 shows a little more contrast and sharpness and looks the better. Mon1 shows less contrast over the foreground with the pale greys and browns. I'd say the bird stands out a little better in Mon2.

Paul.
 
Paul, one thing I forgot to mention, just because Photoshop tells you the image is correct, it doesn´t mean the screen is, it is reading the image not the monitor. Ernie

Yes, that's correct. What I was doing with the recent images was posting the images as Photoshop saw it as correct and not adjusting it further to suit my monitor. That way it should look ok to most people. Mind you it looked ok on my monitor anyway and I didn't feel the need to adjust them anymore.

Paul.
 
Paul,
Looking at your bluetit images the one on the right looks spot on to me on my monitor. The sidelighting on your recent robins looks ok but overall they are dark due to the direction of the light. The middle one is about right but the one on the left might be a half a stop under.
You biggest issue with your setup is getting the exposure right so it's probably worth bracketting plus or minus 1 stop.
Keep up the experimentation, Neil.
 
Warning! This thread is more than 15 years ago old.
It's likely that no further discussion is required, in which case we recommend starting a new thread. If however you feel your response is required you can still do so.

Users who are viewing this thread

Back
Top