• Welcome to BirdForum, the internet's largest birding community with thousands of members from all over the world. The forums are dedicated to wild birds, birding, binoculars and equipment and all that goes with it.

    Please register for an account to take part in the discussions in the forum, post your pictures in the gallery and more.
ZEISS DTI thermal imaging cameras. For more discoveries at night, and during the day.

Backlighting approach/workflow (1 Viewer)

Tim Taylor

work in progress
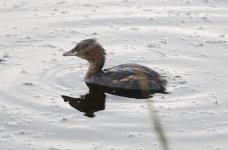
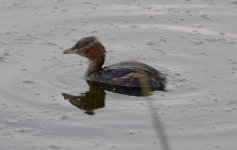
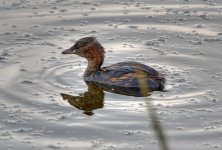
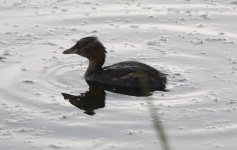
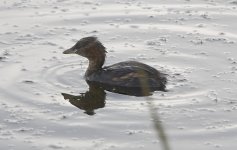
The attached picture of a dabchick on a shiny pond surface caused me some grief yesterday with pictures pretty much unusable. It came reasonably close to the public hide - this represents about 50% of the area of the original after cropping - so the potential should have been there to make something of this situation. Camera settings:

ISO 400, shutter speed 1/500sec, f 5.6, EV +1, evaluative metering mode, 100-400 with 1.4x TC on 30D

With the benefit of hindsight I feel I should have:

1. Had the flash attached and ready (ordered but not here yet!)
2. Consulted the histogram to see if the BG was burning out and continued to increase the EV compensation until it did
3. Considered using the tiny built in flash

What would you guys have done or would you not even have bothered trying to take this shot? Any comments welcome.

Thanks, Tim.
 

Attachments

  • dabchick_exposure.jpg
    dabchick_exposure.jpg
    187.7 KB · Views: 192
I would have popped the flash up myself Tim.At iso 400 and at f 5.6 it would have been enough to illuminate the bird,providing it was in range of course.Not sure about it burning out the surface of the water though.As it is at an angle from the flash you may have got away with.I hope you dont mind but I had a go at your pic in Photoshop.I used the lasso tool to draw around the bird and adjusted the levels.It brought some detail back to the bird without blowing the surface water reflection.
 

Attachments

  • dabchick_exposure.jpg
    dabchick_exposure.jpg
    197.2 KB · Views: 186
I think if Tim had done that Ernie the water would have "blown"even more.

Mike, Possibly so, but not always the case, I use spot exposure with my digiscoping, with bird against the sky without blowing it. Did you use CS2 for your post processing, it has the shadow highlights tool which does an excellent job of this type of image. Ernie
 
Last edited:
Thanks Mike and Ernie. I think what I'm wondering is what goes through people's minds trying to catch a scene like this and what do they do as the bird is gradually coming nearer as happened with this bird yesterday.

Ernie, I do think that spot metering might have been worth a try but it might have blown the exposure on the water so I should have been using the histogram perhaps but didn't.

Mike, thanks for trying this. I've tried this as well myself but there jut isn't enough light coming off the bird into the camera to get anything very worthwhile. I'm hoping the flash will help when it arrives.
 
Grebe's are difficult. He needs to be in full sun with the sun behind you. If you shooting from a hide then you can only control the time. Go when the sun conditions are right.
 
Mike, Possibly so, but not always the case, I use spot exposure with my digiscoping, with bird against the sky without blowing it. Did you use CS2 for your post processing, it has the shadow highlights tool which does an excellent job of this type of image. Ernie
Photoshop Elements 2 Ernie.It also has the shadow highlights feature which is what I used.I havent got to CS2 yet.As with my camera gear I am about 4 years behind the rest of you guys (lol).
 
I'd have still had a go but used the built in flash. I'd have tried a few with just greater EV compensation though the lighting conditions are a bit too extreme here. I quite often use the built in flash just as a fill in.

Whenever lighting conditions are unusual and you have time, just checking the captures on play-back even without using the histogram will give an idea of how close the expsoure is.
 
Grebe's are difficult. He needs to be in full sun with the sun behind you. If you shooting from a hide then you can only control the time. Go when the sun conditions are right.

I suspect this is really the only thing that could make a decent picture here. The trouble is I don't always have the time to get out when I want and the grebes don't always come up to the hide. :C


I'd have still had a go but used the built in flash. I'd have tried a few with just greater EV compensation though the lighting conditions are a bit too extreme here. I quite often use the built in flash just as a fill in.

Whenever lighting conditions are unusual and you have time, just checking the captures on play-back even without using the histogram will give an idea of how close the expsoure is.

Thanks Ian, I must be bolder with the little flash. ;)
 
Shoot RAW, set +1 EV and then bracket at 0 and +2 EV and shoot bursts of 3 at 5fps.

+2 EV should be pretty near right exposure for the Grebe and if the whites are not blown you can convert a second time at -1.5 or -2EV (with the RAW converter) for the water to be better exposed, then comp the two images together, depending which one you paste on the top layer you can then select the unwanted overexposed water or under exposed grebe. the0 and +1 EV frames will give you better exposed water, i.e. not blown, to sample for any repairs.

This is made even easier with software like Photomatix which will tone map and merge the images automatically. For this its best to work in 16 Bit
 
Last edited:
Thanks Nigel - good advice. I occasionally make 2 or 3 copies of a single RAW image with varying exposures generated in ACR and then merge the best bits of each. The trouble with that method is generating noise in the dark areas that have been boosted. Your method should produce a much better result. I must have a look at Photomatix.

Just to illustrate the limitations of making this single image better using software I've attached a blended version made as described above. There's very little detail on the bird and I had to do extra noise reduction.
 

Attachments

  • dabchick_exposure_modified.jpg
    dabchick_exposure_modified.jpg
    191.7 KB · Views: 170
Last edited:
Hi Tim
Tricky one this, I had a play in Lightroom, hope you don't mind.
Reduced exposure slightly, played with levels a bit, increased contrast and increased the orange saturation.
Not that different to your post above, but I think maybe slightly less glare from the water.
 

Attachments

  • dabchick_exposure-8.jpg
    dabchick_exposure-8.jpg
    37.6 KB · Views: 171
Bob, I don't mind at all! I don't think we can get away from the fact that more light is needed from the grebe by:

1. Moving the sun (tricky)
2. Using flash
3. Using Nigel's suggestion of multiple exposures at different EVs and blending

Another thought I've just had is that I could have whacked on a polarising filter to decrease glare from the water. Hmmm.
 
Thanks John. I've rather gone off using spot metering since completely mucking up shooting black and white birds - lol. However, I can see that in this situation it would probably have been much better than evaluative metering so it's on my list of things to try again. This hobby would be boring if it was too easy wouldn't it... ;)
 
I have been using Photomatix Pro for a while now and as Nigel indicates, it works better than Photoshop for blending images.
 
Here's another effort using photomatix. I created versions of the one picture using ACR at -2, -1, 0, +1 and +2 EV and blended them using the default settings of the software. In Photoshop CS2 I did some noise reduction using the Neat Image plugin and then boosted the shadowed areas further with the shadow/highlight tool. Unsharp mask, drop to 8 bits and crop as previous pictures. I don't think there's much more to pull out of this image. However, using Nigel's idea of multiple real exposures blended with this tool, it makes it seem possible to get a reasonable image even with strong backlighting not using flash.

Thanks to all contributors of ideas. :t:

Tim
 

Attachments

  • dabchick_photomatix.jpg
    dabchick_photomatix.jpg
    179.3 KB · Views: 168
Last edited:
Here's another effort using photomatix. I created versions of the one picture using ACR at -2, -1, 0, +1 and +2 EV and blended them using the default settings of the software. In Photoshop CS2 I did some noise reduction using the Neat Image plugin and then boosted the shadowed areas further with the shadow/highlight tool. Unsharp mask, drop to 8 bits and crop as previous pictures. I don't think there's much more to pull out of this image. However, using Nigel's idea of multiple real exposures blended with this tool, it makes it seem possible to get a reasonable image even with strong backlighting not using flash.

Thanks to all contributors of ideas. :t:

Tim

This looks not bad at all considering its all from one exposure, I frequently use the multiple exposure images technique, (much more so with static subjects , landscapes, nightshots etc) it works well because you are able to utilise all the accurately exposed elements of the separate images and negate the noise issues associated with large adjustments of exposure in post processing.
One of the problems with using spot metering is it has a tendency to be fooled by light or dark subjects. Taking a manual meter reading from a similarly lit subject and using those settings can work much better, i.e. a viewfinder frame full of grass has nigh on the same value as an 18% grey card, alternatively an incidence reading from a hand held meter with an invercone fitted will give accurate results.
Highlight/shadow or 'fill in flash' tools in software do have some use if used carefully, however they are prone to increasing chroma noise, the PSP tool is very prone to adding red and green speckles in yellows.
 
Warning! This thread is more than 17 years ago old.
It's likely that no further discussion is required, in which case we recommend starting a new thread. If however you feel your response is required you can still do so.

Users who are viewing this thread

Back
Top