• Welcome to BirdForum, the internet's largest birding community with thousands of members from all over the world. The forums are dedicated to wild birds, birding, binoculars and equipment and all that goes with it.

    Please register for an account to take part in the discussions in the forum, post your pictures in the gallery and more.
ZEISS DTI thermal imaging cameras. For more discoveries at night, and during the day.

Swarovski adaptor in detail (1 Viewer)

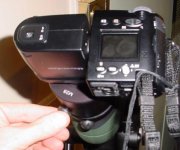
Tighten up the thumbscrew with a couple of half-turns and the job is done. You can mount the camera at any angle you like: horizontal like this, sideways, whatever. It occurs to me that maybe this could lead to getting pictures framed slightly askew (not level) but (if so) that shouldn't be too hard to sort out and is a small price to pay for the added flexibility.

(Note my very unprofessional thumbprints on the LCD!)
 

Attachments

  • fitcamera2.jpg
    fitcamera2.jpg
    22.1 KB · Views: 723
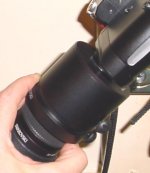
Unlike the Finnish one (is it Spidertech?), the Swarovski adaptor does not allow you to zoom the eyepiece while it is fitted, as it covers the entire unit. However, I soon discovered that this is no real problem, as by undoing the lower (scope-end) thumb-screw you can easily slide the adaptor up far enough to adjust the zoom without actually removing the camera.

I did it with one hand and a modicum of difficulty for this shot (so as to leave the other hand free to take the picture) but in reality it's very easy with both hands. With a little practice you will be able to unscrew, lift, zoom, drop and retighten in no more than five seconds or so.

In any case, I'm starting to think that the in-camera zoom is going to be all I need most of the time. But if I want eyepiece zoom as well, it's not difficult to get at.
 

Attachments

  • zooming.jpg
    zooming.jpg
    20.5 KB · Views: 697
Of course, I should add sample pictures through the scope. But it's late, and I want to try looking at the moon through it before I go to bed - and I don't want to miss any daylight tommorow either! Now to see if we can't manage some bird pictures. ;)
 
Tannin
Good luck you've done the easy part now is all you've got to do is get the bird to sit still long enough, have good light ,perfect focus,i could go on all night, i've not been doing it long i had hair when i started i've since pulled it all out. Again good luck its not easy.
 
Tannin

Very many thanks for all the useful information about the Swarovski digiscope adapter. I read about it yesterday in this month's bird press, and spent an hour or so trying to find out more - its not even mentioned on the Swarovski website yet

Barry Willcock
 
Swarovski & Nikon coolpix 4500

Hello Tannin, we have a Swarovski scope and my hubby is getting the coolpix 4500 next week. Could I ask where did you get your adapters from? are they Swarovski ones, could you point us in the right direction to getting them. Thankyou
 
Excellent tutorial Tannin! My scope and camera are completely different brands, and I was still captivated by your photo-lesson. You must write those how-to "For Dummies" books!
We have just made a universal type digiscope adapter for my own setup, in a professional metal shop, and may offer it commercially after further testing. My lens is not threaded, so I needed to use the 1/4" camera mount threads. I will of course announce somewhere on the forums here our website address if we put the units up for sale, but I want to see how many brands we're likely to fit. My Olympus has a remote control release transmitter, and I was able to take a 1/4 second exposure with the new mount and it looked perfect, without camera shake. Self-timer would work the same but with delay. I don't know if I can get used to that after years of hand-holding my cameras :)
 
I got my Swarovski adaptor from the same place I got the scope, Rednineballl - i.e., the Binocular and Telescope Shop in Sydney. From memory, they are at www.bintel.com.au and their service was excellent. I'll certainly buy from them again if I need something else (maybe a pair of quality binoculars) one day.

I should think that any Swarovski dealer would be able to get you one.

Fourcreeks, I'd be interested to see your adaptor, and so (I am sure) would many other members. Go ahead and post some pictures of it if you like.
 
Tannin that was great just like watching the old serials at the matinee on sat morn (you need to be over 40 to understand)
but seriously it was well done.

As my wife has the swarovski but does not digi-scope I use a leica and 995 I would be intersted in seeing your first pics, by the way I may have missed it but what size scope 65 or 80.

best of luck

Golfnut
 
Tannin, how are you getting on with the cp4500 now that you have had it for a while?
I have an old model at80HD and want to start digiscoping soon.
Cheers
David
 
If I've got the hang of this forum software, David, then here these samples here should answer your question. I'm getting some good pictures, but also still getting heaps of duds. Gradually, ever so gradually, I am learning to get more good pics and fewer duds, but it's hard.

Give me an easy enough subject and I'll get decent results pretty much every time now. (For example, a nice largish bird such as a duck, that's reasonably close, that keeps more-or-less still for several minutes at a time while I fiddle about, and with good, bright light. That's at one extreme. With half-decent gear and a little practice, anyone ought to be able to do that.

At the other extreme are the problem birds - essentially, the ones that break one or more of the "rules" above and make photography difficult. It's all a matter of degree, I think. Things like thornbills or scrub-wrens tend to be very difficult. I still haven't got any decent thornbill pictures even though the tiny little things don't mind me getting close to them, as they are moving constantly and (90% of the time) they are ducking in and out of the shrubbery, making it difficult (a) to get good light on them, and (b) to get the Nikon to auto-focus on the right thing.

But I will, eventually. I'm not in too much of a hurry as, come the summer, I'll be able to lie in wait at watering places and get as many as I like.

Anyway, the short answer is that I'm finding it incredibly rewarding and just as difficult as I want to make it. This weekend, for example, I could have taken any number of nice easy water bird pictures but instead set myself the goal of getting passerine shots. The results are not great and I don't have much to show for it (a handful of reasonable shots is all) but no pain, no gain. Little by little, I'm improving.

My main grumble with the Coolpix is that interminable damn shutter delay. But what can you do? If there is a better digiscoping camera, I'll order one on Monday. In the meantime, we just have to learn to live with the Nikon.
 
Thanks ,Tannin,well you have done yourself proud, photographing and editing that little lot,perhaps the cord was in the way,and that was why i could get a good picture.I noticed that the bottom half was not always square on so to speak,it actually leaned very slightly to one side and although i could get a pic on the lcd screen,something went amiss between me pressing the button and the pic going to the card,ie the one i had on screen.more often than not all i got was arcs of light,i spent the whole of sat afternoon taking pics of a seagull on a boat in the duddon estuary,i do realize the boat was moving slightly due to the incoming tide,but each time the bird was clearly to be seen in the screen,got home and absolutely nothing ,just what looked liked lots of clear ,misty,(contradiction there) 50p pieces.i almost gave up digi scoping there and then,but being very determined,collected my eagle optic adaptor,which hubby had now found a couple more screws for,and went into the evening light and took two very clear pics of "Gull on a Wreck" and some very acceptable heron pics the next day.But i will print of your intructions and have one last try,if all fails again,does anyone want a Swar adaptor?.
Christine.
 
Hello Tannin, have you considered machining a 1.5 " hole on either side of the inner tube so you are able to operate the zoom or do you know anyone who has, thanks in advance, Raptor. PS I am considering the Swaro 80mm and adapter.
 
This adapter appears to have the same problem as I encountered with the Eagle-Eye ie. it is too slow to catch the bird if it is moving around. By the time you have mounted everything, got the focus correct etc. the bird has gone. Much better to have something that is connected to the scope permanently, which can be swung away when the scope is needed by itself, which can be carried around quite safely while attached to the scope and which enables you to immediately pick up the bird and take your shot - no messing about!
Anyone interested I can point them to a system that works as above.
 
Last edited:
JWM said:
This adapter appears to have the same problem as I encountered with the Eagle-Eye ie. it is too slow to catch the bird if it is moving around. By the time you have mounted everything, got the focus correct etc. the bird has gone.

Actually, it is simply a matter of sliding the camera with its portion of the adapter attached onto the eyepiece mounted adapter and snugging an easily accessible knob. This can be done very quickly.

I think this adapter would work well for people who spend a lot of time looking through their scopes and only occasionally attach the camera. The biggest negative would be having the "can-like" part of the adapter always attached to your camera.

FWIW, I zoom the eyepiece in a somewhat different manner than Tannin. None of the adapter parts actually attach to the scope. The bottom part attaches to the eyepiece and the top (camera attached) part clamps to the bottom part. If you turn the whole assembly, the eyepiece will zoom. Of course, the camera turns along with it which is no good.

So I simply slightly loosen the clamping knob on the "camera attached" portion. I then turn the lower portion of the adapter to zoom as desired while holding the camera in place with my other hand. When the desired zoom is reached, I simply tighten the knob on the "camera attached" portion of the adapter.

I also install the adapter so that the "bottom part" knob is directly opposite the 20X label. This way I can tell by quickly glancing at this knob (or feeling for it) what the zoom setting is. 12 o'clock is 20X, 30X is at about 10:30, 40X at 9:00 and 60X is around 7:00.

This adapter also makes it easy to shoot vertically oriented pictures. Simply loosen the knob on the camera attached portion and rotate the camera 90 degrees. Re-tighten the knob and Voila! Portrait mode.

This adapter may not be as versatile as the one made by Cheang in Malaysia, but it is nonetheless very good. It is certainly more versatile than the ones I've made in the past out of PVC pipe. :)
 
Just got one of these today to use with the ATS80HD and 20-60 zoom. Only played with it this evening but looks good. I get the impression that the adaptor can be fitted with the rubber eyecup still in place with only a tiny bit more camera zoom needed to remove the vignetting - grateful if others who have used it could say if that fits with their experience. Main reason I would like this is as I am (or hope to be!) firstly a birder and secondly a digiscoper. Also it would reduce the risk of losing the eyecup in the field.

Any views?

Ivan
 
New guy here with his first post (though third attempt via the reply
box crashing upon his backspacing over previous lines..)

You folks here probably don't understand how much information you pass
along to us newcomers and exactly how useful that is. To this, I thank you.
You allow us newcomers to inherit a fair amount of knowledge with about
30 minutes of reading.

OK, we're now set up with a Nikon 4500 mounted to our STS-80.

I looked but couldn't determine if this was old news:

A Note on the DCA that we just received. It seems to solve some of the
earlier-mentioned zoom problems. Though I ordered a DCA and the shop knew
nothing about what I owned, I received a DCA ZOOM (on the box) and it
handles our 20-60 without the previous problems. Namely, the new version is
shorter on the scope portion of the DCA and grips via the second set-screw on
the end of the rubber which is closest to the scope. They use a C-shaped
plastic thing which keeps the screw from harming the rubber zoom adjustment.

This means you can keep the lens cap attch. and see the zoom adjustment with
the scope portion of the DCA on, regardless of whether the camera is attached.
With the the camera on, you can still see the zoom and adjust it, only having to
bring the camera obviously back to the horizon level afterwards by letting
out the first set screw.

I'm tickled with how this works. Though it is pricey, it's worth it since it
now works out of the box and somebody was listening most importantly.
Besides.. I now understand that the Latin meaning behind "digiscoping" means
to "open your wallet"..

Thanks again,
Mark
 
markacruciani said:
New guy here with his first post (though third attempt via the reply
box crashing upon his backspacing over previous lines..)

You folks here probably don't understand how much information you pass
along to us newcomers and exactly how useful that is. To this, I thank you.
You allow us newcomers to inherit a fair amount of knowledge with about
30 minutes of reading.

OK, we're now set up with a Nikon 4500 mounted to our STS-80.

I looked but couldn't determine if this was old news:

A Note on the DCA that we just received. It seems to solve some of the
earlier-mentioned zoom problems. Though I ordered a DCA and the shop knew
nothing about what I owned, I received a DCA ZOOM (on the box) and it
handles our 20-60 without the previous problems. Namely, the new version is
shorter on the scope portion of the DCA and grips via the second set-screw on
the end of the rubber which is closest to the scope. They use a C-shaped
plastic thing which keeps the screw from harming the rubber zoom adjustment.

This means you can keep the lens cap attch. and see the zoom adjustment with
the scope portion of the DCA on, regardless of whether the camera is attached.
With the the camera on, you can still see the zoom and adjust it, only having to
bring the camera obviously back to the horizon level afterwards by letting
out the first set screw.

I'm tickled with how this works. Though it is pricey, it's worth it since it
now works out of the box and somebody was listening most importantly.
Besides.. I now understand that the Latin meaning behind "digiscoping" means
to "open your wallet"..


Hi Mark,

Yep I think the DCA may have been redesigned all your points are valid. No need to remove anything now including the eyepiece cover attaching cord. You may do on a non-zoom lens though.
 
Warning! This thread is more than 19 years ago old.
It's likely that no further discussion is required, in which case we recommend starting a new thread. If however you feel your response is required you can still do so.

Users who are viewing this thread

Back
Top