Well, it is my opinion that if you want good results, you simply have to invest in learning the craft to some extent. There are a number of ways to approach this, but here is the way I suggest for a "non-expert".
Whenever the background is relatively bright, increase the exposure by a stop or so. This is pretty much what Doug G. also said. But the real question is how much? At this point you have a choice. You can learn some of the "whys and hows" of photography and increase your expertise ... or not. If not, bump the exposure up a stop or so and you'll probably get better results. No need to read further. But if you want to understand it more, read on.
Well Ansel Adams used a spot meter to analyze such situations and that certainly will work if you have one and are willing to use the Zone system or some variant. I'm going to assume that you'd rather not. And in fact, you don't really need to since you have a tool built into your camera that is much more sophisticated. It is the camera's histogram function.
The camera histogram should give you a display that looks something like this:
http://www.jayandwanda.com/digiscope/paulC/histogram.jpg
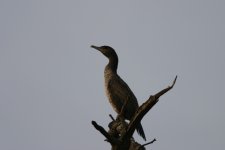
What this graph tells us is that no detail is being recorded in the lightest portion of the image. This pretty much confirms what we can see in the image. The value of the histogram is it gives us a means to measure when our exposure compensation is about right. We should increase our exposure so that we push that large thick bar (which is caused by the sky in this picture) almost all the way to the right as represented by this image.
http://www.jayandwanda.com/digiscope/paulC/betterexposure.jpg
You might even want to push it further or even fully off the right side of the scale. But beware of such a move since the "overexposed" areas might "spill" or "bloom" into the edges of your main subject. Do some tests of this kind of overexposure in your backyard as an experiment to see how your equipment reacts. Then you'll have a good idea of how far you can go if necessary.
This better exposure doesn't completely fix your problem though. The simple fact is that you have an image with a very broad brightness range. This is a place where using the RAW image format might be of use since it records more than 8 bits of data per pixel. But we'll leave that for another discussion.
The fact is that whether it is film or digital, we can only record a limited brightness range. And digital is a bit more limited than film. Our expert Ansel would have carefully recorded his exposure (your camera does that automatically for you) and would have then made notes on how to develope his negative to best exploit his exposure. But there is no developing stage for us. As Doug G. said, situations like this might very well call for setting the camera contrast to low. This is mildly analogous to development since this setting controls how the RAW image data is converted to 8 bit RGB data. So when a scene's contrast is very high, it is generally a good idea to set the camera to a lower contrast.
But while digital mostly takes away the developement stage as an opportunity to control our image, it also give us something very powerful. Photoshop!! (Or insert your favorite image manipulation software here.) Photoshop is our digital replacement for differing paper grades, special developing, and dodging and burning and other manipulations. Getting the exposure right is only the first step and sometimes it is not enough in order to get a good image. In fact, there are very few images that cannot benefit from a little adjustment in Photoshop.
There are many ways to approach this next step, but I generally prefer using Photoshop's "curves" feature. The point to keep in mind regardless of the tool we use is that we want to remap the detail that is in the dark area of the bird so that it covers a wider brightness range. We want to make the bird brighter and also keep its contrast looking more natural. The beauty of the curves tool is that it lets us interactively give different brightness regions of an image a differing level of adjustment. In this case, we try to leave the sky alone (about a 45 degree angle) but want to increase the contrast and elevate the levels of the darker regions (a very steep angle on the curve).
http://www.jayandwanda.com/digiscope/paulC/curves.jpg
You can see in the sample image that the peak at the far left of the histogram has now been spread out into the middle values and that the bird is beginning to look more like what we want. But it does seem to have a bit of a yellow cast to it and it is looking a bit soft. So I shifted the color balance a bit toward blue and sharpened the image a bit to increase the local contrast in the details of the feathers.
http://www.jayandwanda.com/digiscope/paulC/color_sharp.jpg
More could be done. For instance, you might create a number of different layers with different curve treatments and blend them together. This technique could be used to bring out more detail in the very dark branch to the left of the bird.
These results aren't half bad. If the initial exposure had been better, then better results would be possible.
The important points to take from this are:
1) Learn to use historgrams to get a better exposure up front. More detail on histogram use can be found here:
http://www.larry-bolch.com/histogram/
2) Photoshop is a necessary step. The picture isn't done until it has visited Photoshop (or a similar image processing program).
3) Just because we have item (2), don't think that item (1) isn't very important.