• Welcome to BirdForum, the internet's largest birding community with thousands of members from all over the world. The forums are dedicated to wild birds, birding, binoculars and equipment and all that goes with it.

    Please register for an account to take part in the discussions in the forum, post your pictures in the gallery and more.
ZEISS DTI thermal imaging cameras. For more discoveries at night, and during the day.

Tried a new sharpening technique (1 Viewer)

Roy C

Occasional bird snapper
I was looking at some different sharpening techniques this morning ( yea I know, but I was bored ! ) when I came across one that was well thought of on a good birding site so I thought I would give it a try.
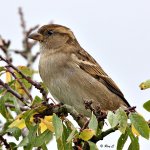
This is just a shot of a house sparrow taken this morning but I thought that the sharpening technique has potential. To me it looks sharp and detailed without looking over sharpened. What do you think of the sharpening? does it looked overdone to you?

(BTW for those that might be interested this is shot with 40D + 300/2.8 + 2xtc. ISO 800)
 

Attachments

  • HS1.jpg
    HS1.jpg
    186.5 KB · Views: 428
Last edited:
That looks absolutely spot on to me Roy, some of the pics I see which are over-sharpened look like the subject has been sprinkled with glitter or plugged into the mains but this one looks very natural.
 
Roy,which site have you used for this technique?
Christine, I cannot remember the site off hand but I have the technique if you want to try it :-

1) Duplicate the layer
2) On the background copy
3) apply USM 18-40-0
4) apply USM 150-.3-0
5) Edit>Fade USM 100% in Darken Mode
6) apply USM 150-.3-0
7) Edit>Fade USM 50% in Lighten Mode
8) Flatten image
 
Roy
What version of Photshop are you using.
I am using Elements 6 and a little lost with instruction (5) & (7)
Thanks for posting
Tom
 
Roy
What version of Photshop are you using.
I am using Elements 6 and a little lost with instruction (5) & (7)
Thanks for posting
Tom
Tom, I am using CS4 but any of the CS series would work I think - I have never used Elements so maybe the fade function is not available. It is just a function that allows you to fade the effects of almost anything you do and also allows you to pick a blend mode.
 
Christine, I cannot remember the site off hand but I have the technique if you want to try it :-

1) Duplicate the layer
2) On the background copy
3) apply USM 18-40-0
4) apply USM 150-.3-0
5) Edit>Fade USM 100% in Darken Mode
6) apply USM 150-.3-0
7) Edit>Fade USM 50% in Lighten Mode
8) Flatten image

After all that did you really need the sparrow?
 
Hi Roy,
To my eyes this looks a little over sharpened on the breast at the collar. Saying that I often undersharpen my shots. Other than that it looks like a good new technique.
Marcus
 
Roy
What version of Photshop are you using.
I am using Elements 6 and a little lost with instruction (5) & (7)
Thanks for posting
Tom
From my reading of it, it is talking about using the opacity slider on the layer. If you look at the top of the layer panel in Elements, it has 2 fields - Blend (it usually says "Normal" - click it and you get more pull-down choices) and Opacity. These instructions are telling you to use duplicate layers, use USM on them, and then change the blend mode from "Normal" to other choices (like Darken). You can then modify the results by using the Opacity slider on the layer, making it more and less pronounced.
 
Last edited:
RAH
Thank you. I was trying that, no sure it had much effect. I assume that it is the Elements equivalent of 'fade USM' . Will have to experiment a little more. Over all seems to be a good technique.
Tom
 
RAH
Thank you. I was trying that, no sure it had much effect. I assume that it is the Elements equivalent of 'fade USM' . Will have to experiment a little more. Over all seems to be a good technique.
Tom
I don't think it is the Elements equivalent of "fade USM" - I think they were speaking in inexact terms with that phrase, and what they were really talking about is using the Opacity slider on the layer to fade the effect in and out, in both Elements and regular Photoshop (and Paint Shop Pro and Gimp too). I say this because this is a common technique and fairly well-known. By using different blend modes and different sharpening amounts on a duplicate layer, and then varying the opacity, you can fine-tune sharpening and you have a lot of control.

If you aren't seeing much effect, you probably haven't tried some of the blend modes. Some of them can do EXTREME things to the image. So, if you change the blend mode and then vary the opacity of the layer, you have control over how extreme it appears.

Having said all this, I myself usually just wind up using regular USM on the non-layered image. It usually does a good job and gives a fair amount of control. if you have too many options, it gets hard to decide which is better!
 
From my reading of it, it is talking about using the opacity slider on the layer. If you look at the top of the layer panel in Elements, it has 2 fields - Blend (it usually says "Normal" - click it and you get more pull-down choices) and Opacity. These instructions are telling you to use duplicate layers, use USM on them, and then change the blend mode from "Normal" to other choices (like Darken). You can then modify the results by using the Opacity slider on the layer, making it more and less pronounced.
RAH, it is definitely not referring to the opacity on the layer.You leave blend mode of the background copy layer on 'normal' and the opacity at 100%. It is when you go into the fade menu (edit>fade) that you change the mode and percentage of fade.
 
Last edited:
I think they were speaking in inexact terms with that phrase, and what they were really talking about is using the Opacity slider on the layer to fade the effect in and out,
The phrase was exactly right, they were talking about the fade mode via edit>fade. this was queried and made crystal clear in the post that I saw. I repeat you do not touch the opacity or blend mode of the layer.
 
Hi Roy,
To my eyes this looks a little over sharpened on the breast at the collar. Saying that I often undersharpen my shots. Other than that it looks like a good new technique.
Marcus
I think you could be right Marcus, I blindly followed the amounts given but you could always tweak the numbers to suit a particular image.

BTW to give the originator credit it is The Manny Librodo Sharpening Technique. A quick 'google' will show lots of hits on the technique.
 
Last edited:
I have ps7 at home, but my work pc has cs2. When the cs line started, everyone seemed very excited about smart sharpening; you guys still seems to use Unsharp mask, is there a reason for that?

Niels
 
The phrase was exactly right, they were talking about the fade mode via edit>fade. this was queried and made crystal clear in the post that I saw. I repeat you do not touch the opacity or blend mode of the layer.
I'm very sorry, I was mistaken. As I said, I've seen the technique I spoke about mentioned in many places, so I mistook it for this similar idea that apparently uses a different technique. So ignore what I said. Actually, you could try the method I was talking about too.
 
Christine, I cannot remember the site off hand but I have the technique if you want to try it :-

1) Duplicate the layer
2) On the background copy
3) apply USM 18-40-0
4) apply USM 150-.3-0
5) Edit>Fade USM 100% in Darken Mode
6) apply USM 150-.3-0
7) Edit>Fade USM 50% in Lighten Mode
8) Flatten image

Tried this & thought ''interesting'', so I set this up as an action sometime ago. 'Never used in anger' ;).
I've now come across this action download , & again thought '' interesting but subtle''.
Having a play for 10, ran one after the other - ''More interesting''.

Have a go, see what you think.
 
Warning! This thread is more than 14 years ago old.
It's likely that no further discussion is required, in which case we recommend starting a new thread. If however you feel your response is required you can still do so.

Users who are viewing this thread

Back
Top