henry link
Well-known member
Paul,
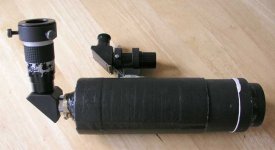
First you need to know the focal length of the telescope objective in mm's. You can measure that reasonably closely by measuring the distance between the objective and the eyepiece fieldstop (probably a flat ring inside the eyepiece tube) when the scope is focused at infinity. Dividing that figure by the eyepiece's 22mm focal length will give you the scope's magnification. Multiply that number by the focal length of the camera's lens to get the effective focal length of the combination.
Henry
")