Hello all,
Though you are welcome to critique this, I am really putting it up so that you can see where I am at with it. I like it when others put up a photo that has been re-worked just to see if I was any where close on my suggestions. Many thanks to Ian and Paula for their critiques, which were very well done.
You can see the original one I posted here
original post
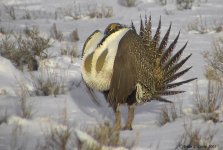
What I did to it?:
1) Clone/Rubber stamp (I am sure the areas are obvious)
2) Reduce blue, green and magenta CA throughout photo.
3) PS tool of despeckle on all of background and just the major showing wing of the bird.
4) USM once over whole photo, then on selected areas on wing and head.
I would like to know your thoughts.
Though you are welcome to critique this, I am really putting it up so that you can see where I am at with it. I like it when others put up a photo that has been re-worked just to see if I was any where close on my suggestions. Many thanks to Ian and Paula for their critiques, which were very well done.
You can see the original one I posted here
original post
What I did to it?:
1) Clone/Rubber stamp (I am sure the areas are obvious)
2) Reduce blue, green and magenta CA throughout photo.
3) PS tool of despeckle on all of background and just the major showing wing of the bird.
4) USM once over whole photo, then on selected areas on wing and head.
I would like to know your thoughts.