In the images in the first post the brightest thing in the scene is the sky, and it is a pretty even level of brightness. Your camera should comfortably have 3 stops of headroom above a centred meter needle before clipping any of the RGB channels. Using spot metering, aimed at the brightest part of the sky, set a manual exposure to send the meter needle to +2 stops above the centre "0" position. This will allow you a full stop or more of latitude in the highlights to cope with surprises and will expose your bird 2 stops brighter than you currently have it, capturing more detail and reducing the disappointment of noise.
If you shoot raw and are really daring, as I normally am, then dial in an exposure at +3 stops over the 0 and maximise your "Expose To The Right" data capture to give you the best capture you can get. Sort out how it looks in post processing. Note, to do this you do need to meter for the brightest part of the scene for which you want to retain detail. Everything less bright should automatically fall into place beneath that exposure.
Manual exposure keeps things so much easier - no need to master spot metering off a BIF; no need to worry about how much EC to dial in just because the bird flies across backgrounds of different tonal values. If the lighting on the bird remains constant then so should your exposure for the bird. Manual exposure keeps it that way.
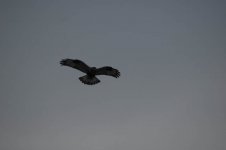
Here is a series of images attempting to illustrate by example. I shot in manual exposure mode and spot metered off the brightest part of the clouds in the top centre of the frame as you see it. Of course, I aimed the centre focus point to take the meter reading and then recomposed to frame the shot. The first image is with the meter centred. i.e. I have captured the very brightest part of the scene as middle grey (12%, 13%, 18% or whatever it is this week). There is nothing in the histogram to the right of centre and I have wasted a massive amount of dynamic range. This is akin to the first BIF shot in post #1, where the sky pretty much sets the exposure for middle grey and everything else is buried in the shadows.
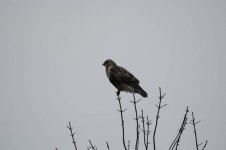
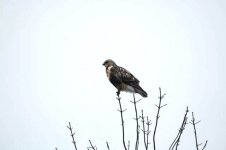
I then slowed down the shutter, 1/3 stop at a time, to record a series of captures in raw all the way up to +4 stops above the metered reading. The attachments below show the shot at +0 followed by the shots at +1, +2, +3 and +4 stops above that baseline shot. The sky is somewhat blown at +4 stops but there is detail there to be recovered using highlight recovery in Lightroom or similar. At +3 and +4 stops over I have also recorded good detail in the rest of the scene, other than the sky. To be honest, the +4 stop image is probably the better one to work with.
I'll post the "+4 with recovery" shot in the next post, as I've reached the five attachment limit in this post.