• Welcome to BirdForum, the internet's largest birding community with thousands of members from all over the world. The forums are dedicated to wild birds, birding, binoculars and equipment and all that goes with it.

    Please register for an account to take part in the discussions in the forum, post your pictures in the gallery and more.
ZEISS DTI thermal imaging cameras. For more discoveries at night, and during the day.

Hawke, Zen-Ray ED field of view (1 Viewer)

kabsetz

Well-known member
Thought I'd post a query to those forum members who own or have access to one of these Chinese ED-roofs. I currently have for testing one sample of the Hawke Frontier ED 8x43, which has a stated field of view of 426 feet/1000yds or 8.2 degrees. As part of my usual testing procedures, I measure the linear field as centimeters at 10 meters, measuring the widest diagonal (in this case top-bottom of the field) I can fit inside the field-stop, with the eyecup fully retracted, binocular mounted on a tripod. To avoid having magnification differences between close/far focus from influencing the reading, I focused the binocular to 1km. In this test setup, the field width was 134cm, which translates to 134m/1km or ca 400ft/1000yds or ca 7.7 degrees. The result for both tubes was the same to within a cm.

Now it would be interesting if others could duplicate these measurements, which are easy and quick to do if one has a measuring tape and some means of holding the binoculars immobile. Is the field the same for the Zen-Ray as for the Hawke, and has the field-stop been altered in one or the other since their production started?

Kimmo
 
Good test Kimmo,

I found this earlier when I tested the Zens against my MeoStars. The Meopta has a FOV of 411 and I posted the Zens FOV fit well within the MeoStars FOV.

No one else would confirm this though.

Cheers
 
My quick measurements were at 10 yards, tape horizontal across the field. It was a nasty cold day and I had a bad cold, so the measurements need to be re checked anyway. I had the ZEN ED 8x43 as 425' @ 1,000, which is right at specification of 426'. The 8x42 Promaster Infinity Elite ELX ED was 404', vs the listed 393'.

I will re do the test this weekend using the same method as kimmo and will post here what I get.

I will say that from the brief time I had a Meopta Meostar 8x42 alongside the ZEN ED 8x43, the Meopta definitely was not obviously wider. They actually seemed pretty close, but the specified fov is pretty close too. Too close for me to notice without seriously looking for it, which I wasn't.
 
Steve,

My Meoptas are 7x... (but 411 FOV like the 8x) and since I live with them (Meoptas) I can say the Zens were not as wide (at least as wide as published)

This was the first think that stuck out about the Zens. A 425 FOV in an 8x is huge.
And they didn't strike me as having an overly large FOV. That led me to compare with a bin I was familiar with.

Would be interesting for Kimmo to do a test to confirm. Clear up the fudge factor
 
The 8x43 ZEN I have is obviously much wider than 8.5x EL. The EL has about 390ft FOV. So my guess is that ZEN should range between 410 and above. Whether it is 415 or 425, it does not really matter to me.
 
Steve,

This was the first think that stuck out about the Zens. A 425 FOV in an 8x is huge. And they didn't strike me as having an overly large FOV. That led me to compare with a bin I was familiar with.

Yes that is a very large fov for an 8x40+ full size binocular. There may well be some variation in sample to sample on fov. However, that is something typically I simply take the specifications at face value. I'd think that that would be pretty well dictated by the design parameters. I did note that the ZEN seemed wider than the Promaster, and the Promaster was a lot wider than any other 8x 40+ roof I had. The Swift Audubon, either 804 or 820, both listed at 430' both seem wider than the ZEN, but I had put that down to the porro prism stereo view and the bit of extra afov from the 8.5x.

Had the Promaster, then the ZEN not come along, I may well have gone with the Meopta. But even 400' is pretty big for a full size 8x roof.
 
I have both the 8x Zen ED and the 8x Meostar. I will see if I can do a comparison this weekend.

If you still have your 8 x 42 Diamondback, throw that one in there too as a comparison. It's supposed to have a 420' FOV. This seemed right to me when I compared it to my Leica 7 x 42 Trinovid which is also 420'.
Bob
 
I just finished the FOV on several binoculars. As nearly as I can determine I followed Kimmo's exact protocol, except I used inches and feet. He's right, its pretty simple, so I hope that means I got this right |:D|.

All of my measuring tapes were in inches. I would have bet money that the 50 foot tape in my pickup was metric on one side. So, it is maybe a good thing nobody was around to make the bet.

ZEN ED 8x43 FOV= 417'@1000 yds. That showed 50.0 inches of tape at ten yards. Specification= 426' @ 100. It was the same in both barrels.

Promaster ELX ED= 404'@1000 yds. That was 48.0 inches' of tape at ten yards. It was 404 in the left barrel, and 396' in the right and 404' using both eyes. Specification is 393' @ 1000 yds.

The distortion in the last 1/4" of so right at the field edge was pretty intense, so presice readings were hard. I may have been able to fudge those up by saying there was 1/4 to 1/2 extra inch of tape, but I think that would be stretching truth a bit. These are both within 2-3% of the specificied fov. There was only distortion of the image of the tape in the outer 1/2 inch at most of the fov. The rest was sharp.

Both the Swift 820 ED and 804 Audubon's measured 433 feet. There is significantly greater edge distortion at the field edge in these big porros, so the edge reading was done by backing out the about 4 inches needed to read the number and then count out toward the edge. The best I could tell was they both used 52.0 inches of tape.
 
Last edited:
Thanks, Steve.

Interesting. Your measurement for the Promaster is, within probable measurement errors, exactly what I got for the Hawke (Doing the inches-yards to metric conversion gives your Promaster field as 134m/km). By the specifications, of course, the Hawke should have matched the Zen.

Now it would be good to get more measurements from others so we could see if there is consistency or not. Perhaps there are two different sizes of field-stops used in the eyepiece to arrive at the different specs?

In any case, this is bit academic. Even the 7.7 degree field is pretty respectable for an 8x binocular, but of course it is not the same thing as the published 8.2. The Zen's 8.0 (from your measurement) is closer to spec.

I agree that it is difficult to see, let alone read, markings on a measuring tape with the fuzzy edge, but you can get around this with a little bit of extra work. Once you have a fair idea of where the edge is, place (or better yet, have an assistance place) something very visible such as a red card over the measuring tape at that point, and move the object along the tape until you just don't see it. Then take the reading. This works even if the edge is full of aberrations and horrendously out-of-focus.

Kimmo
 
Last edited:
Don't forget that the magnification of an internally focused bin (usually a roof but it would apply to porros that move a focusing element rather than the eyepieces) changes with focus distance. How does that factor in? If the bins were off by 0.5x then that's a 6.25% error or 26 feet in a 426 feet @ 1000 yard measurement.

I recall Henry Link and Ron (the Surveyor) contributing a fair bit to a thread about this.

And a quick check with the Zen shows you can get a sharp image at the edge of field (if you defocus from the center i.e. optimize for the edges). The don't have much astigmatism just some field curvature.

I shall try to come up with numbers for the three Chinese ED bins I have later (though I don't have a tripod mount for roofs so this will be handheld estimates.

Another point for those making the measurements is what do you think your percentage error in the measurements is? You should really quote a tolerance. I would have though a couple of percent would be doing well?

What about systematic errors e.g. the tape and the bins should be on the same plane otherwise the distance from the bin to tape is not the same as the distance along the ground. For example bins 1.50m above the ground 10m from the tape (along the ground) are actually 10.112 meters from the tape. That's a 1.1% error or about 5 feet @ 1000 yards.

Where do you measure the distance from the bin to tape from? The objectives? That's another 1.5% potential error (for 6" long bins).

Yes, it's the physicist in me ... ;)
 
And a quick check with the Zen shows you can get a sharp image at the edge of field (if you defocus from the center i.e. optimize for the edges). They don't have much astigmatism just some field curvature.

What about systematic errors e.g. the tape and the bins should be on the same plane otherwise the distance from the bin to tape is not the same as the distance along the ground. For example bins 1.50m above the ground 10m from the tape (along the ground) are actually 10.112 meters from the tape. That's a 1.1% error or about 5 feet @ 1000 yards.

Where do you measure the distance from the bin to tape from? The objectives? That's another 1.5% potential error (for 6" long bins).

Yes, it's the physicist in me ... ;)

FWIW, I had the tape vertical. I taped the top of the measuring tape to the side of the storage shed. There was about 6' of tape. I mounted the binocular on the tripod and levelled the tripod. The only movement I did with the binocular was laterally to center the tape in the field.

The measured distance was to the objective lens.

When the tape was centered to my satisfaction, I read the measurement at the top and bottom of the field and used the difference in inches between the two.

I did not mess with the focus to deal with the edge. For one it was not bad enough to defeat the purpose and moving the focus tended to move the binocular and it threw the alignment of the tape and the field off.
 
Thanks, Steve.

The other point to consider when this close is the distance to the ends of the tape is about 0.5% more distant than the center (not a problem you get when the target is at infinity). This is probably the "field curvature" effect I'm seeing too (so of it's the bin but some of it is the varying distances to the target).

So I suspect you aren't going to be able to measure the FOV to better than 1% (and perhaps rather worse). So that's about a tenth of a degree (especially if you start to include other errors too) or 4 to 8 feet @ 1000 yards.

I wouldn't worry too much if you get numbers 10 feet or more from the "specified" results.
 
Kevin,

As I said in my first post, I measured the field at 10m with the binoculars focused to 1km precisely in order to eliminate the error caused by focusing close. Like Steve, I measured the distance from the objective lens, and had the binocular on a tripod at the same level as the center of the vertical measuring surface, which was the edge of a window where I marked the points just visible inside the field-stop, then measured that distance with a measuring tape. The accuracy of this measurement (taken twice, with two full setups) was within one cm. The accuracy of the distance measurement to the objective lens surface was within a few cm, but less than 5. Also, when rounding figures to the closest cm, I round them in the direction favorable to the published specs in order to avoid unfair tester bias.

I look forward to reading your test results.

Kimmo
 
Because of the problems outlined by Kevin P above and an additional one that I found after the referenced discussion on magnification with Henry Link, one of the math of the magnification getting a little wonky as you approached, and passed, the front focal point of a lens system.

Those who wish to do FOV observations may want to consider using a collimating lens for these measurements. This method has the following advantages:
  • Easier to set up than a linear distance arrangement.
  • Optics are always tested at infinity focus, were they are designed.
  • A bench test, takes a lot less space, typically about 300-400mm versus the shortest focus distance of the optic under test.
  • Depending on the care setting up and the calibration procedure should be more accurate than the tape method because of the problems listed above.
  • The setup can be made more permanent by erecting the setup in a wooden box or similar.
  • The same setup can be used for rough evaluation of the optics, such as examining the grid for astigmatism, curvature, pincushion or barreling at infinity focus.
  • Lighting and air currents along the test path are far easier to control due to the very short distances.
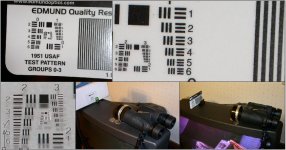
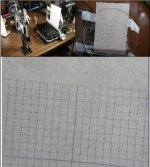
The attached pictures are of a 200mm lens with an Edmunds resolution card at focal point, one with the camera at 35mm focal length and the other at 280mm focal length. Note that by blowing the 280mm picture up you can see the maximum resolution of the card, group 3, element 6 which, at 200mm, is 14.3 lp/mm or 72.4 arc seconds and the ruled section is approximately 8.6 arc minutes per black or white line and 17.189 arc minutes per line pair. The other picture is the same setup but of a better resolution target and blows up to group 5, element 3 or 40.3 lp/mm or 25.6 arc seconds, not bad for a small aperture digital camera. The paper grid has replaced the resolution target and is spaced so the each grid square is 1 degree. The camera was different than the first on (this was a different setup than the first one so I could make a demo photo and took less time to set up than down load the pictures to the computer) and was only 100mm focal length and shows a horizontal FOV of about 19.1 degrees. This picture was just taken for demonstration purposes so I did not take any time in setting up, the camera was just hand held up to the collimating lens, hence the rotation and not quiet square to the target.

The two attached PDF’s grids are scaled to 3.49mm squares @ 200mm and 8.099mm squares @ 464mm. You can ratio the focal lengths to get to any focal length lens you may use. Be sure to print with “no scaling”.

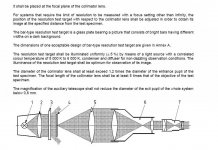
An infinity collimator is nothing more than a lens with a target at its focal point. This setup exhibits an interesting and useful property, that any parallel rays entering anywhere on the objective will hit a common spot on the target (reticle) or, conversely, a spot on the reticle will be projected out of the objective as parallel lines even if not parallel to the optical axis.

Lets make our first collimator. Real accuracy is not called for in these demonstrations since we are just going to discuss functions. We will talk about refinements in the future. First, plot the attached PDF, then take the paper grid and cut it out and tape it to the side of a box or bookend, the more perpendicular and flat, the better. Second, take the lens and set about 200 mm (or whatever focal length you may have available) away from the target. Third, take your finder (I find high powered, fixed focus finders handy just for this purpose), a binocular or telescope and focus on a star at infinity. Focus as best you can, generally the higher the power, the more accuracy that can be attained. Try not to disturb this setting. Place this instrument in front of the objective. Distance is not critical; a one to six inch distance is probably best. Do not touch the instrument focus but move the grid back and forth until the best overall focus is achieved. For future reference, note the distance from an identifiable point on the lens to the grid. This completes the collimator setup.

Lets make a few tests for function. First take your finder, a bino, camera or some other optic and place close to the objective. The grid should become in sharp focus at infinity setting. If the grid is properly positioned and the lens is actually 200 mm the grid spacing should be 1-degree increments with the sub marks along the center axis marked to 0.1 and 0.25 degrees. Check the FOV measurements against your published data. I have the luxury of having survey instruments available so I can directly measure the angles for a check.

If you are checking your finder with the cross hair, move it until you are just looking into the left edge of the lens and place the cross hair on the center of the grid. Note the angle of the finder. If you can slide the finder parallel, do so, otherwise move the finder to the look into the right side of the lens. When the finder is parallel to the first position, the cross hair will be on the center of the grid. You should be able to repeat this experiment at any single point on the grid.

Try it and let me know how it works out for you.

Sorry, could only attach 5 files, but you should still get the idea.

Kimmo;
I have not seen the Hawke or Zen yet but tested my Promaster by the method above late last year and came up with FOV’s of 7.43 degrees left tube and 7.6 degrees right tube.

Best to all.
Ron
 

Attachments

  • 464 Grid.pdf
    171.5 KB · Views: 160
  • Grid 197mm.pdf
    54.3 KB · Views: 174
  • BF1.jpg
    BF1.jpg
    88.7 KB · Views: 170
  • BF2.jpg
    BF2.jpg
    47.7 KB · Views: 165
Last edited:
Kevin,

As I said in my first post, I measured the field at 10m with the binoculars focused to 1km precisely in order to eliminate the error caused by focusing close.

I'm not sure how you can do this ... isn't the tape blurred at that 1km focus? How do you measure to the nearest centimeter with the focus that far off?

Do you bend the tape into a circle of radius of 10m? If not there's the other systematic error I pointed out (which would bias to large FOVs) especially if you are measuring to the centimeter (this error is larger than you measurement error for distances at least).

My main point is that people quote numbers here without tolerances though there are measurement errors (not in the making a mistake sense but in the limits to measurement sense). Without the tolerances you can't say much when comparing two difference measurements. I was trying to give a zeroth order approach to show some of the systematic (magnification) and random errors involved. A better error analysis would show the effect of all the measurement errors and which ones are most significant.

And Steve (AFAICT) is focusing on the tape not at 1km. I think that reduces the magnification (IIRC) so would give larger FOV.

I though about a test bench and I'm glad to see Ron shows it's not as difficult as one might think!

Ron: for resolution tests do you find the collimator (and its precise mounting) sets the lower bound for the measured resolution or is it just insignificant compared to the resolution of the bins?

Oh, for a field with regularly spaced fence posts 1km or so away ;)
 
Last edited:
And Steve (AFAICT) is focusing on the tape not at 1km. I think that reduces the magnification (IIRC) so would give larger FOV.

Oh, for a field with regularly spaced fence posts 1km or so away ;)

Again FWIW, I started out with the focus at 1 km or so. At this point the tape was pretty blurry at the edge. So I tried measuring both ways, it wound up appearing to be the same measurement whether or not I was closely focused on the tape, or focused at some greater distance. I did wind up eventually using the focus on the tape, just because it was easier for me to see what I was doing. I would have stuck with the focus at 1 km if I looked like there was any real difference. There was a far lesser degree of guesswork to read the measurement with the tape being the focus point. I did this by myself, so Kimmos's assistant might be a good idea. But being by myself, it was easier to focus on the tape, look at the top of the fov and see that I could see 3 1/2 inches. look at the bottom of the tape and see 55 1/2 inches and then subtract.

The fence post thing is a good idea. When I am on the home ranch, now 400 miles south of me, there are two fences, on at a mile and the other at a half mile I can read from known distance surveyed property lines. The posts in these fences consist of railroad ties every 100' and steel posts between the ties placed at ten feet. Makes it pretty easy to center the fence line and count fence posts.
 
Ron: for resolution tests do you find the collimator (and its precise mounting) sets the lower bound for the measured resolution or is it just insignificant compared to the resolution of the bins?

Kevin, I have attached a small portion of the ISO collimator requirements for resolution testing. The one I made conforms to the standard up to 42mm objective lens size, my collimator lens is 52mm, a little larger than the 1.2 times required, the only thing I lack internally is the condenser lens and I use one externally when I think it is neccessary. When I go above 35mm objectives, I use a 125mm air-spaced tripplet with a 464mm focal length, this allows me to get up to 90mm objectives. I use the 5 inch lens on objective >35mm. Since the collimator lens is at least 20% greater than the test optics, the test optics should be the limiting factor.

Hope this helps. Have a good day.

Ron
 

Attachments

  • ISO1.jpg
    ISO1.jpg
    133.1 KB · Views: 160
Thanks, Ron. Very helpful.

I was also thinking not just of being diffraction limited but of other potential limits: e.g. the quality ("finishing") of the lens or the lens orientation (how parallel do the target and the lens need to be). That sort of thing.

Those can be big lenses too (especially for working with 80mm spotters!).

I see there is also a minimum requirement for the exit pupil after the booster scope too. Interesting. Was 0.8mm was chosen because is around the minimum usable exit pupil?
 
Kevin,

For use as a focus collimator (not only at infinity, but at any distance you want to set) and for resolution testing I use very good lenses from Edmund, Newport or Thor typically and use at least a good quality achromat. For these uses alignment is not very critical, usually just shine a light thru the objective and have the light reflect to the back side of the objective is plenty sufficient. You really do not get into alignment problems until you start trying to make the grid parallel to the machined case that houses it and use upwards of 30x instruments to measure targets that are only 10 or 20 minutes wide and calibrated down to the 5 arc second range or make your angles exactly parallel to very small angle differences.

For checking resolution unboosted, I have used drug store magnifying glasses and do not see much of a difference. I also routinely use an old camera with a piece of glass at the film position and the lens focused at whatever distance I need, usually infinity though.

You just really need to get a glass and try it. You will be amazed with what you can do with almost any lens. Of course, the better material used and the better it is aligned, the better your results are going to be. You can get very useful data even if the collimator is a long way from ISO or NIST standards.

Best
Ron
 
Warning! This thread is more than 15 years ago old.
It's likely that no further discussion is required, in which case we recommend starting a new thread. If however you feel your response is required you can still do so.

Users who are viewing this thread

Back
Top