• Welcome to BirdForum, the internet's largest birding community with thousands of members from all over the world. The forums are dedicated to wild birds, birding, binoculars and equipment and all that goes with it.

    Please register for an account to take part in the discussions in the forum, post your pictures in the gallery and more.
ZEISS DTI thermal imaging cameras. For more discoveries at night, and during the day.

Strap head for tripod? (1 Viewer)

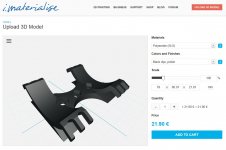
There's a Dutch 3D printing company that will ship worldwide. The price for Henning's model, printed in polyamide, polished and dyed black, is around $60 plus about $20 shipping:

https://i.materialise.com

Shapeways.com cost about the same but lower shipping ($10).

HTH

Cheers, Pete

Thanks, Pete. In case the 3D approach appears too expensive for a 55-year-old scope (that still works with its tabletop tripod), I've purchased the Neweer device you linked earlier along with some gaffer tape.
 
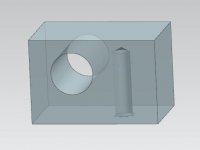
Have you considered just adapting the existing cradle to a standard tripod screw? You could remove the shiny acorn-nut from the horizontal shaft and remove that assembly and mount it to an adapter. The adapter would consist of an aluminum block, the same width as the section that you removed the horizontal shaft from, with a vertical 1/4-20 (or 3/8-16) threaded hole in the bottom and a horizontal hole the same size as the hole in the original mount. Put the horizontal shaft through the new bracket and put the acorn-nut back on, and attach it to whatever tripod that you want. As you wouldn't be altering any of the original pieces to do this, you could put it back to the original setup in a few minutes. I would imagine that a local machine shop could do this for less than the $60 - $80 for the plastic piece above. It wouldn't be beyond the capabilities of many hobbyist either, just a rectangular block, with a through hole and a tapped hole.

Something like this.
 

Attachments

  • Adapter.JPG
    Adapter.JPG
    19 KB · Views: 11
Last edited:
Have you considered just adapting the existing cradle to a standard tripod screw? You could remove the shiny acorn-nut from the horizontal shaft and remove that assembly and mount it to an adapter. The adapter would consist of an aluminum block, the same width as the section that you removed the horizontal shaft from, with a vertical 1/4-20 (or 3/8-16) threaded hole in the bottom and a horizontal hole the same size as the hole in the original mount. Put the horizontal shaft through the new bracket and put the acorn-nut back on, and attach it to whatever tripod that you want. As you wouldn't be altering any of the original pieces to do this, you could put it back to the original setup in a few minutes. I would imagine that a local machine shop could do this for less than the $60 - $80 for the plastic piece above. It wouldn't be beyond the capabilities of many hobbyist either, just a rectangular block, with a through hole and a tapped hole.

No, I had not considered that. Conceptually, it would require only a single through hole for the acorn nut axis and a single drill and thread tap for 1/4"x20. That's interesting.
 
I had whipped up a quick model to post what I was talking about, but you understand what I meant. I added the image to my previous post.
 
Hi Pete,

There's a Dutch 3D printing company that will ship worldwide. The price for Henning's model, printed in polyamide, polished and dyed black, is around $60 plus about $20 shipping:

https://i.materialise.com

Shapeways.com cost about the same but lower shipping ($10).

Thanks for checking the prices! I hadn't tried imaterialize before, great to have another option!

I had not optimized the design for low cost, since my personal printer really prints for about 2 Cents/g. It seems commercial services are a lot more expensive than that, so here's another version that is a bit smaller and thus more economic:

Meltwerk.jpg

At EUR 18, it's really quite a bit cheaper than the previous version. Though Meltwerk now has a EUR 25 minimum order value policy ... last time I ordered, the minimum was EUR 5! :-/

imaterialize, which unlike Meltwerk offers paint and finish options:

imaterialize.jpg

(This version of the cradle is for use either with the Arca Swiss two-screw plate linked above, or a single-screw plate with an indexing pin.)

File (rename to .zip, then unpack):

View attachment Parametric Scope Cradle.txt

Regards,

Henning
 
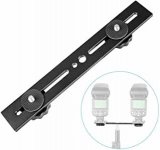
Here's my first attempt at a cheap solution - a Neweer tripod bracket (per Pete), 3 O-ring washers, and gaffer tape.

Neweer tripod bracket.jpg

IMG_3427 copy.jpg

This is the pretty side. Tape won't evenly overlap itself when applied to a conic section like the barrel of this old Kowa TSN-1.

In order to protect the scope barrel I surrounded the "proud" 1/4"x20 screw with an O-ring washer to prevent it from gouging the scope barrel, then put another near each end of the Neweeer bracket in order to prevent a bending moment on the scope.

This is functional, barely. It may require more tape or a different approach, so I won't be surprised if I have to revisit this soon.

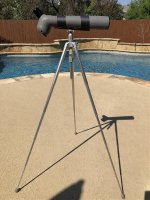
The tripod is an old, cheap QSX-Digi-Pro 100 from about 2007, soon to be supplanted. New tripod has been shipped but has not yet arrived.

Also, FWIW, I considered taping the scope directly to a long Arca Swiss plate in order to remove the need for the screw, but decided not to do so. The A-S plate would be wider than the Neweer and that would mean less gaffer tape on the scope barrel, but it's a possibility.
 
Last edited:
Hi Pete,


Thanks for checking the prices! I hadn't tried imaterialize before, great to have another option!

I had not optimized the design for low cost, since my personal printer really prints for about 2 Cents/g. It seems commercial services are a lot more expensive than that, so here's another version that is a bit smaller and thus more economic:

View attachment 739147

At EUR 18, it's really quite a bit cheaper than the previous version. Though Meltwerk now has a EUR 25 minimum order value policy ... last time I ordered, the minimum was EUR 5! :-/

imaterialize, which unlike Meltwerk offers paint and finish options:

View attachment 739148

(This version of the cradle is for use either with the Arca Swiss two-screw plate linked above, or a single-screw plate with an indexing pin.)

File (rename to .zip, then unpack):

View attachment 739149

Regards,

Henning
Again, thanks, Henning - the cheaper version is very welcome.
 
In the USA I’ve had very good service and reasonable pricing from John Bozeman at his company Photon Express. I recently had one of Hennings adapters printed for $30 including personalized service and very responsive to emails. Absolutely no relationship, just a very satisfied customer. Discovered through his advertising on Cloudy Nights.

https://jwbozeman.com/

Best to all and special regards to Henning!

Jerry
 
Hi,

Again, thanks, Henning - the cheaper version is very welcome.

Here's a version that's an Arca Swiss compatible plate.

It's a bit more expensive again, but you don't need an extra plate for it, which should easily compensate for the added cost.

Note that I simply re-used this design: https://www.thingiverse.com/thing:4427827 and have no way to check how well it meets the Arca Swiss specifications (for which I have no source).

Parametric Scope Cradle Arca Swiss.png

STL-file of the design - rename to ZIP, unpack:

View attachment Parametric Scope Cradle Arca Swiss.txt

Regards,

Henning
 
Hi Jerry,


Hm, he's selling one adapter that looks exactly like one of my designs, despite my license saying "no commercial use":

https://jwbozeman.com/shop?olsPage=products/nato-picatinny-rail-dovetail-adapter-for-red-dot-finder

https://www.thingiverse.com/thing:3004127

He sounds like just the kind of person whom I'd happily have permitted commerical use if he'd asked, but I'm pretty sure he never did.

Regards,

Henning

Hi Henning,

I’m glad that’s not the adapter he printed for me! He custom printed one of your designs for me after I sent the file to him (you and I exchanged information on this). So at least for me it was a custom printing job, not an off-the-shelf purchase.

The astro world is filled with retired or older folks trying to make a little extra cash in difficult times. John seems to me to fit more into this group than hardcore exploitation of others intellectual property. Still, you’ve been very generous with your time and skills. If it is your file he’s printing then it’s not much effort to recognize and acknowledge your work.

As always, best to you
Jerry
 
Hi Jerry,

John seems to me to fit more into this group than hardcore exploitation of others intellectual property. Still, you’ve been very generous with your time and skills. If it is your file he’s printing then it’s not much effort to recognize and acknowledge your work.

To be honest, I expected exactly this kind of thing to happen sooner or later, and as I'm not in this for either money or fame, I don't really care. There are reasons not to acknowledge Thingiverse as a source if you're running a business ... for example, you might fear that people become aware that they can print their own gadgets ..., and I know that people often aren't aware of the fine print in licences, especially when it might contain something that's inconvenient for them.

So, par for the course, and I'm certainly not losing either money or sleep over this! :)

Regards,

Henning
 
Hi Jerry,


To be honest, I expected exactly this kind of thing to happen sooner or later, and as I'm not in this for either money or fame, I don't really care. There are reasons not to acknowledge Thingiverse as a source if you're running a business ... for example, you might fear that people become aware that they can print their own gadgets ..., and I know that people often aren't aware of the fine print in licences, especially when it might contain something that's inconvenient for them.

So, par for the course, and I'm certainly not losing either money or sleep over this! :)

Regards,

Henning

Henning,

You’ve always been exceedingly generous with your time and work - not to mention your useful suggestions and advice. I sincerely hope you won’t be discouraged or disheartened. Please believe your many contributions are well noted and appreciated.

Very best,
Jerry
 
Hi Jerry,

You’ve always been exceedingly generous with your time and work - not to mention your useful suggestions and advice. I sincerely hope you won’t be discouraged or disheartened. Please believe your many contributions are well noted and appreciated.

Thanks a lot - no danger there, I do this for fun, and it particularly fun here on this forum where I get a lot of quality feedback on how to improve the designs :)

Regards,

Henning
 
Hi again,


Here's a variant for the Swiss Arca plate ...

https://www.arca-shop.de/kameraplatten/classic-serie/173/kameraplatte-80mm-2-x-1/4-a-28-40mm?c=7

... with 2 tripod screws:

View attachment 739043

Regards,

Henning
xxxxxxxxxxxxxxxxxxxxxxxxxxxxxxxxxxxxxxxxxxxxxxxxxxxxxxxxxx

Hallo Henning

I very much admire your skills and enthusiasm in designs adapted to additive manufacturing.

Originating from an earlier generation I am experienced in creating own designs the traditional way of subtractive manufacturing without the added benefit of the nice finish obtained by 3D printing. For this particular application I used a polypropylene pipe suitably cut out as a basis. Then welded to a block of the same material by melting the contact surfaces on a pressing iron hold upside down in a vise, preventing sticking to the iron's surface by an aluminium foil separation. In the block I inserted a aluminium bush threaded 10mm outside 1/4 in inside.

The optics get clamped to the adapter using multi-clips:

https://www.dictum.com/de/bandspanner-balg/multi-clip-705870

Working the traditional way, to respect the laws of statics by adapting cross section to the real (if estimated) stresses, or to avoid stress raisers avoiding discontinuous cross section variation is quite difficult to realise.

It would be quite an improvement from the engineering and pleasing from the visual aspect to include such considerations in the future.

HW
 
Moin Hans,

Originating from an earlier generation I am experienced in creating own designs the traditional way of subtractive manufacturing without the added benefit of the nice finish obtained by 3D printing. For this particular application I used a polypropylene pipe suitably cut out as a basis. Then welded to a block of the same material by melting the contact surfaces on a pressing iron hold upside down in a vise, preventing sticking to the iron's surface by an aluminium foil separation. In the block I inserted a aluminium bush threaded 10mm outside 1/4 in inside.

Sounds like quite the professional solution! I have to admit that part of the attraction of 3D printing is I can get away without any specific skills, and don't need any specific blanks :)

Working the traditional way, to respect the laws of statics by adapting cross section to the real (if estimated) stresses, or to avoid stress raisers avoiding discontinuous cross section variation is quite difficult to realise.

In FDM printing, one has to reckon with additional strength complications due to the non-homotrophic nature of the prints. FDM results in layers of material being added on top of each other, and while the (primarily interesting) tensile strenth is quite good in the horizontal, the adhesion between fused layers is quite a bit weaker.

Additionally, the printed parts usually are not solid, but consist of solid walls and a weaker internal structure - typically something like a light honeycomb structure.

So besides varying the cross section, you also have to consider printing direction and decide on the strength of the walls (as well as the bottom and top surfaces, seen in the original printing direction), and the pattern and density of the interior structure.

Usually, I don't try to figure out all of this theoretically, but simply print a prototype, use it until it breaks, then redesign it :)

Regards,

Henning
 
Moin Hans,


Sounds like quite the professional solution! I have to admit that part of the attraction of 3D printing is I can get away without any specific skills, and don't need any specific blanks :)


In FDM printing, one has to reckon with additional strength complications due to the non-homotrophic nature of the prints. FDM results in layers of material being added on top of each other, and while the (primarily interesting) tensile strenth is quite good in the horizontal, the adhesion between fused layers is quite a bit weaker.

Additionally, the printed parts usually are not solid, but consist of solid walls and a weaker internal structure - typically something like a light honeycomb structure.

So besides varying the cross section, you also have to consider printing direction and decide on the strength of the walls (as well as the bottom and top surfaces, seen in the original printing direction), and the pattern and density of the interior structure.

Usually, I don't try to figure out all of this theoretically, but simply print a prototype, use it until it breaks, then redesign it :)

Regards,

Henning

xxxxxxxxxxxxxxxxxxxxxxxxxxxxxxxxxxxxxxxxxxxxxxxxxxxxxxxxxxxxxxxxxx

Hallo Henning

Thanks for the useful informations new to me.

I wonder if stereolitography dating from the mid 80ies using a liquid polymer hardening with selectively applied UV-rays was producing less anisotropic properties. Anyway, the parts at the time were quite brittle and extremely expensive.

Best regards

Hans
 
Warning! This thread is more than 4 years ago old.
It's likely that no further discussion is required, in which case we recommend starting a new thread. If however you feel your response is required you can still do so.

Users who are viewing this thread

Back
Top