KorHaan
Well-known member
kimmo and korhaan,
care to show with pictures of the cable tie on the scope ?
thanks")
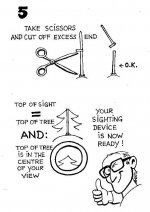
I've just started some instructional drawings; I'm enjoying it, I must say.
Just give me some time... B
Greetings, Ronald


kimmo and korhaan,
care to show with pictures of the cable tie on the scope ?
thanks
Ronald,
Great that you took up the illustration idea!
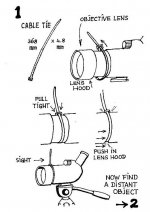
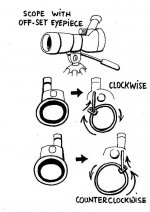
Threading the cable tie so that the orientation matches the offset of the eyepiece will give it a shorter and more stable tip as well as an aesthetically more natural look. So, looking at the scope from the objective end (as I would do when assembling the sight), I would thread the tie clockwise. This means that the free end comes up on the same side as the eyepiece. If this explanation is not clear enough, you can model the situation even with a scope where the eyepiece is centered, by rotating the sight a bit to either side and imagining what it would look like if the eyepiece was offset. You will immediately notice that one orientation provides a significantly more vertical tip to the aiming device, while the other orientation places the tip in a more diagonal orientation. The diagonal orientation works also, but not as well.
Kimmo
Ronald, Awesome, you've got gifts and skills Dude! EE
Just looking at an ad in Birdwatching mag for a couple of Nikon RA III 65 AWP and 82 WP spotting scopes, and I see things sticking out the side that look like finder scopes. As a bit of an astronomy fan I'm used to seeing such things on astro scopes but on a spotter??
I use weaver mount red dot gun sights on all of my scopes.
They are fast, accurate and extremly robust for use out in the field.
They are a must for fast moving wildlife photography.
SF
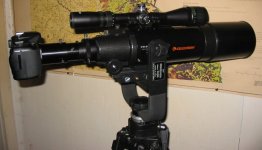
Wow! That's an impressive set of equipment you have!
No need for a cable tie thingy here... :eek!:
But with red dot gun sights, do you mean the things we see in action movies, where commando's are stalking up on each other with night vision goggles and all?!
I realise I may sound daft but one thing puzzles me.
If you're taking pictures wouldn't the red dot show on your photographs then?
Or can it be switched off somehow the moment you take the shot?
Greetings, Ronald

You are confusing a laser sight with a red dot sight.
The laser sight actually projects a dot on the target and the red dot does not. With the red dot you just put the dot on whatever you want then look through ep or camera viewfinder and there it is. Very simple and fast. Because they are made for hunting they are shockproof, waterproof and dustproof. Because of the rugged weaver mount they can be mounted and dismounted and then remounted with perfect repeatable accuracy.
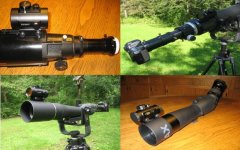
I have also used a conventional rifle scope with cross hairs this way but it is much bigger and slower than a red dot because of the narrow field of view compared to a red dot due too it's magnification. See pic.
SF
Ronald,
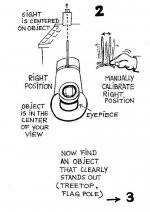
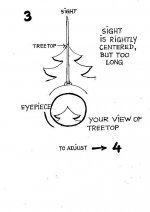
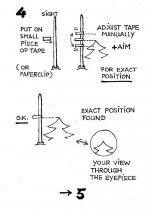
Excellent job, very clear and the style is really nice. There is just one thing that I wish you could change. That is to modify pictures from perhaps no.3 upwards to more clearly illustrate what Kanuuna's second photo, the top right one, shows of how, for both aiming and for correct calibration of the tip length, you have your eye virtually at the eyepiece. This means that the eyecup edge is almost intercepting your line of sight. Since your drawings show the operation from a higher angle, looking from behind and the rear, it might not become clear to people how this is done. Another alternative might be a schematic drawing from the side, which shows the target, the scope with its sight, and the viewer's head, with a dotted straight line from the target, through the tip of the sight and just grazing the eyecup edge, then entering the viewer's eye.
Kimmo
Superb drawings, Ronald....they save a thousand words!!1:t: