• Welcome to BirdForum, the internet's largest birding community with thousands of members from all over the world. The forums are dedicated to wild birds, birding, binoculars and equipment and all that goes with it.

    Please register for an account to take part in the discussions in the forum, post your pictures in the gallery and more.
ZEISS DTI thermal imaging cameras. For more discoveries at night, and during the day.

Swarovski st80 objective lens removal. (1 Viewer)

Noseymosey

New member
United Kingdom
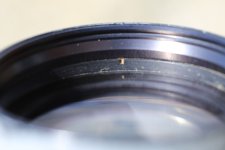
I am trying to remove the ring which holds the objective lens glass in position so I can clean opposite side of lens as it has spots on it, maybe fungus ?? The ring which is next to the lens has cut out slots but there is another ring in front of this. Tried with the round rubber ring tool but with no luck. Anybody any tips on correct method or maybe someone has done this in the past. Any info greatly appreciated.
 

Attachments

  • IMG_2566.JPG
    IMG_2566.JPG
    1.3 MB · Views: 14
Not a good idea. You would be unlikely to be able to restore alignment of the objective elements and performance would suffer. The scope should also have been nitrogen-purged, although this might have dissipated over the past 20 years or so.
Best to send it to Swarovski for a service.

John
 
Hi,

with an ST80 of probably late 80s or early 90s vintage, I would guess the nitrogen content is close to 78% nowadays and thus negligible.

As for alignment, it is a good idea to first have a close look inside the objective whether any old-fashioned spacers like tinfoil or cardboard are present at the edges. In that case the position and orientation of each spacer must be marked on the front element with a sharpie before loosening the retainment ring (as this can rotate the lenses in some cases) and extra care must be taken when reassembling that each spacer goes exactly back into the same position and orientation as before. But I would expect metal or plastic spacer rings...

Also the orientation of each lens should be marked with a sharpie relative to some fixed point like the foot or the focus drive - don't forget to remove this with isoprop after reinstalling each element.

Lastly, when installing the retainment ring, please do not overtighten as this will deform the lenses and introduce aberrations and in case of classic tinfoil or cardboard spacers they will get compressed and the alignment will be completely wrong with lots of spherical aberration if you are lucky and compress evenly and strong coma if they get compressed unevenly. Some slight rattling of the lenses is not a sign of sloppy workmanship but just how it should be with optics.

Joachim
 
If the cutaway below from a 1991 Swarovski catalogue is accurate the ST/AT 80 objective lens is a simple cemented doublet, which should make removing it relatively simple. Still, as John suggested, it would be better to return it to Swarovski for a complete service.
 

Attachments

  • IMG_4351.JPG
    IMG_4351.JPG
    257.3 KB · Views: 29
Hi,

thanks to Henry's post, most orientation issues can be disregarded.

I am still astonished that swaro cemented an 80mm doublet - which is about the limit of what one would do with this technique due to stress caused by different thermal coefficients... and also less degrees of freedom for the optical designer.

Joachim
 
Although it is generally thought that 80mm is the maximum diameter for a cemented doublet there are surprising exceptions.

My most used telescope was the custom made Jaegers 123m f/5.15 refractor.
I probably used this on over one thousand nights for hours at a time.
It was stored indoors and took about twenty minutes to stabilise to around 0C outside.

It was used from 16x to 145x.

What surprised me is that James Baker, the U.S. top optical designer designed the various Jaeger refractor objectives.

The clear diameter was 130mm and it is cemented.
My one is also coated, although I think also available uncoated.
Mine had the Jaeger's cell also.

This was bought about 1973 and Royal Mail almost destroyed the lens by opening the parcel, charging customs duty etc. and then sending the glass almost completely unpacked to me.
They were a shambles then and a shambles now.

However, the Kodak Aero Ektar 12 inch f/2.5 aero lens from about 1943 was hard coated, but I think the front elements are cemented. The diameter is probably 125mm.
Many of these have starfish shaped patterns in the front where the cement has failed locally.
This also occurs in the smaller 7 inch f/2.5.

But at the height these lenses were used the temperature can be about minus 53C. Even minus 70C in some places.
Probably used from 20,000ft to 50,000ft, sometimes 68,000ft.

I have seen perfect condition 7 inch f/2.5 Aero Ektars, but these were maybe used at low levels.
Sometimes at 250ft at 300mph and later up to 500mph.

Regards,
B.
 
Last edited:
However, the Kodak Aero Ektar 12 inch f/2.5 aero lens from about 1943 was hard coated, but I think the front elements are cemented. The diameter is probably 125mm.
Many of these have starfish shaped patterns in the front where the cement has failed locally.
This also occurs in the smaller 7 inch f/2.5.

But at the height these lenses were used the temperature can be about minus 53C. Even minus 70C in some places.

Hi,

a cemented lens being destroyed by internal stress due to different thermal expansion is of course an extreme example.

But trust me, the image is going to deteriorate long before that in most cases due to internal stress. The 123mm f5.25 Jaegers probably didn't show it due to the use with the modest magnifications of a rich field telescope (maybe that's what the swaro designers thought too... or the leica sales rep who stated 2 lambda P/V as acceptable for a spotter iirc)...
Or the designer had that in mind and used glass with close thermal expansion coefficients...

Joachim
 
Warning! This thread is more than 1 year ago old.
It's likely that no further discussion is required, in which case we recommend starting a new thread. If however you feel your response is required you can still do so.

Users who are viewing this thread

Back
Top