• Welcome to BirdForum, the internet's largest birding community with thousands of members from all over the world. The forums are dedicated to wild birds, birding, binoculars and equipment and all that goes with it.

    Please register for an account to take part in the discussions in the forum, post your pictures in the gallery and more.
ZEISS DTI thermal imaging cameras. For more discoveries at night, and during the day.

Ground Pod Mk1 (3 Viewers)

Weasel1

Well-known member
Supporter
United Kingdom
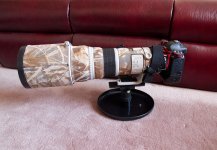
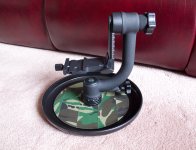
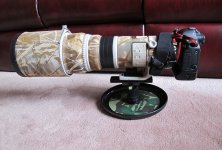
I plan on doing some low level wader photography this year, so had a go at making a Ground Pod.

Items used

Cheap Gimbal that will probably fall to bits, but couldn't justify £600 on another Wimberley.
Frisbee
Plastic Spacers
UNC 3/8 Bolt

Total cost £52
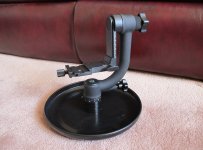
IMG_2779.jpg

IMG_2780.jpg

IMG_2784.jpg

Lessons learned after putting it all together.

1. Frisbee needs beefing up with a 20cm stainless steel plate ( on order but hasn't arrived yet )

2. Bolt needs to be shorter as the cameras centre of gravity is too high ( shorter bolt ordered )

Will see how the Mk2 differs once the parts arrive.

By the time I've finished it would probably have been cheaper to buy a Skimmer Pod from the US but, that would cost £180

For the Mk3 version I going to try the trusty frying pan method and using a Bearing Press, recess the centre of the pan so the bolt won't catch on the ground.
 
I plan on doing some low level wader photography this year, so had a go at making a Ground Pod.

Items used

Cheap Gimbal that will probably fall to bits, but couldn't justify £600 on another Wimberley.
Frisbee
Plastic Spacers
UNC 3/8 Bolt

Total cost £52
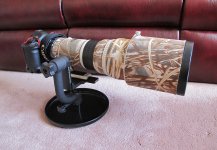
View attachment 1557827

View attachment 1557828

View attachment 1557829

Lessons learned after putting it all together.

1. Frisbee needs beefing up with a 20cm stainless steel plate ( on order but hasn't arrived yet )

2. Bolt needs to be shorter as the cameras centre of gravity is too high ( shorter bolt ordered )

Will see how the Mk2 differs once the parts arrive.

By the time I've finished it would probably have been cheaper to buy a Skimmer Pod from the US but, that would cost £180

For the Mk3 version I going to try the trusty frying pan method and using a Bearing Press, recess the centre of the pan so the bolt won't catch on the ground.
Really neat work!
Great improvisation, just wonder whether a wok might be a more serviceable base for the Mk 3, as the raised lip would help keep the dirt away from the gimbal.
 
Good idea @etudiant so will have a look at what is available.

Steel plate arrived today and at 1.2mm thick is really solid so should add some good stability to the frisbee.
 
The Mk2 Frisbee version is now complete with the stainless steel plate and shorter bolt fitted, the plate and shorter bolt have eliminated all the flex in the Frisbee which is now giving a very stable platform, so will see how it fairs in the field, but at this moment in time I'm quite pleased with how it's turned out.

I covered the plate in some camo tape I had lying around, just to get rid of the glare from the shiny metal surface and the shorter bolt means I only had to use 3 spacers as opposed to the 7 in the Mk1 version, so now the centre of gravity is spot on.

The plate and bolt added £11 so the total cost now is £63, so about a third of the cost of a Skimmer Pod shipped to the UK, though I have no doubts the SP will be bomb proof and mine not so much, but it'll do.

The Frying Pan Mk3 version is still on the cards, but Pancake Day is coming up so frying pans are thin on the ground at the moment, but I'm itching to see how one stands up to the bearing press, it will only have to withstand two presses, one 5mm press for the bolt recess and one to flatten the first to make a flat base for the gimbal, so think I'd better buy a decent Tefal one, other makes are available ;)

IMG_2791.jpg

IMG_2794.jpg
 
I recycled an old aluminum frying pan for the same purpose. The handle was at times useful to push the rig around......

I am also an alu frying pan user. And it cost me nothing, the pan would otherwise have been thrown out. I sometimes screw the head so it is at the bottom of the bowl, yet often invert it and place the head on the pan base. The latter variant prevents the pan filling up with crap such as sand. Placing the head on the base does raise the camera by a couple of inches though. Have covered it in camo tape to make it less obtrusive. In addition I have an old baking tray that I drilled a hole in and can screw on a tripod head - same purpose as the skimmer but without any raised edges.

And coming up in next week's episode of "DIY Birding Gear" we will be making a monopod by taping 14 rolling pins together end to end :ROFLMAO:

SW
Well I bet Blue Peter was your favorite TV program when you were a kid:ROFLMAO:

 
Well I bet Blue Peter was your favorite TV program when you were a kid:ROFLMAO:

How did you know? I used to watch Blue Peter religiously, used to run home from school to make the start of the show. And was always trying to knock together something I had seen them making on BP, and failing miserably. But they never made a ground pod, unless I missed that episode. Basically, you can make a ground pod or a variant thereof with anything flat(tish) as a base and stick the head of your choice on top. A ground pod is one piece of essential kit that I really don't see any point in spending loads of money on. It is after all going to get trashed, covered in sand, saltwater etc. etc. Most of us at some time or other will have a frying pan ready for the bin, but here we can reuse it to enhance or hobby.
 
How did you know? I used to watch Blue Peter religiously, used to run home from school to make the start of the show. And was always trying to knock together something I had seen them making on BP, and failing miserably. But they never made a ground pod, unless I missed that episode. Basically, you can make a ground pod or a variant thereof with anything flat(tish) as a base and stick the head of your choice on top. A ground pod is one piece of essential kit that I really don't see any point in spending loads of money on. It is after all going to get trashed, covered in sand, saltwater etc. etc. Most of us at some time or other will have a frying pan ready for the bin, but here we can reuse it to enhance or hobby.
I actually bought a Naturescapes Skimmer several years ago but sold it when I got to old and creaky to get down in the sand. I could get down easy enough, it was getting back up that was the problem🤪
 
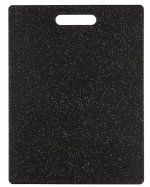
I use a HDPE cutting board and drill a 1/4" hole and insert a 1/4-20 stainless steel bolt and use it to mount a ball head. The cutting board has a handle which I find convenient when carrying the rig. My cost was about $17 in total. I like this size for use on sand when photographing shore birds at eye level.

Cutting board.JPG
 

Users who are viewing this thread

Back
Top