I am not so much a bird watcher who takes photos, as a photographer who uses birds as the subject.
I am always trying to create a picture that, whilst perhaps not art, I would be happy to see it mounted on my wall.
This is one such photo.

Why does it work for me? It is a common bird, not doing anything special, but I like it.
A lot of the appeal lies in the composition of the picture.
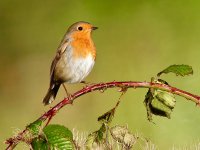
While the bird is the obvious subject of the photo, it does not occupy all the frame. It has room all around it, especially in front. If possible, the subject should always have space to look or move into.
The robin is actually placed very strategically one third from the top and one third from the left. This is perhaps the strongest place to place a subject. It is achieved by cropping the photo after the shot was taken.
The perch, with the foliage underneath, provides a base to the photo and the two large leaves combine with the bird to form a triangle, leading the eye around the picture.
The background is subdued, but there are differing tones and the bramble briar offers a change of colour from the more dominant green. It has purposefully been sprayed with water to give it more texture and appeal.
The bird is in profile, in focus and there is a catchlight in the eye. Even though it is not all that large in the frame, it dominates the picture, especially with its red breast.
All of this has not happened by chance. The background, perch and lighting have been carefully chosen to complement the expected subject and the photo taken when the bird was in the correct position, in profile and with an interesting pose. I do not use a continuous burst of the shutter in the hope of getting a decent shot, but try to be patient, waiting for the bird to pose correctly. It doesn’t happen every time, but it is pleasing when it does.
I am always trying to create a picture that, whilst perhaps not art, I would be happy to see it mounted on my wall.
This is one such photo.

Why does it work for me? It is a common bird, not doing anything special, but I like it.
A lot of the appeal lies in the composition of the picture.
While the bird is the obvious subject of the photo, it does not occupy all the frame. It has room all around it, especially in front. If possible, the subject should always have space to look or move into.
The robin is actually placed very strategically one third from the top and one third from the left. This is perhaps the strongest place to place a subject. It is achieved by cropping the photo after the shot was taken.
The perch, with the foliage underneath, provides a base to the photo and the two large leaves combine with the bird to form a triangle, leading the eye around the picture.
The background is subdued, but there are differing tones and the bramble briar offers a change of colour from the more dominant green. It has purposefully been sprayed with water to give it more texture and appeal.
The bird is in profile, in focus and there is a catchlight in the eye. Even though it is not all that large in the frame, it dominates the picture, especially with its red breast.
All of this has not happened by chance. The background, perch and lighting have been carefully chosen to complement the expected subject and the photo taken when the bird was in the correct position, in profile and with an interesting pose. I do not use a continuous burst of the shutter in the hope of getting a decent shot, but try to be patient, waiting for the bird to pose correctly. It doesn’t happen every time, but it is pleasing when it does.


