• Welcome to BirdForum, the internet's largest birding community with thousands of members from all over the world. The forums are dedicated to wild birds, birding, binoculars and equipment and all that goes with it.

    Please register for an account to take part in the discussions in the forum, post your pictures in the gallery and more.
ZEISS DTI thermal imaging cameras. For more discoveries at night, and during the day.

Kowa TSN-2 help. (1 Viewer)

Mas6277

Member
Hey All. I’ve just bought a Kowa TSN-2 as a first scope and will be needing a few accessories to bring it up to scratch.
Have looked for the Skua stay-on-case but no luck so far and the scope is missing an objective lens cap, any suggestions would be greatly appreciated.
Thank you.

Martin
 
Hi Martin, I've moved your post to the dedicated Kowa forum and subscribed you to the thread so that you can find it easily (you'll be notified by email when there's a reply).

You can easily unsubscribe from it at any time.

I'm sure someone will be along before too long to help you out.
 
LOL we're here to help Martin. Don't worry about it.

We are a big site, but it does get easier with each visit.
 
Hi Martin, Welcome to BF! I found a case for a Kowa C601 60mm spotter that might fit. It seems like these might be kind of expensive. Of course this is on this side of the "pond".
https://www.adorama.com/kwc601.html

I have that case for a TSN-601 and it's a snug fit. I can't imagine it fitting a 77mm scope.

The best approach might be to look for a case for the current TSN-77# scopes -- maybe. Length inside and the ability to handle the different "bulges" at the rear of the TSN-2 would be a concern. The case I got for my recent TSN-663 has a different design than the one you showed from Adorama -- and seems a little more commodious in the prism bulge/eyepiece area.
 
Hi Martin,

first of all, welcome to to birdforum!

Congratulations to your new scope - with a 30 wide EP it will deliver great views!

Unfortunately a stay-on case for the old straight TSN2/4 will be hard to get - Kite still sells one for the angled 1/3 variants but not for the straight versions.

One option I have seen was people wrapping their scopes with foamed tape - camo if you're so inclined or whatever color you like.

There is of course Skua cases around used, but it takes luck and patience to get one - and usually there's a scope inside...

Regarding the objective cover - I have bought a TSN-3 from the UK (with the kind help of BF member Crake Dude - the seller didn't like selling abroad). It came wit a red plastic lid on the objective which fits perfectly and obviously came off some food container sold in the UK... I don't know what product but can send you an image if you want to try to find it.

Joachim
 
Last edited:
I bought my TSN-4 (externally similar) quite a while ago and haven't bothered with a cover of any sort - no issues so far.
 
I especially look forward to trying all sorts of biscuits and cake to hunt down that lens cap Joachim. :)

Yes...The sacrifices we make for -- errrrrr -- science.

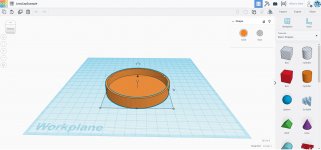
On a more serious note; if you have (or have access to) a 3D printer this is a relatively simple project. Search sites that have downloadable files for "parametric lens cap" or similar search terms. Or you could design your own online using https://www.tinkercad.com/. Tinkercad allows you to select geometric shapes, move them onto the "Workplane" with your mouse, modify their dimensions, combine and group them into a single shape, and download an *.stl file that can be used by almost any 3D printer and "slicing" software.

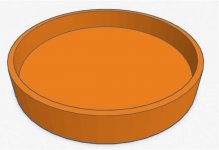
The cap illustrated below was whipped up in a few minutes using Tinkercad. It is actually two shapes:
  1. A 80mm x 13mm disk (a re-dimensioned "column")
  2. A 76mm x 10mm disk
The second disk was raised 3mm above the Workplane, designated a "hole" (a negative space), and centered over (and inside) the first disk. The two shapes were grouped and now appear thus. In practice, I would make the whole shape taller/deeper, with the inside walls matching the width of Velcro "loop" tape. Increase the diameters to provide an extra millimeter or so, print, apply the Velcro inside, and slide it over the end of the scope.

[The actual model is cylindrical. These are just screen grabs of the perspective view and the Tinkercad work area.]
 

Attachments

  • LensCapExample-01.jpg
    LensCapExample-01.jpg
    74.7 KB · Views: 48
  • LensCapExample-02.jpg
    LensCapExample-02.jpg
    518.1 KB · Views: 39
Hi,

well actually I just got a 3d printer to play around with and might make a model for objective caps for the TSN-1/2/3/4... I wanted to get a roll of flexible filament anyways...

Joachim
 
Hi,

well actually I just got a 3d printer to play around with and might make a model for objective caps for the TSN-1/2/3/4... I wanted to get a roll of flexible filament anyways...

Joachim

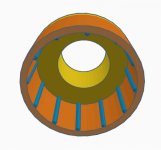
Unless you've already got PLA filament printing totally nailed, I don't see a need for the flexible filaments. Make the recess deep and count on the Velcro loop tape. To keep the flexible filament from hanging up, you'd probably want to make little ribs inside the cavity -- like the illustration.

Deep cavity/Velcro would be my first choice, in either PLA or ABS, for objective caps. For the ocular end, with rubber eye cups, the flexible filament would give results closer to what we see with stock covers. You could even work up a bridge piece between the two eyepiece caps.

Any of the filaments would offer a wider choice of colors -- I'd even consider wood PLA for the objective cap.

[Something I'm working on to do a better job adapting the PhoneSkope to my Kowa 30X eyepiece.]
 

Attachments

  • RibsExample-01.jpg
    RibsExample-01.jpg
    69.3 KB · Views: 37
Hi,

I am going to get a roll of flexible anyways - want to try to print eyecups...

Regarding PLA - yes that works fine - I took a shortcut and bought a used china i3 clone which was nicely pimped by sb. with experience (4040 aluminum frame, bowden extruder which actually works and a nice milled heatbed carrier) for roughly the price of the china kit new (the original owner had built sth larger) and since he sent me his settings too, I basically got good prints from the start... so time to check those other sets of settings ;-)

With the velcro you mentioned - do I understand you right that you print the cap about a 2 or 3 mm oversize and then put only the fluffy side of velcro in there?

Joachim

Right. You want to design of the lens cap with a deep enough "cup" so that you can apply a full width of the Velcro tape without having to slit it. Velcro requires both "hook" and "loop" fabric -- loop being "fluffy". Measure two layers of Velcro loop with a caliper and make your best guess for the oversize. Good slicer software will allow you to start your print at a different height above the base. For trials, you can just print the "top" 10mm or so of the cap so that you have a ring you can test the fit and friction.

A common width for Velcro tape is 3/4 inch, so a 20mm or 21mm depth in the cap will allow a clean installation. The deeper cup will require a less precise design because the depth will aid in cap retention while still being able to slip the cap off without a struggle.

If you look around you see many items that use Velcro loop to take up slack -- just like the ring of fuzzy stuff inside traditional Leica camera metal lens caps.

When you design the width of the cap walls, take into account the diameter of your extruder nozzle-- typically 0.4mm. I designed a little safety rim to go around my laptop's on/off key with a 1mm thick wall. When I printed it, I got a two walls with a gap -- the slicer software directed passes of 0.4mm and 0.4mm. When I increased the wall thickness to 1.2mm, it printed fine.

When you get a chance, try wood PLA. You can sand, stain and varnish it and I've seen some pretty nice looking models. The stain takes much longer to dry than for real wood, but that's just time.
 
Hi,

ah ok, I think I understand now... so I make the cap to size with 1mm slack and put circular notch with the width of the tape on the inside to partly hide the loop part of the velcro - maybe 1mm deep... right?

The ring of velcro loops then ensures a tight fit...

Sorry, I think I have never seen a Leica camera or glass, let alone handled one... I like digicams better... or maybe Leica bins or scopes...

Joachim

Not quite. Think of two parts of this cap, that will be printed as one. Go back to my first illustration...

  1. The first piece is a ring about 20-21mm high. The inside diameter of the ring is the outside diameter of the end of the scope (o.d. of the lens hood for this scope) PLUS 1mm to 3mm slack to account for the Velcro and a little compression of the loop. The final i.d will be [a] the scope o.d. plus the combined slack for the velcro plus [c] twice the wall thickness of the ring (2-3.6mm x 2).

    [*]The second piece is a disk that is the same diameter as the o.d. of the ring and and a thickness of between 4mm and 6mm.

The inside of the cap is deep so that you can apply the Velcro in one full-width piece. It will be deep, but it should have good holding power. You'll know it is correct when it feels right to you putting in on and taking it off.

I'm off to the zoo, but I'll do an annotated 3D illustration this evening.
 
Hi,

ok, that's what I meant with "print the cap about a 2 or 3 mm oversize and then put only the fluffy side of velcro in there"... maybe should have added in diameter and of course at least as deep as the velcro is wide...

No need for an image...there's sth printing atm but I'll try it tomorrow... there should be some vecro in my parts bins...

Thanks,

Joachim
 
Hi,

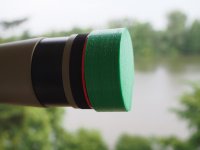
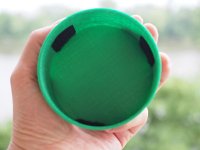
ok, now that's what the new lens cap looks like... the print quality is not great but it works.
And it was the first piece printed in PET-G... some tuning will be necessary...

P6050023-small.JPG

P6050025-small.JPG

I have uploaded the openscad source too - just change remove the .txt extension and load in there.

View attachment objective-cap.scad.txt

Joachim
 
Hi Joachim,

I have uploaded the openscad source too - just change remove the .txt extension and load in there.

Good idea to use velcro! I tried to use self-adhesive felt, which was too thick and smeared glue all over the eyepiece.

Here's your OpenSCAD file, re-uploaded with a slight improvement: When using the difference function, it's good practice to subtract volumes that exceed the boundaries of the volume they're subtracted from.

View attachment Objective-cap-2.scad.txt

(Otherwise, you get bogus mesh parts of almost zero thickness that can confuse your slicer, for example. That mesh is visible as green-ish trash in the F5 preview of OpenSCAD.)

Regards,

Henning
 
Warning! This thread is more than 6 years ago old.
It's likely that no further discussion is required, in which case we recommend starting a new thread. If however you feel your response is required you can still do so.

Users who are viewing this thread

Back
Top