• Welcome to BirdForum, the internet's largest birding community with thousands of members from all over the world. The forums are dedicated to wild birds, birding, binoculars and equipment and all that goes with it.

    Please register for an account to take part in the discussions in the forum, post your pictures in the gallery and more.
ZEISS DTI thermal imaging cameras. For more discoveries at night, and during the day.

joined the Audobon club at last (1 Viewer)

thanks Ed,

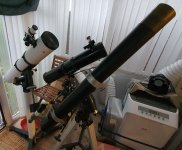
chuffed to bits with the result and to crown it all, got my first sight of comet neowise last night and with these HR/5's at that so they've restarted life with a spectacular viewing session :)

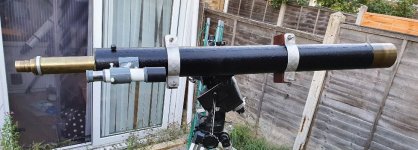
The fun part of that repair tho was no machine tools to mill the metalwork, so I had to rig a solution so that the ally arm was level when filed down. Simple work-around after hand filing most of the way was 2 wood blocks taped at the ends of the file and a plastic block raising the arm a fraction above meeting the file. Double-sided taped the arm to the plastic block and on a flat surface, gently work the file till it was no longer removing any metal. Seems to have done the trick as the arm sits nice and square/level now it's all fitted up.
 
Aengus: I like the way you repaired the ocular arm. I've taken a different approach to repair several arms, though I think your method has a better chance of surviving another shock than my method. After cleaning the broken parts, I epoxy bond the 2 parts together using glass fibers set into slots I cut with a thin abrasive disc on all four sides of the broken area on the arm. Managed 10 repairs that way and thus far (fingers crossed) none have failed. The binocs are usually treated gently after the repair so I can't vouch for their durability. Seems to be a weak link, that area of the focus mechanism. Regards, Pat

Hi Pat and thank you :)

I've read of that mode of repair too, one using kevlar fibres but as you say, I'd be thinking how much handling would they take on such a small repair area. I found this method on CN forum but someone who did similar and after exploring a couple options decided that was likely the best route for these.

I did consider just epoxy bonding the 2 parts, also if adding grub/set-screws holding them for strain relief would work. Initially I had tapped for 2mm brass grub screws but wasn't convinced they'd hold the 2 sections together very well while the epoxy set, a slight wobble as there's no clamping pressure. So I went with 2mm screws at 6mm length which is just the exact thickness of the arm/plate combo.

So the final repair has the steel+ally sections epoxy bonded with 2mm stainless steel screws clamping the parts together. Epoxy should give a good barrier to moisture ingress down the line so the steel won't rust in the bond area. Should also be a lot stronger than the original pivot.

I'm sure what did for these was a drop, judging by the other damage, at least that didn't bend the focus spindle else that'd have been the end most likely.

When Cory Suddarth and I were in the fleet, we decided to keep the simple knowledge and—to some—equally mysterious and misunderstood techniques for collimating binoculars to ourselves. Yet, with seeing all the sham “collimation tips” (which lead to CoAl at best) proffered by armchair opticians on the Internet binocular forums, we caved.

Since—and with us getting older—Cory has offered classes in which he has taught, in his shop, folks from Europe to Australia and I have covered succinct and straightforward instructions in my books.

A few years ago, I would have thought that understanding SERIOUS binocular repair and collimation was going to die with us (by survey, only 3% of Navy Opticalmen wanted to be such). Today, Cory and I have hope.

aengus4h, I don’t know what you know about 3-axis collimation. But I do know that anyone with the resolve to carry out such a repair has the mettle to make quick understanding of the techniques.

With a tear in my eye, I take my hat off to you and a FEW others who have left so many armchair technicians behind to address what is often needed to be an OPTICAL BENCH TECHNICIAN. Furthermore, I see hope for the continuing of the craft. :cat:

I THANK YOU!

Bill
 

Attachments

  • Cory copy.jpg
    Cory copy.jpg
    11.2 KB · Views: 35
  • Screen Shot 2020-07-19 at 12.54.33 PM.jpg
    Screen Shot 2020-07-19 at 12.54.33 PM.jpg
    135.7 KB · Views: 25
Last edited:
This thread makes me think. Swift has been around for many years, and the Audobon Club makes
me enjoy the history of binoculars.

There is a special effort to preserve the memory of Zenray optics. Just a flash in the pan, china produced junk type, clone optic company.

I like Swift much better...;)

Jerry
 
When Cory Suddarth and I were in the fleet, we decided to keep the simple knowledge and—to some—equally mysterious and misunderstood techniques for collimating binoculars to ourselves. Yet, with seeing all the sham “collimation tips” (which lead to CoAl at best) proffered by armchair opticians on the Internet binocular forums, we caved.

Since—and with us getting older—Cory has offered classes in which he has taught, in his shop, folks from Europe to Australia and I have covered succinct and straightforward instructions in my books.

A few years ago, I would have thought that understanding SERIOUS binocular repair and collimation was going to die with us (by survey, only 3% of Navy Opticalmen wanted to be such). Today, Cory and I have hope.

aengus4h, I don’t know what you know about 3-axis collimation. But I do know that anyone with the resolve to carry out such a repair has the mettle to make quick understanding of the techniques.

With a tear in my eye, I take my hat off to you and a FEW others who have left so many armchair technicians behind to address what is often needed to be an OPTICAL BENCH TECHNICIAN. Furthermore, I see hope for the continuing of the craft. :cat:

I THANK YOU!

Bill

Wow thank you Bill, from a true professional that's high praise indeed :)

I have read a bit on collimation and several of your posts here and elsewhere on the subject. Unfortunately I've not the equipment nor the space to set something like that up, sadly and being only a few years from official retirement age probably not the time to make a going concern of this either. Since most of my collection is own use I accept the CoAl limitation and I'd be reluctant to do a repair for someone else with that limitation in mind. Not that I wouldn't help a friend out but will always say it won't be perfect/factory.

While and where I can, I will give a go at fixing most things. This pair was a challenge as none of the real damage was noted in the sale. Since he cut a sweet deal I figured why not try and see, otherwise I'd be out of pocket the return shipping and externally these were in fair shape. Would've been easier if I'd had better tooling but it turned out pretty ok in the end so I was rather pleased with the result. And as mentioned, crowned by my first sighting of the comet in these very bino's and crystal clear and sharp to remind me how worth saving they were.

My latest "toy" is a vintage telescope, again picked up for a nice price. 76mm objective, leather clad and brass drawtube focuser. After a clean of the lenses it gave very nice viewing of Jupiter and Saturn the other night. I'll gradually work on a light restore on it and enjoy using it alongside my others :)

Cheers
Dave
 

Attachments

  • vintage scope.JPG
    vintage scope.JPG
    102 KB · Views: 17
  • vintage scope 2.JPG
    vintage scope 2.JPG
    94.6 KB · Views: 14
Last edited:
Warning! This thread is more than 4 years ago old.
It's likely that no further discussion is required, in which case we recommend starting a new thread. If however you feel your response is required you can still do so.

Users who are viewing this thread

Back
Top