• Welcome to BirdForum, the internet's largest birding community with thousands of members from all over the world. The forums are dedicated to wild birds, birding, binoculars and equipment and all that goes with it.

    Please register for an account to take part in the discussions in the forum, post your pictures in the gallery and more.
ZEISS DTI thermal imaging cameras. For more discoveries at night, and during the day.

Binocular Repairs and Cleaning (1 Viewer)

OPTIC_NUT

Well-known member
I have discovered a lot of things while fixing up auctioned binoculars
that I wish were better documented. I have also watch bencw's and others'
restorations with interest, and I have made some thread clutter by describing
each restoration, and worked on even binoculars from the 90s and a few
years ago.

This thread would be a great place to collect up rework information
and also reduce the clutter elsewhere. Perhaps even copy in little
gems like where to get silicone damping grease and how to clean,
or impressive leather restoration. Even prism transplants!

So add what seems handy (and isn't hazardous)...let the explorers
keep a log.
 
A common cleaning accident: someone wrecked the pin / focuser clamp on the binoculars.

( To avoid this they should have removed that 'stabbing' setscrew, then turned the clamping screw)

Many pairs I got have been fairly well cleaned but the focuser arms are slack or
too tight, and it turns out someone cranked the clamping screw so it shredded
the setscrew in it and ground at the threads.

After a few attempts so just clean up and re-clamp (usually comes loose with
3-4 working of the hinge to spread oculars apart-together), I hit upon
the Blue Loctite threadlocker (removable thread locker).
Cleaning all shreds and greases out, doing any slip-plate work, setting the clamping
screw with a bit of Loctite in the threads (only!), and waiting 10 minutes gives
you a modern thread locking that's better for maintenance later.
You might need a new clamping screw (froma junker).

It's very satisfying to have solid focuser arms again and a good cleaning.
Blue Loctite is a great modern friend.

If there is a screwdriver slot, you will need a special screwdriver you can make
by grinding a wide screwdriver down thinner. Some gun screwdrivers work.

If not you have a tricky job using ratchet pliers or grips....that can be dicey
without exotic tools. Best to keep with the narrow slots.
 
O-N, I like the idea of this thread as my hobby has become collecting and restoring binoculars, porro's mainly so I always appreciate tips and ideas anyone has. So, just to help start, a link to a thread I posted some time ago on making a small repair to the leather covering on a Jenoptem.

http://www.birdforum.net/showthread.php?p=2783252#post2783252

Another simple trick that has often worked for me is when I have bought a binocular which is slightly out of alignment, it is worth simply first trying swapping the objective barrels over before getting into adjusting things, that has worked for me on about 4 occasions now.
 
Heh...loved that leather work. I had the whole leather cover on
a pair of Spindler&Hoyers disintegrate tonight, as I worked. Crumbs.

I think that swap saved me on the Customs. I got the barrels confused.

The most messed up are often the ones with radically eccentric rings up front.
I condemned 4 Sans_Streiffe when it was just mis-oriented rings.

---------------------

OK: another accident: dioptre-yoke scraping. It can take a while to get the
set-screws for the focuser yoke equal, but many cleaners botch it and screw
them in one-by-one. Then they scrape or freeze. You have to go in a little at
a time, and when the scraping happens, find which screw is in too far...back out
a dite and it glides again. Removing grease and replacing is key, too.
I haven't gotten the silicone yet, but the cycle bearing grease is very smooth,
if a little thin.

I got a pair of Stellar 6x30s that were well-preserved, really well cleaned at the
lenses, but dragging and scraping in both focusers. Easy fix. Someone knew a lot
but not the finishing bits. And....they didn't bash the thing up on the way in.
 
Last edited:
Here is kbrabble's post on synthetic greases:


I reworked an old set of porro's I got at a thrift store, not even sure what brand as most of the lettering is gone, just to do it. I ordered a sample kit of fluorocarbon dampening lubricants from http://www.nyelubricants.com/products/damping.shtml

I used the very heavy grade on the focusing mechanism and it works very well; smooth and precise, and has a wide temperature range. You might want to give it a try..
kbrabble is offline Report Post

I'm recognizing the need for different viscosities
so I'm thinking the sample pack might be my first and last.
 
Another accident: Cross-threading.
Not something I do, but something I fix. Usually the final tube.
This causes collimation trouble and can even be visible in a photo.
There is some much aluminum used, and it galls up easily.

If the thing can be turned apart, th efirst thing to do is clean off
every last bit of churn, dirt, and shavings. I put on candle wax after
because it helps prevent galling. Later I switch to grease again..a tiny bit.

You can gently work the threads backward usually and feel one or two
little 'clicks'. Two back-clicks would be the proper threading and the bad threading.
By turning in just 15 degrees or so into each, you can look and see which is more level.
You try the thread by moving back and forth a lot and moving in slowly (more and
more clockwise). If it digs in you clean off the debris tight away and re-do.
If it doesn't jam too much you can work it with the little oscillations and it will
re-form the threads. It will resist a bit but then get smooth at some point.
Check to make sure it's dead level with the mating surface.

I use to recover galled stainless threads in a summer job for the water district.
Aluminum is similar. It might have been ruined, but this gives it a chance to find the
real threading. Lots of wiping, wax, many 'oscillations'.
 
Another mess: nicotine 'fogging'

The lenses usually look find, or only a little bit yellow, but looking through
them shows a feint white "smoke". 91% isopropyl can take a long time since
it dehydrates the tar complex first and the tar 'epoxifies'. Some distilled
water with a tiny bit of detergent first (and dry a bit) will hydrate the
tars so the isopropyl undercuts the tar-poxy better. Otherwise you end up with something
that looks like a good job but still makes "white smoke" looking through.

A "white smoke" view through and a definite smell of cigarettes is the indicator.
More white smoke if amber coatings are involved. Not sure why.
 
Last edited:
When I dismantled my Binuxit which is in mid restore at present, I found one chipped prism and another so badly marked and stained that isopropyl would not touch it. I have replaced these with 2 Jenoptem prisms which I have to thank Simon Spiers for suggesting.
I did however hang on to this prism, and in trying to clean it, made some light scratches to add to the damage. I recently obtained some watchmakers crystal polishing powder which I experimented with on this prism. You mix a little powder with little water, run the thin paste on the glass and polish by hand with a fine cloth, I used microfibre. The prism has come up with a perfect mirror finish, all the stains and fine scratches have been taken out. Of course this stuff would take any coatings right off glass, but if you have something so badly damaged then the coatings are history anyway and better to have something useable even if transmission is very slightly less effective. Useful stuff.
 
Last edited:
I think that dovetails nicely with this topic: MOLD

Swabbing at mold with alcohol will not usually remove the organic film.
I've been able to remove mold from prisms with toothpaste and water on the fingers.
On cotton paper it can scratch a little. With moderate finger rubbing,
I haven't removed coatings yet. I leave the few feint "center dits" where
the mold ate the coating.

So...you have a way to abrade and keep a flat finish and I have a way to clean
life residues without removing coatings.

Isn't it odd how mold usually goes for prisms and not lenses?


For those pondering prism work I 'd say:
---practice on junkers first!
---work out with your fingers if they aren't strong..
stabbing hand into bucket of pebbles or something.
Those mounting spring clips (most binocs use them) are tough...
 
Last edited:
Another horror: lens ring abuse..


Some use screwdrivers and a hammer to drive the ring slots. Evil.
You need an optical spanner, or a watch crab with the tips ground down.

To recover: you can tidy damaged outer threads by carefully scraping
the galling away with a tiny slot screwdriver (make room for threads).

If the slot is lost from the ring, because of abuse or sand-jamming,
all I can do is take a tiny cone diamond Dremal bit, cut just through the ring,
pry it out, and have a replacement ring from a junker. (check first)
Putting a tiny slope on one side of the cut will make it easier to pry without
stabbing threads.

I shop the goodwill auction so I get some Frankensteins. "As-Is". I need to
give that a rest. There are gems, but the postage hurts on the duds.
 
Bencw:
Maybe you could describe what the adhesive for your leather repair is like.
Is it like a contact cement? That seems like the critical element.
I've had a few leather "crumblers" from the 20s. You grip hard and it's
all on the floor...looked fine a minute before.
 
Bencw:
Maybe you could describe what the adhesive for your leather repair is like.
Is it like a contact cement? That seems like the critical element.
I've had a few leather "crumblers" from the 20s. You grip hard and it's
all on the floor...looked fine a minute before.

For this repair I used araldite, which is a two part epoxy adhesive, the kind where you mix the resin and hardener together, it takes about 10 to 15 minutes to go off, so you have time to wipe it off if it goes wrong. If you wanted to recover a whole binocular, give cameraleather.com a look up, they are not cheap, they do many variations, but the self adhesive black pebble vinyl sheets they sell are cheapest, look ok and large enough to cover most hand held binoculars. You can make a template or use the old covering to draw your outline and cut, then fit on the binocular body.
 
That's a complete binocular course at that link.

Ah, epoxy. You take no prisoners...hah. Solves the drying problem and part of the
hungry-fungus problem. Might even keep the leather 'crumbs' on as a mosaic in 100 years.
I'm thinking during the brief 'tacky period' is a great time to make sure the hollows
stick down.

I'm pondering abalone or mother of pearl look for the steam-punk set for a few pairs of oldies.
Nice but catchy off-shape focus tubes, that type of binocs. They wrestle the focus for infinity on the
old 8x22s and leave it be... The shedders look ghastly bare.
 
Last edited:
Here is something I don't have the answer for"

Some old binoculars have two little holes in the focuser clamping screw.
They expect a tool with two small steel pins sticking down.

Does anyone know how to make or buy a tool like this?
Last time I used two little screwdrivers clamped by pliers.
I'd like to do better than that, for the sake of the screwdrivers and the
brass fitting.
 
The example is big, but they have smaller.
I noticed the magic key phrase "pin wrench" works
great for finding all sizes. Thanks! These days, the name is everything.
 
Here is something I don't have the answer for"

Some old binoculars have two little holes in the focuser clamping screw.
They expect a tool with two small steel pins sticking down.

Does anyone know how to make or buy a tool like this?
Last time I used two little screwdrivers clamped by pliers.
I'd like to do better than that, for the sake of the screwdrivers and the
brass fitting.

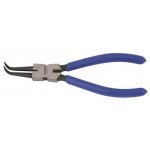
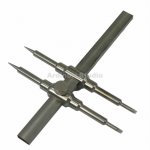
I sometimes use circlip pliers, something like these, mine are smaller and were quite cheap to buy, just get the tips in the holes and squeeze to keep firmly in, and carefully turn. An optical spanner wrench using the pointed ends will do it too, but if I have my spanner wrench correctly adjusted for using on a lens retaining ring, I am reluctant to change it, so the circlip pliers come in handy.
 

Attachments

  • circlip.jpg
    circlip.jpg
    4.9 KB · Views: 129
  • spanwrench.jpg
    spanwrench.jpg
    40.7 KB · Views: 163
Last edited:
Looks like the circlip pliers would also help out
re-assembling erfle and plossl eyepieces.

I had a hard time re-assembling my (very flat view)
AMC 603s, so I used dowels with 'bowls' at the ends to
lift the pieces into place upside down. Otherwise the thick elements
would keep diagonally jamming on the way in.
The circlips, or maybe with ground-down tips, might have
allowed a clean placement of things.
 
Some ( perhaps) useful tips when disassembling binoculars
1. put separated optical parts, i.e., prisms and lens into small zip lock bags
when awaiting cleaning or when delays expose optics to dust particles .
2. use a small vacuum cleaner to suck out particles which will fall into the
open bodies, often when the lids are removed.
3. wear nitrate tight fitting disposable gloves when handling optical elements
4. avoid using blown air on parts - tends to stir up contaminants
5. synthetic wipes work well on prisms and lens
6. K-D tool No. 3151 can be used to turn out the two hole screws - it comes
with different size pins -
 
Warning! This thread is more than 9 years ago old.
It's likely that no further discussion is required, in which case we recommend starting a new thread. If however you feel your response is required you can still do so.

Users who are viewing this thread

Back
Top