• Welcome to BirdForum, the internet's largest birding community with thousands of members from all over the world. The forums are dedicated to wild birds, birding, binoculars and equipment and all that goes with it.

    Please register for an account to take part in the discussions in the forum, post your pictures in the gallery and more.
ZEISS DTI thermal imaging cameras. For more discoveries at night, and during the day.

Binocular Repairs and Cleaning (1 Viewer)

Thanks John,
Useful tips. I have been using thin rubber gloves, but they really make my hands wet. The vacuum cleaner is always handy when I am working on binoculars, has saved me from having to remove a prism by sucking the offending particle out on more than one occasion.

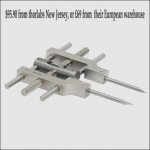
I came across this optical spanner wrench yesterday, the company is nothing to do with me I stress, but it is the best one I have seen, you just pull out and turn the end prongs round if you want the flat ends instead of the points. It looks a high quality piece of kit, but is very expensive though, my own wrench was only £16, this is nearly £70.
 

Attachments

  • 1435_SPW801_SGL.JPG
    1435_SPW801_SGL.JPG
    30.3 KB · Views: 180
Last edited:
Last edited:
This is a free ebook on Google Play Books. It is now on my Nexus 7.

https://play.google.com/store/books/...AAAYAAJ&rdot=1

Complete ordinance manual for dissassembly, service and repair of military binoculars. There is 289 pages.

You can also get this from milsurpmanuals from AbeBooks for $5.00.You pay the price and receive a download link. I paid the $5 then found the link to Google. :eek!:

I tried the link. Got message from both firefox and safari that requested URL was not found on either server. Which is odd because it worked on the Vintage Binocular thread below.:h?:

Bob
 
Last edited:
Here it is again. What happens sometimes when one copies and pastes url's, like I did with the link here, the url will either not open or claim it does not exist. I don't know why.

https://play.google.com/store/books/details?id=QUoYAAAAYAAJ&rdid=book-QUoYAAAAYAAJ&rdot=1

So here's hoping this one works ;) Tried it after I posted it here, and it works for me...changed it above too, works for me on both posts, so I hope it is fixed.

I'm looking for the initial link to the download I paid for, but can't seem to duplicate it.

You can get it from Amazon if you have a Kindle for $0.99:
http://www.amazon.com/Technical-MAINTENANCE-BINOCULARS-TELESCOPE-ebook/dp/B00336EVX0?tag=inkmesh-20
 
Last edited:
Thanks for this thread. Very informative. I am not technical, and until today had never disassembled binos. (Usually if I take a screwdriver to something it ends up irreparable). I had a junker pair someone gave me, and today my son wanted to know all about light and prisms because he´s learning about them in school. So I decided to try to take out the prisms (Bisley 8x40 - nice bins to hold, construction seems exactly same as old Zeiss or Nikon). I was suprised by how easy it was to take them apart, and it occurred to me that if I knew how to put a pair of old-style porros back together again, I would be happy with my Nikon EII 8x30 as my main binos for ever. (Sick of modern roofs, each with their own peculiar annoyance).
Of course, the re-assembly is the problem. I would never tackle my EII´s, unless they got water damage inside. But I would love to know if any BF amateur has ever reassembled a pair, as I´d love to learn how, should it ever become necessary. They have screws exactly where the old Bisley pair had, so I imagine they are similar. (My SE 8x32 have no exposed screws, I suppose you´d have to remove the rubber armouring to tackle them).
Is there a book or manual specific to Nikon binos that anyone can recommend? Or am I kidding myself?
 
Last edited:
Dear Sancho,

Most Porro binoculars have the same basic build, but different makes have slight variations, like how the prisms are held in place, how the oculars remove etc. I have dismantled and repaired many porro bins, the Zeiss Jenoptem is quite easy to work on but the big problem is getting them aligned again.
Once you remove the objective cells and prisms the binocular will be out of collimation when re-assembled and need re- aligning, although there are little tricks to make it easier like marking the position of the objectives, it takes patience and a lot of time usually. I generally work on binoculars I have picked up at bargain prices, I would think twice about a complete dismantle of an expensive one, unless I was very confident that I knew exactly what the problem was and how to fix it.
I do not think you will find a book specifically on Nikons, your E11 is a very precise and excellent instrument, as is your SE 8X32 and I would advise not messing with it. But you have an old bin to practice on and if this interests you have you read "Choosing,using & repairing binoculars" by JW Seyfried? it is a general guide and takes you through dismantling and assembly and re-alignment. It can be found on that auction site, I think cheapest on there.
 
Last edited:
Thank you Ben! I´ll get that book for fun, and hopefully I´ll never need to fool about with my EII´s. I put the Bisley´s back together again, and they´re actually better than they were! But the kids want the prisms to take to school to show their teachers, so I have to disassemble them again.
Strangely, these old Bisley´s have no collimation adjustment screws. Metal housing (made to look like leatherette), and the prisms just pop in right as the Bisley folk intended, secured in place with thin metal clamps. They´re a lovely design, 8x40 and very light, easy to hand-hold with one hand as they´re wide enough to allow a full "wrap-around" grip on the barrel, with two middle fingers passing between the two bridges.
 
Your Bisley sounds a great design, sometime the prisms will fit exactly into the slots, which helps, the front and back prisms must be positioned at exactly 90 degree angle, and with many you have to tweak them to get them right. Best wishes Sancho, hope you enjoy the book, I did and found it very useful, I actually built the collimating device outlined in the book and it does work.
 
Thank you Ben! I´ll look forward to it. Your collimating device sounds interesting. Like something to fear at the dentist´s;). I´m going to get myself an old pair of Jenoptems to play around with. As far as I know, there is no-one in Ireland who repairs binoculars anymore, although there must be some amateurs somewhere over here who enjoy taking them apart and putting them back together again.
 
Last edited:
Why not buy some junkers and take them apart for the prisms?
If you have nice coatings on a few faces you don't want school use to
scratch them up...

(just being angsty)

I have seen four types of collimation used:

1) wobbling the objectives by rotating them in eccentric rings at the front.

2) screws pushing the prisms

3) adjusting the oculars

4) 3 setscrews used to position objectives

#1 is the most common.
#2 usually means digging through a covering.. sometimes they are
polite enough to show the setscrews but you have to 'unstick' them.

I love #4 (On special Bushnell Ensigns) but that's mainly for 30mm and under.

Practice surgery on junkers is extremely valuable and can yield you parts!
I made a telescope from 8x30 parts without prisms. The image was backwards
but it was brighter and sharper. Very informative.
 
Last edited:
Just a couple of things that will not be in the book mentioned above which might be useful.

The book tells you the correct way to remove the oculars,which is from the front, but although correct for most Porro, Jenoptems are actually different and dismantle from the rear, ocular end. The front button has a plastic disc with the serial number and removing it will not help with Jenoptems,

If you take repairing up you will need some tools like the ones in this link, as well as a small set of jewelers screwdrivers and long nose pliers.
http://www.birdforum.net/showthread.php?p=2908703#post2908703

If a prism or any glass is scratched or so badly marked that isopropyl cleaning alcohol will not work, then glass can be polished to a mirror finish using watchmakers crystal polishing powder, you mix a little with water and polish the glass with a clean fine microfibre cloth, it takes out stains and fine scratches. This would of course also remove any original coatings, but if its that bad, protecting the coatings becomes irrelevant.

If you want to improve a binocular cosmetically, paint etc, I use satin black acrylic paint, rub smooth and then spray objective rings etc. Take your time, 3 or 4 very fine coats with time to dry in between. If the prism plates have white letters, and the black paint at the edges has rubbed, I touch this in by brush. The white letters will often come up bright by gentle rubbing some washing up liquid on a cloth. Then the whole part can be sprayed with a clear satin acrylic lacquer to give a uniform finish. If you need a more gloss finish than the satin, you can polish it up to the required finish using a car wax like autoglym. Always leave paint or lacquer a few days to dry hard before polishing or you will remove too much. Also to rub painted edges to a smoother finish, metal polish works just like T-cut.

For lubricant, I usually find a lithium based grease is fine, and obtainable from the 99p shop if you have those. Apply sparingly with cotton buds or in fine threads with the point of a cocktail stick. Old grease will clean off with alcohol usually, maybe using an old toothbrush in threads and crevices. On leather shoe cream and furniture polish are good.
Boot fairs and charity shops are good for finding old binoculars, I sometimes find very good ones that just need a clean inside or a part replaced, which can be then sold on.

Hope helpful.
 
This is a good time for a follow-up on my "laser collimation" tool thing.
While I got some great information with it, it was taking too long per measurement
to use to adjust collimation, unless I make some changes and additions.


I went back to looking out the window at a street sign 200 ft away.
Early in the day my eyes are too good at aligning things, so I look in the dark at
night. The reflecting sign and the light behind me make a glowing target. I learned
the 'uneasy feeling' of a slight collimation error as I tuned a pair off on purpose.
So...practice, a far glowing target, and tired eyes seem to make a good tuning set too.
 
I use a lone Juniper tree on a ridge line two miles from the house. After setting up on a tripod or similar solid rest, and using a few minutes observation, it is fairly easy to determine which barrel, or even if both barrels are off. What I find happens, as I center the tree as best the mis-aligned view allows, that as I back my eyes away from the oculars so you are looking at the image through the exit pupils, that one side will be much further away from center as the other remains closer to center. If both look to be off, I start with the side that appears to be closest to centered. In other words the left barrel is pointing high right, for example. Being careful and marking where the rings were at the start, I can usually get to the point where that side is OK. If both sides don't quite match, then I fiddle with the other side. That way I can almost always get close. I then use Jupiter or some bright star and that will usually tell me what else needs doing. I've done several that show single images of stars. A couple I have had to give up on.
 
Makes sense. I think the "lone tree" or the "street sign in the dark" is key.
No other clues.
If there is a lot of clutter and detail around the target, the optic cortex
is relentless about stitching the view together. Of course it hurts the
eyes after a while. I'll have to try the "backing away from oculars" thing out.
Might make a good first check as well, when the eyes are otherwise too rested.
 
Extending a little on bencw's suggestion of needlenose pliers (in a pinch) for pin-wrench
use, I got a set of little "spring clip pliers" at the local Harbor Freight shop. They
worked great on the focuser clamp on some pre-occupied-Japan Mayflower 7x35s.
A little assortment of them will allow me to grind tips for smaller holes.
So that's another alternativ...in between needlenose pliers and pin wrench for
effectiveness.
 
Soviet bnu2 8x30 prisms = Jenna 8x30

Having just dismantled, cleaned and aligned an old soviet era Russian 8x30 I found that the front (smaller) and rear (larger) prisms are exactly the same as the front/rear Zeiss Jenna East German made 8x30, Jenoptem/Deltrintem. Not a surprise really I suppose, but maybe useful to note if you did not already know this.
 
Makes me wonder about various "KOMZ" models...

It would be great to have equivalence lists, especially for Japanese 1940-1960 parts
(some of which probably match the German). Hard to do alone though..

You have successfully swapped in other prisms too, I think.
Measuring what one has on the scrapped shelf is a start, I guess. I have left
that little 'star' fungus trace where the coating was eaten when I probably could have
put a fresh prism in. The stars are pretty small though.
 
Just found this trick after months: You can put a tiny dab of grease on a setscrew
head and then brandish it with the screwdriver. Saves lots of manipulation and
encourages setting the little things aside (instead or perching them 90% out and
hoping they don't fall). Beats tweezers, if your grease is thick enough.
 
Magnetising your screwdriver does the same job - keep one solely for screws and just rub it against a magnet every few weeks.
 
Warning! This thread is more than 9 years ago old.
It's likely that no further discussion is required, in which case we recommend starting a new thread. If however you feel your response is required you can still do so.

Users who are viewing this thread

Back
Top