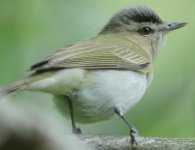
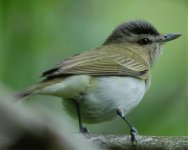
• Welcome to BirdForum, the internet's largest birding community with thousands of members from all over the world. The forums are dedicated to wild birds, birding, binoculars and equipment and all that goes with it.

    Please register for an account to take part in the discussions in the forum, post your pictures in the gallery and more.
ZEISS DTI thermal imaging cameras. For more discoveries at night, and during the day.

What am I doing wrong? (4 Viewers)

Terry O'Nolley

Cow-headed Jaybird
First, my setup. I use a Nikon D-50 with a Nikkor AFED 300 film lens (effective 450mm).

Even when my pictures are in focus (via autofocus), they are not as sharp as many of the images that are posted here. There is always a soft outline to the subject.

I do not shoot in RAW mode, I use the highest resolution JPG setting.

Should I change to RAW mode?

I also have never post-processed my images. Is that something that should be done? How would film photographers have handled that without all the fancy digital tricks that can change what it was that you actually photographed?

Other possibilities:
  • Not using a tripod
  • Bad lens (not as sharp as it should be)
  • Defective autofocus

I have heard of Noise Ninja. Is that considered "fair play" when sharing your images? It just seems to me that your final image should be what you shot - not what software does to fake your images.

I just want to get those crisp, sharp images I see here on a daily basis. If a person shooting with a non SLR little pocket camera through a digiscoping kit can get totally razor-sharp images, then why can't I when I am only shooting birds less than 30 feet away?

This is really frustrating and I am ready to trash my entire camera kit and start over.

(Please check out my gallery -you will see what I mean. The pics I upload are the ones I think are my best - but when I compare with others, they lack that sharpness)
 
Last edited:
Well, I'm not familiar with your lens but I have the same camera.

I never shoot at the top of my lens limit and I shoot in manual settings and use an extremely small aperture F10 usually. I do use a tripod because of the lens I use Is a bit heavy for me. The only time I don't use a tripod is when I am aiming at the sky which allows me to use a much higher shutter speed which offsets any camera shake.
 
Terry

Are you using a high enough shutter speed to avoid camera shake? your shutter speed should equal or be higher than the focal length of the lens, ie; a 500mm lens will need a shutter speed of 1/500th sec to avoid problems of camera shake, dont forget to factor in the additional focal length for the digital sensor (usually 1.5X) so a 500mm lens is actually 750mm which mean shooting at 1/750th sec. this will vary from person to person due to technique but the above is a good guideline.

If you cant maintian the above then either use a rock steady tripod or increase the ISO, alternatively just put the camera away and wait till the light is better.

Your problem has nothing to do with shooting RAW or jpeg or how the image is processed, or even what camera and lens were used, its simply a matter of technique and knowing the limitations of your equipment in getting the image captured sharply in the first place
 
I've just been looking through your gallery - some very well composed and exposed shots there. I particularly like your osprey - I've yet to see one of these magnificent birds.
I do see what you mean about sharpness though. It looks as though the images ought to be sharp - ie not motion blur or incorrect focussing - so I would guess it's a processing issue of some sort.
I have never used a Nikon, and have only been using digital at all since October last year (and RAW exclusively), so there will undoubtedly be better informed people here, but here's my stab at it! Firstly, nothing wrong with shooting jpeg so long as you are not doing much post-processing (each manipulation and save will cost you data, and hence in fairly short order, image quality will dip). With jpeg, what you get from the camera has already had some processing. I use canon, but I would imagine nikons are fairly similar in what they do. In canon, you can set parameters for colour, sharpening etc in camera, so there may be a problem in what you have told the camera to do with the data.
Secondly, although you say you do not post-process, there must have been some post-processing involved in putting them on the web - resizing and resaving as a minimum would be my guess. This could also affect sharpness and IQ - I think most people sharpen as the last step before saving - ie after exposure correction, resizing etc - to improve edge contrast that will have been lost, and also to avoid introducing artifacts by manipulating altered pixels (which broadly speaking is how sharpening works).
In summary, there may be some workflow tweaks which will help, right from capture to web-placement.

RAW has pros and cons, but it gives me rather than the camera control over the data and how it is processed. My workflow - RAW capture, converted to TIFF in Capture One LE (with exposure correction, white balance correction and cropping as necessary), import to Photoshop 7 for resizing and sharpening, save as Jpeg. It sounds laborious, but you can batch process in both programmes. Check my gallery for results - there are shots from my old film camera in there, but the newer ones are digital. I personally feel I could also get these sharper, but I think that's in part down to my lens (though no doubt I could improve my technique as well!)
 
TerryAre you using a high enough shutter speed to avoid camera shake? your shutter speed should equal or be higher than the focal length of the lens
To be honest, I have no idea. I keep my camera set at the "Sports" auto-setting which features a narrow depth of field. Nikon tells me that they handle the rest - the shutter speed, etc.


its simply a matter of technique and knowing the limitations of your equipment in getting the image captured sharply in the first place
Why do the camera manufacturers try to fool people into thinking their auto settings are worth anything?

If Nikon is crappy enough that a photographer using auto-focus can stand in a brightly lit meadow with the sun at his back and take a picture of a bird 15 feet away and only get a fuzzy image then I am ready to throw the entire kit in the trash bin.

I was really hoping that someone could provide me with extremely sharp, crisp examples of bird photography taken with Nikon auto settings (without all the digital Photoshop magic going on behind the scenes).

As for my "technique" - there is none :D I use an auto setting and let the auto-focus do its magic.

I was so hoping that my lack of tripod was the issue and not my technique.
If my technique is the issue then I need to scrap all the auto settings and actually learn about photography :D
 
My workflow - RAW capture, converted to TIFF in Capture One LE (with exposure correction, white balance correction and cropping as necessary), import to Photoshop 7 for resizing and sharpening, save as Jpeg. It sounds laborious, but you can batch process in both programmes. Check my gallery for results - there are shots from my old film camera in there, but the newer ones are digital. I personally feel I could also get these sharper, but I think that's in part down to my lens (though no doubt I could improve my technique as well!)

Your pictures are perfect examples for what I am talking about! Like this one:
http://www.birdforum.net/gallery/showphoto.php?photo=141854

It is just so sharp!

My current flow is to just DL the pics off my camera to my harddrive and then copy and paste them into LView and save as a new JPG of a resolution that is allowed at BirdForum (800x800 or less).

If lens jiggle isn't the issue here, then Nikon either produced a broken camera or else they are just incapable of caturing sharp images.

EVERYTHING I shoot - even groups of co-workers at a recent luncheon have that fuzzy border (and, for that, I used my AF35-70) and my external Nikkon flash unit.

I use the auto-focus setting and the lens does whirr into position to take a focused shot, but the edges of the subjects always look too soft.

I honestly took sharper images with my Olympus C4000!
 
Terry, one thing you should think about is that digital images require processing, and in particular they need to be sharpened. It is the nature of the beast.

There is no reason to be heavy handed though, this only creates unwanted artifacts. You can for example select only the subject in your editing program and sharpen only it. There is a bit of a learning curve to it but it is necessary.

You might also look at your technique, especially when not using a tripod. Simple things like holding your breath as you press the shutter, locking your elbows to your side, pressing as lightly as possible on the shutter release, etc. And using a tripod when it is reasonable will improve your results.

Get away from the Sports mode and take control of things. Start by using either AV or TV Mode. Read your manual, ask someone with experience or just play with it. You can take a lot of digital shots and trash them without cost.

Have you considered that the lens may be back or front focusing? Use a tripod and get a good target with clear edges and take a shot by manual focusing the lens, making sure you have good light. If this is not sharp, you may need to get the lens calibrated.

BTW, we all have been frustrated to the point of pitching the whole deal off a bridge when we started, this is common experience. Take things in steps, think of something you can improve and work on it. Look at your results and work on the next thing.

Good luck, Harold
 
Hi Terry.I use the Canon equivilant to your camera,300d.I believe that your Nikon is 6mp.If this is the case it means that you cannot crop a picture too much.You will lose too much detail.I found this out myself.I post process all the pics in my gallery and I also shoot at jpeg/large.Never RAW.I have also found that if you use a high iso (ie 800) you lose detail as well.My tecnique is that I use a tripod,and even more importantly,a cable release whenever shooting in overcast light.I saw a great improvement in my pictures (sharpness)after employing this method.The cable release allows you to have no contact with the camera at all therefore eliminating camera shake at high magnification.The tripod I use has a panning handle,I tighten up the head so I can just move it with my left hand and with my right I have the cable release.Once I pan onto the bird I focus and let go of the tripod handle and fire.I have taken sharp shots with this method down to 1/20th sec (providing the bird doesnt move) at my feeding station which is very dark at this time of year (due to the canopy).I also shoot on burst mode.I find that the noise of the first shutter release gets the birds attention and at the second the bird is stock still,wondering where the noise is coming from.Then I do my sharpening and adjustments in photoshop prior to uploading to here.The only time I dont use the tripod method is with birds in flight (see Peregrine in my gallery).I find it more of a hindrance then.So in short,get as close as you can to capture as much detail as possible,eliminate camera shake at lowish shutter speeds and dont worry about post processing as nearly all of us do it.Sorry if this reply is a bit longwinded but I hope it helps,Mike.
 
Hi Terry. The first thing you need to decide is whether you want to take bird photographs or not. If you do, then you have to decide that you are going to put in the work required to reach the sort of standard you want to reach. It isn't easy, and you can't just hand over your credit card in a shop and walk away with a machine that will do everything for you.

Your equipment is OK. Don't go buying anything else (except a decent tripod and head, if you don't already have one) until you have demonstrated to yourself that you are competent to use your camera.

Now, to practicalities:
  • You need to be aware of what your camera is doing. You need to decide what the shot needs. No camera on earth is smart enough to take bird pictures by itself. Bird work (or any long-lens work) requires quite specific settings, which vary with the circumstances.
  • Never, ever do any serious photography using AUTO mode. This mode is for your granny to take happy snaps with, and isn't much good for anything else.
  • Short summary: you must get the shutter speed up, especially if you are hand-holding. Aim for 1000th of a second or faster. Do this by shooting in aperture priority. Set the aperture as wide as possible (if your lens is first-class - most lenses are not) or about 1 stop below wide-open. So, if you have an f/5.6 lens, set it to f/5.6, f/6.7, or f/8, no smaller (bigger number) than that. If in doubt, set it wide-open.
  • The camera is smart: it will adjust the exposure to match the light and the aperture you have set. Watch what it's doing: if you are not close to 1/1000th of a second, use a tripod or increase the ISO
  • Don't worry about shooting RAW. You have enough on your plate learning the basics. You can think about finer details like RAW vs JPG after you master the basics.
  • Learn some basic post-processing. It isn't hard. Select a picture viewing/editing program you like (not Photoshop!) and learn to re-size, crop, and sharpen. I like PMView - http://pmview.com - but there are lots of other good ones.
 
Thank you all for the good advice. I will try the lens calibration test (shooting manual and then letting auto-focus try and make sure they are both equally in focus).

I am also glad that my equipment is capable of producing sharp images, provided I take the advice here and learn how to properly use it. I've bought a Magic Lantern camera guide book for my D-50 and will experiment taking photos with different settings and learn how to properly use the camera. I do have a fairly good tripod (Vivitar V900) and will see if I can't take some sharp pictures this weekend.

I just want sharp images and was wondering if the fact I couldn't get sharp images with Nikkon's auto settings meant something was wrong with my equipment or if using their auto settings and not getting sharp images was a "feature" of my camera.

Also, I have used Photoshop for about a decade and thought it was good. I am currently using version CS2. What is it about Photoshop that is so bad? I looked at PMView and it seems like it is designed to process digital camera images - probably be a much quicker tool for doing lots of images. But is the photo sharpening (like the Photoshop Noise Ninja filter) good in PMView?
 
Last edited:
Hi Terry ,
I've looked into your gallery and i think the main problem is shutter speed .
(But as said before - i would first check out the lens to see there's no back-focusing etc..) .
Keeping the camera on auto\ sport - is not enough .
You need fast shutter speeds and a good lens support ( bean bag , tripod ) .
I almost always try to shoot at speeds of 1\1000 and up .
I agree with what has been said above : you should control the camera and not the other way around.
If a picture is not sharp from the camera - then no post processing will help.
( I can see in a few of your pictures - a visible sharpening halo -in an effort to make the picture sharper ...).
On the other hand - post processing is almost a must in digital photography .
Photoshop is actually the modern "Dark Room " - and if you look into many
bird photography sites on the net - you'll find that even the big pro's- post process almost every shot .
 
Last edited:
You need fast shutter speeds and a good lens support ( bean bag , tripod ) .
How do people manage shooting warblers that are jumping all over the trees above them? I would never be able to get any of those shots with a tripod. And I certainly wouldn't have time to manually adjust all of those settings and manually focus as the birds were jumping from light patches to dark shadowed areas. So I chose the "Sport" autosetting because it seemed to offer the best settings for that type of photography (but the results are not what I was hoping for).


If a picture is not sharp from the camera - then no post processing will help.
But if they were sharp from the camera, I wouldn't need to sharpen them. Or is there a difference between "sharpness", "focus" and "vibration"?

( I can see in a few of your pictures - a visible sharpening halo -in an effort to make the picture sharper ...).
The Halos are probably because I DL the pics from the camera and paste them into LView and that is where I crop them and re-save. I will also raise the gamma because when I crop out a part it always gets a lot darker - that is probably introducing the halos. LView's JPG compression setting is pretty high - which is fine for web display. But even the JPGs straight from the camera lack the sharpness.

On the other hand - post processing is almost a must in digital photography . Photoshop is actually the modern "Dark Room " - and if you look into many bird photography sites on the net - you'll find that even the big pro's- post process almost every shot .
I am glad that digitally tweaking images is not considered "cheating". I sort of thought that if you are going to digitally manipulate the pixels to make the picture look different than it actually was, you might as well paste a picture of an Ivory-billed Woodpecker into it :) Like I said, I'm glad that sharpening and color balance isn't considered "cheating".
 
Last edited:
How do people manage shooting warblers that are jumping all over the trees above them? I would never be able to get any of those shots with a tripod. And I certainly wouldn't have time to manually adjust all of those settings and manually focus as the birds were jumping from light patches to dark shadowed areas. So I chose the "Sport" autosetting because it seemed to offer the best settings for that type of photography (but the results are not what I was hoping for).

If you choose AV mode , set aperture to wide, iso 320-400, autofocus, then you'll get shutter speeds of 1\1250 or higher - depending on light. This will enable you to hand hold the lens , track the jumping warblers , and nail the photo !

But if they were sharp from the camera, I wouldn't need to sharpen them. Or is there a difference between "sharpness", "focus" and "vibration"?

Thats a wrong conclusion . Even sharp photos can benefit from more sharpness. There's a big difference between sharpness and focus. You can focus on the bird , but if shutter speed is low- the end result will be a blurred image


I am glad that digitally tweaking images is not considered "cheating". I sort of thought that if you are going to digitally manipulate the pixels to make the picture look different than it actually was, you might as well paste a picture of an Ivory-billed Woodpecker into it :) Like I said, I'm glad that sharpening and color balance isn't considered "cheating".


I would almost say that post processing is mandatory , and in no way considered cheating .
 
Thanks DOC. I looked through my guidebook for the D-50 and figured out how to set things. Hoping the sun comes back out tomorrow so I can practice.

I think some of my problems were related to processing the images.
First pic is the image I uploaded to the gallery. Second pic is my re-processing that image in Photoshop instead of LView. I like the second pic better.
 

Attachments

  • Red-eyed Vireo.jpg
    Red-eyed Vireo.jpg
    38.2 KB · Views: 162
  • rev2.jpg
    rev2.jpg
    42.2 KB · Views: 176
Digtal technology needs sharpening becuase of the way it processes an image. DSLR cameras have filters which cut down noise, moire, etc, but this causes the images to be less sharp.

Shooting in RAW gives you the least sharpness because it has no in-camera sharpening like jpgs do. RAW images are then expected to be sharpened in software.

I think photographers are gradually coming to the idea that digital photography is a two step process, in camera and in computer, just as it is in film camera and in darkroom. An expertise with post processing is essential to being a good digital photographer.

BTW, its a whole huge other topic but there are a great many photographers who wish they had always shot in RAW as they become more proficent in processing, and you want to use your new processing skills on older images. I susppose this is not new. I saw an Ansel Adams exposition last year and one of the things that struck me was that he would go back to old negatives and reprocess them in the darkroom. The same image processed decades apart was very different.
 
Having looked at your gallery images I think you may also be resizing with Bicubic interpolation (the default setting) where Bilininear interpolation is the better method for making images smaller as the algorythm is designed for removing pixels. You will find where tochangethis in the resizing options palette.
 
Terry, I said "not Photoshop" because it has such a dreadful user interface, making it very difficult to learn - I figured you had a lot on your plate already and didn't need more pain! But as you already know Photoshop, no problem.

You are right about the speed of PMView (and of a number of similar programs). It is perfect for zipping through a pile of images looking for the best ones, and for a lot of light-duty tasks that are much faster and easier with a small, nimble viewer/editor.

There are lots of different ways to sharpen. Noise reduction is a different thing. Maybe it would help if I described my workflow:
  • Upload pictures. (I use Downloader Pro for this, as you can tell it to put things exactly where you want them and name them as you please: very nifty program. But, of course, this is just a convienience, any downloading method is as good as any other method so far as image quality goes.)
  • Run through them with PMView, moving the poorer ones off to a sub-folder, rotating portrait-format shots as I go. (Yes, you can rotate in-camera, or have Downloader Pro do it for you, which is quicker, but I prefer to do it myself. Matter of taste. I move rather than delete because deletion is so final, which means you can make a move/don't move decision in an instant, but a delete/don't delete decision requires more careful thought. Also, sometimes you want to look at the poorer pictures later, to confirm a tricky ID, for example. In any case, disc space is cheap.)
  • Go through the remaining ones again. I mostly aim to remove about 50% of the pictures each time I run through them, until I am left with just the ones I want to keep. I find it helps to let them sit for a while (hours, weeks, often months) and then come back to see them afresh. Often, doing this, you can suddenly see that image #4 is clearly the best one and that images #2, #3 and #6 can be discarded, where last time you looked, you were struggling to pick them all apart because your visual sense was jaded. PMView is perfect for this, because it is so fast and easy to use. (One of the best things about PMView is that the keyboard is totally soft - i.e., you can assign any action to any key: I can move, delete. rotate, resize, sharpen, zoom in, zoom out, crop, and so on with just one keypress.)
  • Rinse, lather, and repeat.
  • By this time I have a fair idea which pictures I want to go further with - the stand-out better shots. Now it's time to bring out the heavier artillery: Bibble, Neat Image, and sometimes either Photoshop or Paintshop Pro.
  • First I decide if I need to alter levels, curves, or white balance. I prefer Bibble for this job, and because Bibble can't read TIFF files, only JPG and RAW, you have to use it before your other tools. (Apparently they are going to fix this in a future version.) Typically, I just do levels in Bibble, to get the best range of dark to light and good contrast, but do more if I need to. Save the file (as a TIFF of course, JPG is no good for intermediate results.) Often, there is no need for this step and I skip Bibble completely - depends on the picture.
  • Neat Image. Nearly always, I use the default noise-removal (because it's usually spot-on as-is) and also a tiny bit of sharpening. But some images are better without any sharpening at this stage and some are better without noise reduction - your eye is your guide.
  • Back to PMView for cropping, rotation (if my horizon is crooked, for example) and possibly also little tweaks to saturation, colour balance and exposure - you can also do the colour-related stuff in Bibble, in PMView, or in Photoshop. I mostly use PMView's (very limited) colour tools because it's the fastest and easiest and the interface is the cleanest, but return to Bibble or else fire up Photoshop if I need something more powerful and/or subtle.
  • Save the result, again as a TIFF. This is now my "master" copy: it is adjusted in every way I want except size and sharpening.
  • Output the result. This stage depends, of course, on what you want to do with your image. I mostly want 800 x 600 for my website (you can find it at http://tannin.net.au if you are interested), thumbnails also for the website, and 1600 x 1200, 1280 x 1024, and 1024 x 768 versions that I use for display or as screensavers. So, in most cases, I want 4 versions, plus a thumbnail. Once again, PMView is my tool of choice.
  • First, I resize to a sample resolution, usually 1280 x 1024, and apply PMView's "moderate" sharpening. Usually, that looks good and I can carry on with the next step, but sometimes it needs a "strong" sharpen, and sometimes, now that I can finally see exactly what it's going to look like, I decide that I need to go back and re-do one of the earlier steps (more contrast in Bibble, maybe, or perhaps it's a Photoshop job). If I'm happy:
  • Throw away my experimental "sample" resize and sharpen by reloading the "master" copy (takes two keystrokes), and tell PMView to make the 5 final images (takes 5 mouse clicks - one for each).
  • Some more detail on this last step. PMView allows you to create macros: lists of actions that you want repeated over and over. They are easy enough to create, and once you have one you can call it up as often as you like. The five macros I use for this all do much the same thing: resize the image to (e.g.) 1280 x 1024, apply the "moderate" sharpening level, and save the result in a particular folder (different folder for each size of image) using (in my cases) the same filename as the original. I have another set of 4 macros, which can also be called up with a single mouse action, which mimic the main four, but apply "strong" sharpening.
I'm not sure how useful this is to you, Terry, as your primary issue isn't post-processing, it's getting the image in the first place. But we can deal with that a little later. (I have to go to work now.) Oh, by the way, I mostly shoot in JPG rather than RAW and have the cameras set to apply no sharpening at all - I do that in post-processing.
 
Wow! That is a lot of info! I really appreciate people taking the time to help a newbie photographer.

I originally wanted to photograph the birds as a sort of a photographic "tick" (I am also a stamp collector) and was more interested in number of species photographed. Then I started wanting to take "good" pictures and I quickly hit a wall.

Going back through my pictures today I noticed that I do have some that I consider quite sharp but the composition is bad. That at least tells me my camera is capable of producing quality photos. Which leaves...... me. And that led me to post here.

I see I have a lot to learn, but I am getting that feeling that learning will be a fun and rewarding experience.

I want to get to that stage where I "get" the connection between how light it is, what I am shooting, etc. and I just "know" which settings to adjust and will be able to do it while still looking through the viewfinder. It will take years, no doubt. But if those years are spent learning and enjoying this wonderful new aspect of nature then I can't wait!
 
So what is sharpening? It doesn't really have anything to do with improving focus or the like, what it does is increase the contrast in places where there are sharp(ish) transitions between blocks of colour. Let's say you take a picture of a dark grey square on a light grey wall. What sharpening does is darken the last couple of dark pixels, and lighten the first couple of light pixels, so that instead of:

dark dark dark dark light light light light

you wind up with:

dark dark black black white white light light

In other words, it accentuates the differences along edges. Seen from a distance (i.e., as a small part of a large image) the edge stands out more and the eye is fooled into thinking that the picture is "sharper".
 
I see I have a lot to learn, but I am getting that feeling that learning will be a fun and rewarding experience.

I want to get to that stage where I "get" the connection between how light it is, what I am shooting, etc. and I just "know" which settings to adjust and will be able to do it while still looking through the viewfinder. It will take years, no doubt. But if those years are spent learning and enjoying this wonderful new aspect of nature then I can't wait!

Digital is a real bonus for learning, as it allows such quick feedback with histograms and EXIF data - much better than waiting for transparencies and negs in the post!
Just to summarise the advice so far:
Get the capture right - use the camera controls to your advantage; for birds, aim for a high shutter speed where possible - this minimises the chance that camera shake or subject movement will blur your image. AV mode is a good place to start, as the camera still automates some of the work. Using a tripod does also help, and perhaps a shutter release. However, I wouldnt regard either as compulsary - it depends on the exact situation. (For example, that puffin shot you picked out was handheld, and I wouldnt have got near it with a tripod, but the shutter speed was sufficiently fast)
Post-processing - sharpening is necessary. Most people do it last, after correcting exposure, cropping, white balance corrections, noise reduction, resizing. There are loads of good programmes around to do this stuff, so use what suits your purposes.
Read up on exposure control - there are some good threads on this in www.worldphotographyforum.com - the sister site to this place.
Above all, have fun with it - if it starts spoiling your day, leave it for a while
 
Warning! This thread is more than 17 years ago old.
It's likely that no further discussion is required, in which case we recommend starting a new thread. If however you feel your response is required you can still do so.

Users who are viewing this thread

Back
Top