• Welcome to BirdForum, the internet's largest birding community with thousands of members from all over the world. The forums are dedicated to wild birds, birding, binoculars and equipment and all that goes with it.

    Please register for an account to take part in the discussions in the forum, post your pictures in the gallery and more.
ZEISS DTI thermal imaging cameras. For more discoveries at night, and during the day.

Testing prime focus digiscoping setups (1 Viewer)

JGobeil

Nature Photographer
Paul Corfield has started a thread last November called "Some digiscoping experiments with a DSLR". It has been extremely popular and is now in its 15th page. Paul and a few others have experimented with prime focus digiscoping and the results are quite fantastic. Using low cost astro refractor telescopes, very high magnification levels have been reached with good quality results. 100X seems possible under good conditions, and possibly more.

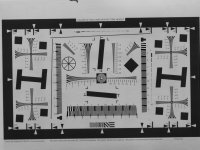
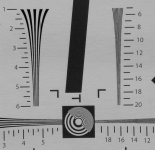
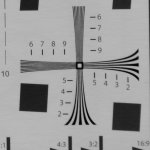
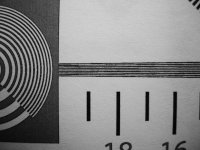
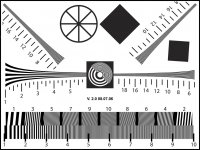
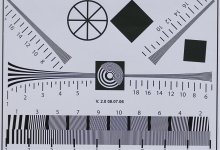
Lately, we have been working on a way to test those setups. We want a standard way to test different prime focus digiscoping setups to better understand the effect of adding teleconverters, barlows and extenders, stand alone or in series. This should allow us to evaluate different components for digiscoping use and to find out the best way to use them.

This thread has been opened to display and discuss those results.
To begin, we will test only the most simple setup possible: a refractor scope directly connected to a DSLR. This will allow us to optimize our testing protocol so that we become able to meaningfully compare different setups and options. After this initial stage, we will experiment with teleconverters, barlows and spacers, still in prime focus digiscoping only.

You are invited to participate with us. THERE IS ONLY ONE RULE: YOU MUST ABIDE BY THE PROTOCOL. If you feel that changes should be made, indeed suggest them but don't make changes on your own. We must compare apples with apples...

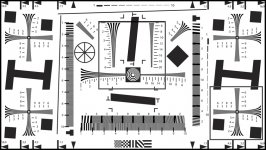
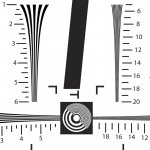
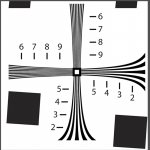
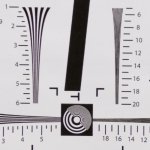
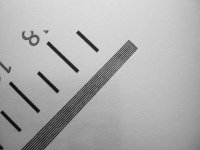
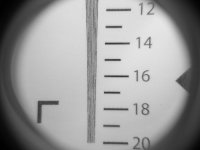
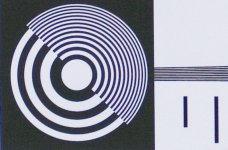
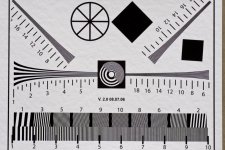
Feel free to use this protocol and the suggested target for your own resolution tests with other types of digiscoping. But please, POST ONLY PRIME FOCUS DIGISCOPING RESULTS ON THIS THREAD. Prime focus digiscoping is a DSLR directly connected to a telescope, without an eyepiece.

Version 1.0 of the testing protocol is described in the next post.

Regards
Jules Gobeil
 
Prime focus digiscoping protocol - V. 1.0
(Revised 08.07.02 20:00 EST)

PLEASE FOLLOW EXACTLY ALL THE INSTRUCTIONS IN THIS PROTOCOL AND DO NOT CHANGE ANYTHING. We won’t be able to compare meaningfully if we don’t use the EXACT same settings.


1- To begin this experiment, the test will be limited to a DSLR connected directly to an astro refractor scope. Nothing else: no teleconverters or barlows. Use spacers ONLY if they are required to get the target in focus. As soon as we are satisfied with the protocol we will open it to other setups.

2- The DSLR must be set to its standard settings. Of particular interest is the internal sharpness setting which should be set at the DEFAULT VALUE. It should be set at its maximum megapixel value if any choice is offered.

3- The target to be used is a standard ISO 12233 test chart. The file containing the target in JPEG form is available here. Right click on the image and copy.
http://julesgobeil.com/private/ISO_12233-reschart - resized-a.jpg

Only this file should be use as a source for the target. This target has those dimensions:
10.0 x 5.65 inches (254.0 x 143.51 mm) at 300 pixels/inch (118.11 pixels/cm). The complete image should be included in the target, do not crop out anything.

This size will fit A4 and Letter size paper with an adequate margin for all printers. After printing, the dimensions should be checked to make sure they are the same as the original file.

4- Find an adequate place to photograph the target under sunny conditions with little or no wind. Put the target on a firm background like a cardboard box or a piece of wood and fix it solidly so that it doesn’t wobble and its surface is perfectly flat. You must put it at a distance where the target will exactly fill the width of the viewfinder – no more, no less. The sun should be facing the target – behind your back when you take the picture. Make sure that the target is perfectly vertical and that the camera is at the same height as the target. Use a sturdy tripod and head - lock everything so it doesn’t move.

5- If possible use mirror lock-up and timer activated shutter or remote cable. Set the camera at ISO 400 and adjust the shutter speed for proper exposure. Take the photograph using RAW if it is available – if not, use JPEG at the highest resolution possible. Focus with extreme care and take 3 pictures, keeping the one with the best resolution.

6- Resize the COMPLETE photograph of the target to 800 megapixels wide and convert to JPG if you shoot RAW. DO NOT CROP AND DO NOT PROCESS IN ANY WAY. NO SHARPENING PLEASE ! Attach this picture to your post (Picture 1).

7- Using the photograph you made in step 5 (before resizing), Make a 800x800 pixels crop of the middle top portion of the target in your picture which is marked by a square, exactly as shown below. Convert it to JPG, no compression. Also attach this picture to your post (Picture 2).

Here is how it is done in Photoshop:
Start with your picture before resizing to 800 pixels (after Step 5)
Select the Crop Tool
Use those parameters (top left of screen, below the menus)
- Width: 800
- Height: 800
- Resolution: leave value empty and select Pixels/inch
Select the area with the mouse – it will be square
Press Enter to select
Verify that it is 800 x 800 pixels (Menu: Image / Image size)
Save it as picture2.jpg , no compression

8- Using the photograph you made in step 5 (before resizing), Make a 800x800 pixels crop of the lower right portion of the target in your picture which is also marked by a square, exactly as shown below. Convert it to JPG, no compression. Also attach this picture to your post (Picture 3).

9- Studying the target, evaluate the BEST resolution number. This is the highest number where you can see WHITE SPACE BETWEEN ALL FIVE LINES.

10- Publish your picture with the following information:

Make and model of DSLR:
Make and model of scope:
Type, make and model of camera adapter:
Length of spacer needed to reach focus:
Focal length of complete setup in mm:
Measured distance between target and telescope in meters:
Evaluated resolution number:
Speed setting of camera:
ISO:
Original picture format (RAW, JPG) and resolution (mpx)
Date and time:
Weather conditions (sun and wind):
Other pertinent information:

Pictures 1,2 and 3:
 

Attachments

  • ISO_12233-reschart - resized-a 800px.jpg
    ISO_12233-reschart - resized-a 800px.jpg
    196.2 KB · Views: 571
  • ISO_12233-reschart - crop 1a.jpg
    ISO_12233-reschart - crop 1a.jpg
    174.5 KB · Views: 385
  • ISO_12233-reschart - crop 2a.jpg
    ISO_12233-reschart - crop 2a.jpg
    159.5 KB · Views: 411
Last edited:
This is a laudable project, and I hope it gets a long run. I don't currently have a DSLR or an astro scope -- I cannot be in the early group of participants but I'll be reading this thread to decide what to buy.

I was confused by your statement that 100x magnification is obtainable. I take this to be equivalent to the view of a 5000mm lens. Is that really possible with no eyepiece or camera lens?

Yes, 5000mm is easily obtainable using either teleconverters, barlow or both combined. I've never tried a 5X barlow but on a 600mm scope it would equate to 4800mm with a 1.6X crop factor. I've had my own setup out to beyond 7000mm using teleconverters combined with a barlow but in reality you would rarely need to go that far. 1000-4000mm would cover most situations I think.

Paul.
 
Right, here's my images using just prime focus. For the resolution score I went for 11 but looking at my printout the lines start to bleed together at around 11-12 so it's going to be hard to score any higher because of the limitations in the printing. On other parts of the chart where it only goes up to 10 I can see white very clearly between the lines so I'd say 11 is an honest score.

Make and model of DSLR: Canon 450D
Make and model of scope: Skywatcher Evostar Pro 80ED
Type, make and model of camera adapter: T-Ring with 2" scope adapter, both unbranded
Length of spacer needed to reach focus: 85mm
Focal length of complete setup in mm: 960mm after crop factor of 1.6
Measured distance between target and telescope in meters: 6m 74cm
Evaluated resolution number: 11
Speed setting of camera: 1/1000 sec
ISO: 400
Original picture format (RAW, JPG) and resolution (mpx) RAW 12.2 million pixels
Date and time: 4th july 13:16
Weather conditions (sun and wind): Sunny, breezy but garden is sheltered.
Other pertinent information:
 

Attachments

  • Chart_test_1.jpg
    Chart_test_1.jpg
    183 KB · Views: 330
  • Chart_test_2.jpg
    Chart_test_2.jpg
    236.2 KB · Views: 315
  • Chart_test_3.jpg
    Chart_test_3.jpg
    213.8 KB · Views: 309
Last edited:
fine clear day today for my test,, can sure see the need for a macro focuser on the scope doing this,, used live view at 10X and even the slightest touch on the focuser was wild,, found the best of the photos taken,, can see higher line count on the original than on the reduced ones posted,,

Make and model of DSLR: Olympus E3
Make and model of scope: TeleVue TV85
Type, make and model of camera adapter: Olympus 4/3 to OM T mount
Length of spacer needed to reach focus: 50mm
Focal length of complete setup in mm: 1200mm (camers has 2X crop)
Measured distance between target and telescope in meters: 10.05m (33 feet)
Evaluated resolution number: 13 with 14 on the vertical
Speed setting of camera: 1/500 sec
ISO: 100
Original picture format: RAW then to JPEG, final 9.75 million pixels
Date and time: 2008-07-04 13:08:56
Weather conditions (sun and wind): Sunny, no clouds or wind
Other pertinent information:
 

Attachments

  • P7044978 (800 x 600).jpg
    P7044978 (800 x 600).jpg
    208.2 KB · Views: 257
  • center (800 x 778).jpg
    center (800 x 778).jpg
    251.4 KB · Views: 324
  • lower right (800 x 800).jpg
    lower right (800 x 800).jpg
    225.9 KB · Views: 288
when we use the spacer to allow focus and the shorter distance should that be figured into the over-all mm length of the scope,,??

I just used the scopes mm fl and the camera crop factor,, still in prime focus though,,

Derry
 
when we use the spacer to allow focus and the shorter distance should that be figured into the over-all mm length of the scope,,??

I just used the scopes mm fl and the camera crop factor,, still in prime focus though,,

Derry

The size of the spacer wont affect the magnification or the size of the image so it doesn't really need to be factored in. All it does alter how near or far you can focus.

Paul.
 
We got a rain storm when I was finally ready to test this afternoon. I tested anyway after dinner to find out if I was able to focus close enough - no problem with the Kenko set of spacers!. The sun was gone so I won't post but even with low light, I has a resolution around 11-12.

I also think that printing the target will be the biggest limitation. I can print 13"x19" here but most people can't. This why I resized to 10" but this was probably a mistake. What do you think ?
 
One way I suppose would be to take the most relevant parts from the test sheet and rearrange them to make our own sheet. That way they could be better positioned on the paper to allow them to be printed at the maximum size possible on A4. You could have the two parts that show resolution running length ways on the paper rather than top to bottom as they are now.

Paul.
 
The usefulness of Picture 3 is questionable. Both Paul and Derry have posted Picture 3 images in which the lines spacings are visible all the way to the max resolution of 10. So the resolution at which failure occurs is not determined.

[edit] I've yet to print a target image in which the full resolution (20) is visible using a loupe. In fact, I don't think this max resolution is discernible in the posted jpeg.
 
Last edited:
The usefulness of Picture 3 is questionable. Both Paul and Derry have posted Picture 3 images in which the lines spacings are visible all the way to the max resolution of 10. So the resolution at which failure occurs is not determined.

[edit] I've yet to print a target image in which the full resolution (20) is visible using a loupe. In fact, I don't think this max resolution is discernible in the posted jpeg.

Picture 3 is a crop from the bottom right corner of the test image and is purely to see any softness etc at the far corner of the lens.

Paul.
 
was just looking (10X loupe) at my test chart printed on glossy photographic paper and the smallest resolution is in the 17 line area,, can see some in the 18 but after that the lines are really blending,,

Allan, I printed the test chart out on legal (8.5 X 14") letter quality paper and the 20 lines are "barely" readable with the loupe,, that is the largest size I have to print and cannot handle any wider paper,,

with paper and printer abilites differing I agree that we need a larger or different chart, perhaps the Coke can mentioned prior or something we all could obtain that is printed the same to remove our printers limitation(s),, at least we would all be shooting an exact item,,

any thoughts,,


I also notice the right side of my photos are a tad more out of focus that the left,, apparently the chart was not at a true 90 degrees to the scope,, an error on my part (??) as I have never seen that in any other photos taken through the scope,, set up is very critial as we are dealing with a very shallow DOF as we all are aware,,

Derry
 
Last edited:
I'm working on a new test chart. I should post it later today for your opinion. I think that your evaluations of the resolution are a bit on the optimist side - don't forget that you should be able to see white between all lines.

Regards
Jules
 
Here is a tentative for a new version of the target. It makes it easier to evaluate the resolution, specially when we will be working at high magnification. and only one post will be required instead of 3. However, it does not change anything - the lines and the spaces are just bigger.

Printing the target on an inkjet at 300ppi, I easily see all lines and spaces at the maximum 20 resolution.

Taking a full screen picture at 896mm, I get a very net 20 resolution.

Right click on the image and copy the file - you should get a 10"x7.5" 300ppi image.
http//julesgobeil.com/private/iso_12233-mod-jules-v1_0.jpg

Comments please !
Jules
 
Jules, printed the chart out at 300 dpi and can see the lines out to the 20 even on the low grade letter paper I have,, you can see the texture in the first two photos below,, chart looks fine,,

took a couple macros with my P5000 for display,,

the last one is through my 10X loupe of the original test chart printed on glossy photo paper which show resolution in the 16 and 17 area,, sure could not capture it on the camera though,,

Derry


macro

------ of center ----------- upper right ----------- first test chart
 

Attachments

  • DSCN1165 800.jpg
    DSCN1165 800.jpg
    106.7 KB · Views: 231
  • DSCN1164 800.jpg
    DSCN1164 800.jpg
    78.8 KB · Views: 215
  • DSCN1159 800.jpg
    DSCN1159 800.jpg
    58 KB · Views: 254
Last edited:
I printed off the new chart today and did a test photo. Here's a crop showing the middle portion with white space between all the lines. I think the new chart is pretty good and should serve well for the tests at higher magnification.

All details for this image were the same as the fist chart I posted apart from shutter speed which was 1/640sec.

Paul.
 

Attachments

  • crop.jpg
    crop.jpg
    143.8 KB · Views: 294
Ok, here is the new Version 2.0 protocol with the revised target. Let's hope it is the last revision...

Besides the new target, I have removed the mandatory requirement for those elements that are not required to compare meaningfully.


Prime focus digiscoping protocol - V. 2.0
(Revised 08.07.06 17:15 EST)

PLEASE FOLLOW EXACTLY ALL THE INSTRUCTIONS IN THIS PROTOCOL AND DO NOT CHANGE ANYTHING. We won’t be able to compare meaningfully if we don’t use the EXACT same settings.


1- To begin this experiment, the test will be limited to a DSLR connected directly to an astro refractor scope. Nothing else: no teleconverters or barlows. Use spacers ONLY if they are required to get the target in focus. As soon as we are satisfied with the protocol we will open it to other setups.

2- The DSLR must be set to its standard settings. Of particular interest is the internal sharpness setting which should be set at the DEFAULT VALUE. It should be set at its maximum megapixel value if any choice is offered.

3- The target to be used is derived from a standard ISO 12233 test chart. It has been modified so that everybody can print it with a standard home printer and resolve the finest resolution. The file containing the target in JPEG form is available here. Right click on the image and copy.
http://julesgobeil.com/private/digiscoping%20target%20v2_0.jpg

Only this file should be use as a source for the target. This target has those dimensions:
10.0 x 7.7527 inches (254.0 x 191,18) at 300 pixels/inch (118,11 pixels/cm). The complete image should be included in the target, do not crop out anything.

This size will fit A4 and Letter size paper with an adequate margin for all printers. After printing, the dimensions should be checked to make sure they are the same as the original file.

4- Find an adequate place to photograph the target under sunny conditions with little or no wind. Put the target on a firm background like a cardboard box or a piece of wood and fix it solidly so that it doesn’t wobble and its surface is perfectly flat. You must put it at a distance where the target will exactly fill the width of the viewfinder – no more, no less. The sun should be facing the target – behind your back when you take the picture. Make sure that the target is perfectly vertical and that the camera is at the same height as the target. Use a sturdy tripod and head - lock everything so it doesn’t move. These recommendations about sun, wind and setup stability are not mandatory but are most important to ensure a sharp picture.

5- If possible use mirror lock-up and timer activated shutter or remote cable. Set the camera at ISO 400 (not mandatory) and adjust the shutter speed for proper exposure. Take the photograph using RAW if it is available – if not, use JPEG at the highest resolution possible. Focus with extreme care and take a few pictures, keeping the one with the most accurate focus.

6- Resize the COMPLETE photograph of the target to 1024 pixels wide and convert to JPG if you shoot RAW. DO NOT CROP AND DO NOT PROCESS IN ANY WAY. NO SHARPENING PLEASE ! Attach this picture to your post. If the file is too big to upload, reduce the JPEG quality (In Photoshop, set it to 8).

7- Studying the target, evaluate the BEST resolution number. This is the highest number where you can see WHITE SPACE BETWEEN ALL FIVE BLACK LINES.

8- Publish your picture with the following information:

Make and model of DSLR:
Make and model of scope:
Type, make and model of camera adapter:
Length of spacer needed to reach focus:
Focal length of complete setup in mm:
Measured distance between target and telescope in meters:
Evaluated resolution number:
Speed setting of camera:
ISO:
Original picture format (RAW, JPG) and resolution (mpx)
Date and time:
Weather conditions (sun and wind):
Other pertinent information:

Target resized at 1024 px wide attached.
 

Attachments

  • digiscoping target v2_0 1024px.jpg
    digiscoping target v2_0 1024px.jpg
    177 KB · Views: 297
I took the test today. Max resolution easily resolved. I think we should open the test to teleconverters and barlows.

Jules

Make and model of DSLR: Canon 20D
Make and model of scope: Astro-Tech AT80ED 80mm f/7 ED doublet refractor
Type, make and model of camera adapter: CNC Supply EOS 2" Adaptor
Length of spacer needed to reach focus: Kenko 68mm set
Focal length of complete setup in mm: 896mm
Measured distance between target and telescope in meters: 7,26 m. - 23.8"
Evaluated resolution number:20 max
Speed setting of camera: 1/200
ISO: 400
Original picture format (RAW, JPG) and resolution (mpx) RAW - 8mpx
Date and time: 08.07.07 19:00
Weather conditions (sun and wind): cloudy bright - no wind - extremely humjid
Other pertinent information:
 

Attachments

  • pic1.jpg
    pic1.jpg
    107.6 KB · Views: 262
  • pic3.jpg
    pic3.jpg
    153.5 KB · Views: 286
Time for a couple of teleconverter tests. I added in an extra category for teleconverter/barlow type, is that OK?

Make and model of DSLR: Canon 450D
Make and model of scope: Skywatcher Evostar Pro 80ED
Make and model of converter or barlow: 1.5X Vivitar Teleconverter
Type, make and model of camera adapter: T-Ring with 2" scope adapter, both unbranded
Length of spacer needed to reach focus: 60mm
Focal length of complete setup in mm: 1440mm after crop factor of 1.6
Measured distance between target and telescope in meters: 12m 19cm
Evaluated resolution number: 20
Speed setting of camera: 1/160sec
ISO: 400
Original picture format (RAW, JPG) and resolution (mpx) RAW 12.2 million pixels
Date and time: 8th july 09:53
Weather conditions (sun and wind): Sunny, breezy but garden is sheltered.
Other pertinent information:
 

Attachments

  • IMG_1680.jpg
    IMG_1680.jpg
    197.5 KB · Views: 250
  • IMG_1680_crop.jpg
    IMG_1680_crop.jpg
    143.4 KB · Views: 258
Warning! This thread is more than 16 years ago old.
It's likely that no further discussion is required, in which case we recommend starting a new thread. If however you feel your response is required you can still do so.

Users who are viewing this thread

Back
Top