


-
Welcome to BirdForum, the internet's largest birding community with thousands of members from all over the world. The forums are dedicated to wild birds, birding, binoculars and equipment and all that goes with it.
Please register for an account to take part in the discussions in the forum, post your pictures in the gallery and more.

You are using an out of date browser. It may not display this or other websites correctly.
You should upgrade or use an alternative browser.
You should upgrade or use an alternative browser.
R7 for bird photography and birds in flight (1 Viewer)
- Thread starter Evan Atkinson
- Start date
More options
Who Replied?Farnboro John
Well-known member
I find all this very interesting. I'm now using the R7 with 100-500RF and my two dials are set up top dial shutter speed, front dial exposure compensation (because I often go immediately from perched bird below the horizon to flying bird/aircraft above it, on which I want some positive exposure comp: and, obviously, back again).
I rarely want to mess about with the aperture during a particular burst and am generally happy to let the ISO float.
John
I rarely want to mess about with the aperture during a particular burst and am generally happy to let the ISO float.
John
Barred Wobbler
Well-known member
I too might be in situations of moving from perched to flying birds, or often (on migration) flying raptors that might be against a hillside one moment and the sky a moment later. It's important that they are correctly exposed - I can't stand shots of a silhouette of a bird against a blank sky, that often result from a camera being left to set the exposure, yet I never use exposure compensation. It's too much like being busy when I've got other things to be doing, such as getting the shot.I find all this very interesting. I'm now using the R7 with 100-500RF and my two dials are set up top dial shutter speed, front dial exposure compensation (because I often go immediately from perched bird below the horizon to flying bird/aircraft above it, on which I want some positive exposure comp: and, obviously, back again).
I rarely want to mess about with the aperture during a particular burst and am generally happy to let the ISO float.
John
I simply do what I had to do when I first had cameras back in the days before automatic exposure and exposure compensation. I expose for the light falling on the subject, rather than the average light falling on the film or sensor (which is what happens if you leave it all to the camera computer). The advantage these days is that I can change the ISO, whereas with film cameras I couldn't, unless I used a different film speed for the next roll.
The light falling on the bird (or aircraft) doesn't change when it suddenly decides to fly above a skyline. It's lit by the same source, so the correct exposure doesn't change either. If the exposure was 1/2500 at ISO 1000 against the hill, then it's still going to be 1/2500 at 1000 if it flies up against the sky. That's why I shoot in Manual. I take an exposure based on the current light, for instance by pointing the camera at a patch of ground or grass lit by the same light. I set the shutter speed to what I want, given the likelihood of subject movement, and ISO to match (the aperture is probably wide open anyway and doesn't get changed) and away I go, shooting on those same settings until the light changes (eg a cloud in front of the sun), then I simply repeat the exposure test on a bit of grass or something of similar tone, and adjust the shutter or ISO accordingly until the sun comes out again. If the subject is going to be very light or dark, say an egret or a crow, then I make adjustments 'off the cuff' by reducing or increasing the exposure to avoid highlight or shadow clipping. No faffing about with exposure compensation mid-way through a burst required.
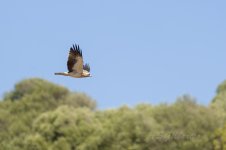
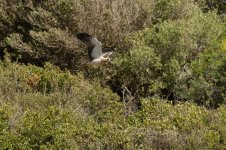
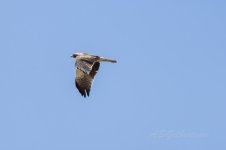
An example here: Two shots with the R7 of the same booted eagle on 1st September, 5 shots apart, in a sequence of 9 or 10. No time for messing about with dials as the bird passed and I was fighting to keep it in the frame in the high wind that is so common at Tarifa. I've left both shots uncropped and unedited to show the different average light falling on the scene. The first shot (99) has a large area of sky, the second (104) has a background of bushes, some in shade. No doubt the camera's light meter was screaming at me for the second shot to change the exposure, but they both have exactly the same settings of shutter speed, aperture and ISO and both are properly exposed, (give or take a bit of tweaking in post, that I haven't done here). The important thing is that whatever happens to the background, the light falling on the subject, and so the correct exposure, remains the same. No compensation adjustment required.
Attachments
Last edited:
Farnboro John
Well-known member
I hear what you say, but what exposure measuring area are you using to set the exposure in the first place? If it's averaged across the entire frame, you will end up with a silhouette against the sky that you need to correct in PP or a dark image overall as you revert to below the horizon. If its centre-weighted or the image is very big in the frame you might get away with it I suppose.I too might be in situations of moving from perched to flying birds, or often (on migration) flying raptors that might be against a hillside one moment and the sky a moment later. It's important that they are correctly exposed - I can't stand shots of a silhouette of a bird against a blank sky, that often result from a camera being left to set the exposure, yet I never use exposure compensation. It's too much like being busy when I've got other things to be doing, such as getting the shot.
I simply do what I had to do when I first had cameras back in the days before automatic exposure and exposure compensation. I expose for the light falling on the subject, rather than the average light falling on the film or sensor (which is what happens if you leave it all to the camera computer). The advantage these days is that I can change the ISO, whereas with film cameras I couldn't, unless I used a different film speed for the next roll.
The light falling on the bird (or aircraft) doesn't change when it suddenly decides to fly above a skyline. It's lit by the same source, so the correct exposure doesn't change either. If the exposure was 1/2500 at ISO 1000 against the hill, then it's still going to be 1/2500 at 1000 if it flies up against the sky. That's why I shoot in Manual. I take an exposure based on the current light, for instance by pointing the camera at a patch of ground or grass lit by the same light. I set the shutter speed to what I want, given the likelihood of subject movement, and ISO to match (the aperture is probably wide open anyway and doesn't get changed) and away I go, shooting on those same settings until the light changes (eg a cloud in front of the sun), then I simply repeat the exposure test on a bit of grass or something of similar tone, and adjust the shutter or ISO accordingly until the sun comes out again. If the subject is going to be very light or dark, say an egret or a crow, then I make adjustments 'off the cuff' by reducing or increasing the exposure to avoid highlight or shadow clipping. No faffing about with exposure compensation mid-way through a burst required.
An example here: Two shots with the R7 of the same booted eagle on 1st September, 5 shots apart, in a sequence of 9 or 10. No time for messing about with dials as the bird passed and I was fighting to keep it in the frame in the high wind that is so common at Tarifa. I've left both shots uncropped and unedited to show the different average light falling on the scene. The first shot (99) has a large area of sky, the second (104) has a background of bushes, some in shade. No doubt the camera's light meter was screaming at me for the second shot to change the exposure, but they both have exactly the same settings of shutter speed, aperture and ISO and both are properly exposed, (give or take a bit of tweaking in post, that I haven't done here). The important thing is that whatever happens to the background, the light falling on the subject, and so the correct exposure, remains the same. No compensation adjustment required.
If I don't use EP I can correct in PP but I get a better result if I don't have to, or have less far to go - and the aircraft photography community all favour "exposing to the right" when shooting against the sky. I find it easy to roll EP in and out on the front dial but then I do it a lot: I imagine each of us improves by practice in whatever we do!
Cheers
John
Barred Wobbler
Well-known member
Whether you use spot, centre-weighted, evaluative or whatever, the old rule of thumb is to direct the camera light metre to an area that would appear mid-grey in tone in a monochrome image and that equates to the area of the frame covered by your chosen measuring area. A patch of grass is often quoted as being about the right tone, but that's only one example. If you've got no grass, choose something else of the same tonal value. The effect is to do what the camera auto settings are trying to do anyway, which is to present the area covered by your metre selection of choice, whether spot or full frame as a 'mid-grey', but once you've got your setting, you don't touch anything. You can leave it like that all day, as long as the light doesn't change, but if it does, you just change the settings to match the change in light, and again don't change them unless the light changes againI hear what you say, but what exposure measuring area are you using to set the exposure in the first place? If it's averaged across the entire frame, you will end up with a silhouette against the sky that you need to correct in PP or a dark image overall as you revert to below the horizon. If its centre-weighted or the image is very big in the frame you might get away with it I suppose.
If I don't use EP I can correct in PP but I get a better result if I don't have to, or have less far to go - and the aircraft photography community all favour "exposing to the right" when shooting against the sky. I find it easy to roll EP in and out on the front dial but then I do it a lot: I imagine each of us improves by practice in whatever we do!
Cheers
John
The difference is that with auto settings, the moment the camera is pointing somewhere else, it automatically tries to make whatever else it is pointing at then mid-grey too.
With manual exposure settings, you are exposing for the light source; sun, cloudy sky, deep shade or whatever. Mid-grey (in tone) objects remain mid grey, dark objects remain dark, and light areas, such as sky stay light. The failure to not appreciate this is the reason that people shooting in automatic trying to take an exposure of for instance a flying bird against an empty bright sky finish up with a silhouette against a grey sky, then they haver to try to pull it back in post.
This photo (98) was taken about a minute before the other two (the time stamp says 63 seconds before shot (99)). It's probably the same bird, with the reason it's apparently pointing in the opposite direction being that birds flying into the valley where I was often have to tack across the strong east wind, before making progress maybe on the other side of the valley where the wind speed may be slightly less. Again, it's uncropped, full image and unedited. The important thing is that it's against a clear blue sky, it's properly exposed, and the shot was taken with exactly the same shutter speed, aperture and ISO as the photo (104) that was taken with a background of dark bushes without having to touch anything on the camera apart from the focus button and the shutter release.
Regarding not getting a bit of grass that gives you the right tone of grey, if you're a half or stop or two out, it doesn't matter as long as it's consistent across the sequence, you can correct it later. The main thing is that whether the target is against a black wall or a pale blue sky, it will still have the same exposure, because the light illuminating the subject is the same. It's why in old films you'll see a pro photographer (think David Hemmings in Blow Up sort of thing) on a photo shoot using an Incident Light Meter to measure the light falling onto his subject and he has his back to the subject rather than using a reflective light meter, where he would be pointing towards the subject.
When I was at RIAT last year, I don't think I changed my exposure values at all during the whole day (or if I did, not by much), whether photographing ground displays or flying stuff. The sun stayed out all day, so the light never changed. I did actually slow the shutter speed for the BoB flypast to try to get a bit prop blur, but moved the ISO by the same amount to compensate for the change, and speeded it up, again with ISO correction in the opposite direction for fast jet passes.
Attachments
Last edited:
Mendobirder
Well-known member

I have the R7 and my wife has an R5 with the 100-500. Her images are consistently far superior to any I have produced. In low light there is simply no comparison, the R7 struggles to focus and the images are sometimes okay if you don't crop at all. Her R5 just reached into a bush and pulled out images of a rare bird that my R7 couldn't even focus on.I use the R5, tc 1.4 and 100-500. Do I need an R7?
Colin
R5 in crop mode will accomplish pretty much the same thing as an R7, only with much improved AF.
Barred Wobbler
Well-known member
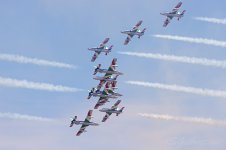
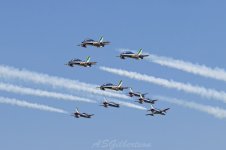
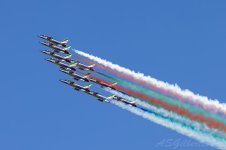
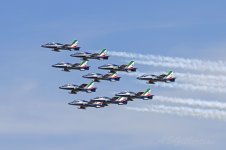
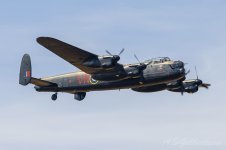
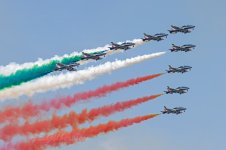
A few RIAT shots with the R5.
The Lancaster shots were both taken with the same settings, whether flying or on the ground between bodies. 1/640 second, F10, ISO 400, but looking at the blades, I should have gone slower on the shutter, Maybe 1/250 with ISO 160. The Italian display was at 1/4000 second to stop the action when they passed, F10, ISO 2000.
That's not precisely the same exposure value, but they only differ by a third of a stop.
Attachments
-
 Frecce-Tricolori-(144)-fbook.jpg717.1 KB · Views: 14
 -
 Frecce-Tricolori-(52)-fbook.jpg643.9 KB · Views: 14
 -
 Frecce-Tricolori-(24)-fbook.jpg751.5 KB · Views: 13
 -
 Frecce-Tricolori-(21)-fbook.jpg586.6 KB · Views: 15
 -
 Lancaster-(108)-fbook.jpg738.2 KB · Views: 18
 -
 Lancaster-(88)-fbook.jpg636.5 KB · Views: 19
 -
 Frecce-Tricolori-(180)-fbook.jpg598.5 KB · Views: 19
Barred Wobbler
Well-known member
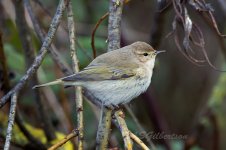
R7 photos in low light with high ISOs. 55° 15'N on the last day of October. ISO 5000, 4000 and 8000I have the R7 and my wife has an R5 with the 100-500. Her images are consistently far superior to any I have produced. In low light there is simply no comparison, the R7 struggles to focus and the images are sometimes okay if you don't crop at all. Her R5 just reached into a bush and pulled out images of a rare bird that my R7 couldn't even focus on.
R5 in crop mode will accomplish pretty much the same thing as an R7, only with much improved AF.
They'll do me.
Attachments
Farnboro John
Well-known member
Hmmm.... I hear what you say and will try to make time to test it when I'm not doing anything important. Certainly I'm impressed with the detail drawn out on the Lanc shots because I know how hard it can be to get anything but black underneath that aircraft!
TYVM
John
TYVM
John
Mendobirder
Well-known member
Those appear far sharper than any image I have obtained yet. Are they cropped?R7 photos in low light with high ISOs. 55° 15'N on the last day of October. ISO 5000, 4000 and 8000
They'll do me.
Here's one of the best I've been able to manage, it is is nowhere near as sharp as yours.
1/1250, f5.6, 365mm, ISO 4000.
Attachments
Barred Wobbler
Well-known member
I particularly like this one.Hmmm.... I hear what you say and will try to make time to test it when I'm not doing anything important. Certainly I'm impressed with the detail drawn out on the Lanc shots because I know how hard it can be to get anything but black underneath that aircraft!
TYVM
John
Attachments

Farnboro John
Well-known member
colincurry
Well-known member

Thanks for all the comments about R5 and R7. Have looked at various videos from Duade, Wegener and Whistling Wings and have decided to stick with R5, 100-500 and 1.4 tc.
Colin
Colin
Barred Wobbler
Well-known member
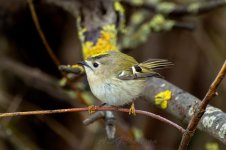
The middle shot is uncropped, which is an extreme rarity for me. I was able to do it because the bird was very confiding and used to my presence.Those appear far sharper than any image I have obtained yet. Are they cropped?
Here's one of the best I've been able to manage, it is is nowhere near as sharp as yours.
1/1250, f5.6, 365mm, ISO 4000.
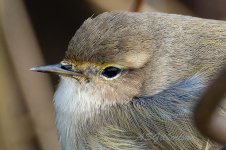
The others are cropped. The first chiffchaff was cropped from 6984 pixels wide to 3929 wide, which is 56% on the side, giving 31% of the area of the original. The goldcrest was cropped to 4543 Pixels wide, so 65% of the side and shows 42% of the original area. All shots were reduced to 2048 wide and 'saved for web' with some compression to fit with Facebook's preferences, so the original edits are better than these shown here.
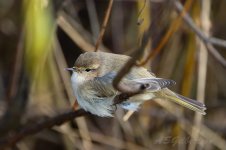
This is a detail crop of the second chiffchaff, again resized to 2048 and saved for web. All shots taken with the 100-500 at 500mm on Electronic First Curtain shutter.
The R7 isn't the R5 - at a third of the price, we couldn't expect it to be, but the R7 is still a good camera.
Attachments
Last edited:
Barred Wobbler
Well-known member
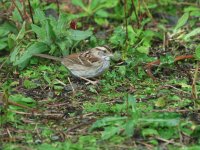
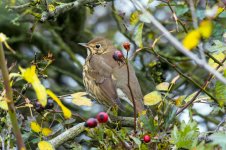
Another shot in dull conditions with the R7, taken this autumn on a particularly dull and wet morning after heavy overnight rain and a north-east wind, 28th October. A song thrush sheltering in a hedge, probably after arriving from the other side of the North Sea overnight (Denmark is the next land to the east from us, with Norway/Sweden to its north) with other migrants and taking advantage of its first landfall after the perilous crossing. The place was alive with recently arrived goldcrests and various thrushes.Those appear far sharper than any image I have obtained yet. Are they cropped?
Here's one of the best I've been able to manage, it is is nowhere near as sharp as yours.
1/1250, f5.6, 365mm, ISO 4000.
It's cropped from the original 6984 pixels across to 4829, so 69% on the side, 48% of the original photo area, again resized to 2048 and saved for web.
Attachments
Farnboro John
Well-known member
Some Brent Geese and Starlings at Cut Bridge in Hampshire the other week (one of my first essays with the R7 and the 100-500 instead of my old 100-400 Mk II) - nice conditions and some decent results, I think.
John
_Brent_Goose.JPG")
_Brent_Goose.JPG")
_Starling.JPG")
John
Barred Wobbler
Well-known member
Well done with the starlings. Small and quick stuff isn't easy, especially on the approach. It makes a focus system really work hard.Some Brent Geese and Starlings at Cut Bridge in Hampshire the other week (one of my first essays with the R7 and the 100-500 instead of my old 100-400 Mk II) - nice conditions and some decent results, I think.
John
View attachment 1549716View attachment 1549717View attachment 1549718
Mark Jarrett
Up Ont’ Moors
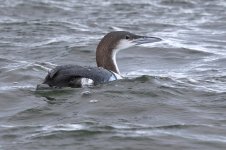
Juvenile Black-throated Diver on Crosby Marine Lake today, blustery and challenging light. Took around 250 photos, then narrowed it down to 50 that I could do something with. Probably have 15-20 that are pretty decent, with the one attached, my favourite. Not as many keepers as with my R5 and the eye detect certainly didn’t fix on as well but, overall, I’m warming to the camera, especially now that I’ve ditched the 1.4 extender and am using electronic shutter.
Attachments
Mark Jarrett
Up Ont’ Moors
Tend to forget that there is a state, to be honest, it’s all about the city. We did a New England road trip in 2019 and drove up through Vermont, almost to the Canadian border. Very close to New York State, obviously, so I bet the scenery is just as nice.A bit off topic but a question for you Britts, what first comes to mind when you hear "New York", The city or the state? What do you hear about the state?
Similar threads
- Replies
- 3
- Views
- 3K
Users who are viewing this thread
Total: 2 (members: 0, guests: 2)