Robert L Jarvis
Robert L Jarvis
At the birdfair on the SRB stand they were demonstrating a swing away adapter which looked very good and at a non-exorbitant price. As I had previously used a simple alignment collar before which meant hand holding the camera and the vagaries that introduced into taking photos the swing away looked ideal for me.
I got in touch with Terry Fogden at SRB-Griturn (01442 257477 www.srb-griturn.com) and asked if he could produce one for me. So after providing the measurements and details of my needs, Terry sent an adapter for me to try. I have set out pictures below.
5) This the sleeve fixed to the scope body with cutouts to allow the zoom of the eyepiece to be used.
4) This shows the adapter fixed to the sleeve by means of a collar, in this can also be seen the attachment for the remote release cable.
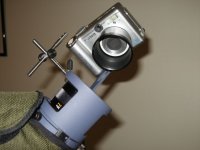
3) The camera is now attached and set in the position ready for use.
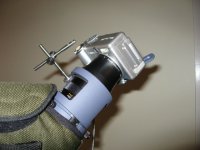
2) Shows the camera swung away for the scope to be used.
1) The camera with the lens extended ready for those photos. As can be seen the front of the camera lens can be put right up to the eyepiece glass without hitting it! It just requires a small effort in setting up and sorting out exactly the best position for your camera and scope. Once this is set it is simple to do a number of things to remember the position of the camera when it is removed at the end of a session and has to be put back another day such as a little mark here or there with a marker.
In practice in the field I found that this set up works extremely well once everything is in place. The camera can be set so accurately and very stable for taking photos. The adapter in the photos is not its finished state as it has to be anodised to complete it's appearance. The adapter is very light as the metal is aluminium and very finely constructed. I am confident that this can accomodate all scopes and cameras at for a very reasonable outlay.
I got in touch with Terry Fogden at SRB-Griturn (01442 257477 www.srb-griturn.com) and asked if he could produce one for me. So after providing the measurements and details of my needs, Terry sent an adapter for me to try. I have set out pictures below.
5) This the sleeve fixed to the scope body with cutouts to allow the zoom of the eyepiece to be used.
4) This shows the adapter fixed to the sleeve by means of a collar, in this can also be seen the attachment for the remote release cable.
3) The camera is now attached and set in the position ready for use.
2) Shows the camera swung away for the scope to be used.
1) The camera with the lens extended ready for those photos. As can be seen the front of the camera lens can be put right up to the eyepiece glass without hitting it! It just requires a small effort in setting up and sorting out exactly the best position for your camera and scope. Once this is set it is simple to do a number of things to remember the position of the camera when it is removed at the end of a session and has to be put back another day such as a little mark here or there with a marker.
In practice in the field I found that this set up works extremely well once everything is in place. The camera can be set so accurately and very stable for taking photos. The adapter in the photos is not its finished state as it has to be anodised to complete it's appearance. The adapter is very light as the metal is aluminium and very finely constructed. I am confident that this can accomodate all scopes and cameras at for a very reasonable outlay.
Last edited: