Vollmeise
Well-known member
Hello everybody!
While the first part of my post Autonomous Field Recorder, PART I
was about general requirements for a programmable recorder,
The second post Autonomous Field Recorder, PART II dealed specifically with the requirements for a smartphone used as a field recorder.
___________________________________
+++++++++++ Disclaimer ++++++++++
These are my very personal and certainly not objective experiences in the hope that they can help others.
This thread here is not a guide, no purchase recommendation and no invitation to anything!
Everyone has to check and ensure that his/her devices do not pose any danger and that no applicable law is violated.
Everyone is also responsible for ensuring that their devices cannot be lost or damaged.
++++++++++++++++++++++++++++++
___________________________________
In the next two parts, I would like to present my personal setup of a smartphone recorder and in the next part you'll read about my first practical experience.
First of all: I've had the setup presented in this form for just about 3 months and with 8 identical devices in intensive use.
Accordingly, there is plenty of potential to make the system more efficient, more reliable, more affordable and more powerful. So if someone has any idea or any helpful experience - much appreciated!
The smartphone
My personal choice fell on the outdoor smartphone "OUKITEL WP6", simply because I liked the specs according to the manufacturer and cause it seemed to be reasonably affordable at around 260 EUR:
Other models from the same manufacturer are more modern (USB-C, Android 10), but do not show a 3,5 mm socket, or do use a smaller battery (e.g. the cheaper WP8 pro)
So first of all I ordered and tested 1 device, and I immediately noticed some weaknesses:
I think those rather unusable microphones could be a general weak point in weatherproof smartphones after I was briefly allowed to test the mic quality of two other outdoor phones (CAT, Ulefone). Unfortunately, their mics didn't sound any better than those of the OUKITEL either, so it was clear to me that I couldn't get around an external microphone (if someone has a rugged phone with highly sensitive mics, I'd be relly happy to get these test recordings).
Another point that actually affects all devices is their conspicuousness.
You can imagine how long a normal smartphone will go unnoticed if you don't want to leave it in the Brazilian rainforest, but in a nearby park or on a busy hiking trail ... 10 minutes? 1 hour?
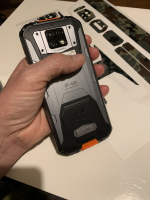
To camouflage, it is sufficient to put or wrap the device in a bag made of coarse material with a camouflage pattern, leaving an opening for the microphone (or a microphone cable). If you don't use a waterproof cell phone, you can pack it in a plastic bag beforehand, which you also leave open at the bottom for the microphone.
Here is my solution for camouflage, a combination of foiling with camouflage tape and a fabric cover that I cut from the pants and sleeves of a sniper suit (1 suit for about 25 EUR provides fabric for at least 15 smartphone camouflage covers
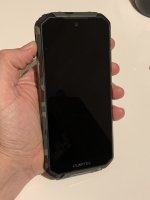


The operational and camouflaged smartphone is then wrapped around a tree with green gardener's wire, a little moss, grass or leaves and the unit is sometimes so invisible that you can hardly find it after a few days, even with GPS 😆

My concerns about the micro-USB socket were also partially unfounded; the included 18W power supply fully charges the battery in 4.5 hours. USB-C would of course be helpful for transferring data, after all, after a few days of use, a few gigabytes of recording data have to be transferred to the computer for analysis.
The software
The key role on the way to an autonomous smartphone recorder is played by the automation app, with the help of which, for example, time control, starting other apps, querying parameters, creating protocols or remote control of the device can be carried out.
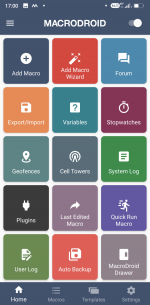
Home screen of the "Macrodroid" automation app.
Another important role is played by the recording app, which does the actual sound recording. I decided on the Android app "Hi-Q MP3 Recorder" and will go into the settings in more detail later.
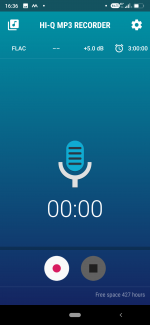
Home screen of the "Hi-Q MP3 Recorder" app.
Some settings should also be made on the operating system itself, in my case Android 9, so that the smartphone can be used reliably as an autonomous recorder. More on that later.
Creating a macro for autonomous audio recording with the "Macrodroid" app
I will endeavor to really only describe the most necessary steps to explain the basic principle of simple automation. Everyone should simply try out the numerous other options for oneselve.
The macro described step by step below will start the recording app every day at 5:30 in the morning until you will stop the process or the battery is empty.
1. Install and start Macrodroid:
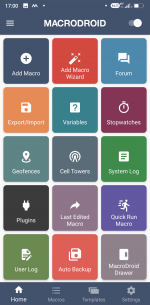
2. Tap the "Macros" button:
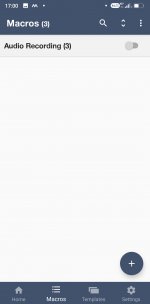
3. Tap the "+" button to create a new macro:
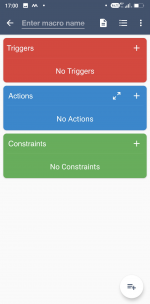
4. Enter a name for the macro under "Enter macro name":
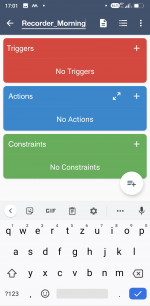
5. Confirm the name
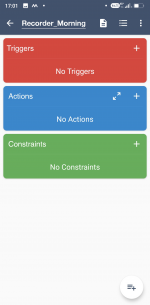
6. In the red "Triggers" field, tap "+" to select a new trigger:
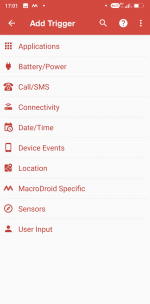
7. Tap "Date / Time" to select a timed trigger:
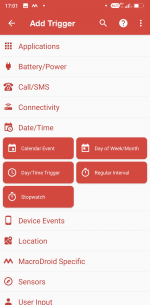
8. Tap on Day / Time Trigger:
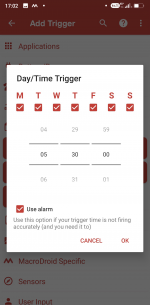
9. Select all days of the week and set the start time. Set a tick in the "Use alarm" checkbox, then confirm with "OK":
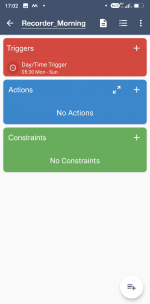
10. The trigger is now set, the set start time is displayed. Now tap on "+" in the blue "Actions" field to define an action:
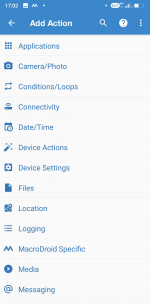
11. Tap on "Applications":
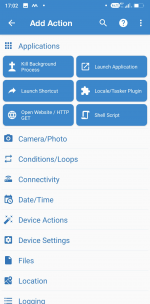
11. Tap on "Launch Application":
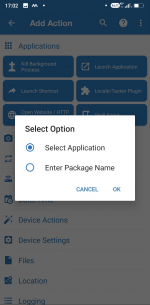
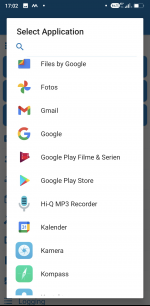
12. Select "Select Application" and confirm with "OK":
.. next steps:
Autonomous Field Recorder - PART IV (Setup 2/2)
While the first part of my post Autonomous Field Recorder, PART I
was about general requirements for a programmable recorder,
The second post Autonomous Field Recorder, PART II dealed specifically with the requirements for a smartphone used as a field recorder.
___________________________________
+++++++++++ Disclaimer ++++++++++
These are my very personal and certainly not objective experiences in the hope that they can help others.
This thread here is not a guide, no purchase recommendation and no invitation to anything!
Everyone has to check and ensure that his/her devices do not pose any danger and that no applicable law is violated.
Everyone is also responsible for ensuring that their devices cannot be lost or damaged.
++++++++++++++++++++++++++++++
___________________________________
In the next two parts, I would like to present my personal setup of a smartphone recorder and in the next part you'll read about my first practical experience.
First of all: I've had the setup presented in this form for just about 3 months and with 8 identical devices in intensive use.
Accordingly, there is plenty of potential to make the system more efficient, more reliable, more affordable and more powerful. So if someone has any idea or any helpful experience - much appreciated!
The smartphone
My personal choice fell on the outdoor smartphone "OUKITEL WP6", simply because I liked the specs according to the manufacturer and cause it seemed to be reasonably affordable at around 260 EUR:
- weather and cold resistant (down to -15 ° C)
- 3.5mm headphone jack socket
- large battery with 10,000 mAh
- rugged due to thick rubber frame
- 6 GB RAM / 128 GB internal storage
- micro SDHC slot
- faster processor
Other models from the same manufacturer are more modern (USB-C, Android 10), but do not show a 3,5 mm socket, or do use a smaller battery (e.g. the cheaper WP8 pro)
So first of all I ordered and tested 1 device, and I immediately noticed some weaknesses:
- the built-in microphones are not very sensitive and useless for my purposes
- the look of the case is rather noticeable with its black / orange / metal parts
- outdated micro USB (slow, low charging current, mechanically susceptible)
I think those rather unusable microphones could be a general weak point in weatherproof smartphones after I was briefly allowed to test the mic quality of two other outdoor phones (CAT, Ulefone). Unfortunately, their mics didn't sound any better than those of the OUKITEL either, so it was clear to me that I couldn't get around an external microphone (if someone has a rugged phone with highly sensitive mics, I'd be relly happy to get these test recordings).
Another point that actually affects all devices is their conspicuousness.
You can imagine how long a normal smartphone will go unnoticed if you don't want to leave it in the Brazilian rainforest, but in a nearby park or on a busy hiking trail ... 10 minutes? 1 hour?

To camouflage, it is sufficient to put or wrap the device in a bag made of coarse material with a camouflage pattern, leaving an opening for the microphone (or a microphone cable). If you don't use a waterproof cell phone, you can pack it in a plastic bag beforehand, which you also leave open at the bottom for the microphone.
Here is my solution for camouflage, a combination of foiling with camouflage tape and a fabric cover that I cut from the pants and sleeves of a sniper suit (1 suit for about 25 EUR provides fabric for at least 15 smartphone camouflage covers


The operational and camouflaged smartphone is then wrapped around a tree with green gardener's wire, a little moss, grass or leaves and the unit is sometimes so invisible that you can hardly find it after a few days, even with GPS 😆

My concerns about the micro-USB socket were also partially unfounded; the included 18W power supply fully charges the battery in 4.5 hours. USB-C would of course be helpful for transferring data, after all, after a few days of use, a few gigabytes of recording data have to be transferred to the computer for analysis.
The software
The key role on the way to an autonomous smartphone recorder is played by the automation app, with the help of which, for example, time control, starting other apps, querying parameters, creating protocols or remote control of the device can be carried out.

Home screen of the "Macrodroid" automation app.
Another important role is played by the recording app, which does the actual sound recording. I decided on the Android app "Hi-Q MP3 Recorder" and will go into the settings in more detail later.

Home screen of the "Hi-Q MP3 Recorder" app.
Some settings should also be made on the operating system itself, in my case Android 9, so that the smartphone can be used reliably as an autonomous recorder. More on that later.
Creating a macro for autonomous audio recording with the "Macrodroid" app
I will endeavor to really only describe the most necessary steps to explain the basic principle of simple automation. Everyone should simply try out the numerous other options for oneselve.
The macro described step by step below will start the recording app every day at 5:30 in the morning until you will stop the process or the battery is empty.
1. Install and start Macrodroid:

2. Tap the "Macros" button:

3. Tap the "+" button to create a new macro:

4. Enter a name for the macro under "Enter macro name":

5. Confirm the name

6. In the red "Triggers" field, tap "+" to select a new trigger:

7. Tap "Date / Time" to select a timed trigger:

8. Tap on Day / Time Trigger:

9. Select all days of the week and set the start time. Set a tick in the "Use alarm" checkbox, then confirm with "OK":

10. The trigger is now set, the set start time is displayed. Now tap on "+" in the blue "Actions" field to define an action:

11. Tap on "Applications":

11. Tap on "Launch Application":

12. Select "Select Application" and confirm with "OK":

.. next steps:
Autonomous Field Recorder - PART IV (Setup 2/2)
Last edited:


