Vollmeise
Well-known member
Since only a maximum of 20 images can be posted at a time, I had to split the description of the setup into two parts. Sorry for that!
13. Select the "Hi-Q MP3 Recorder" app:
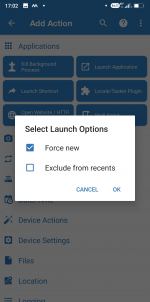
14. Tick the "Force New" checkbox and confirm with OK:
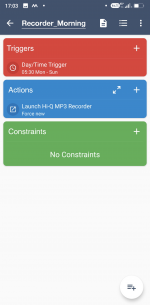
15. The time trigger (5:30 Mon-Sun) and the action (Launch Hi-Q MP3 Recorder) should now be displayed like that:
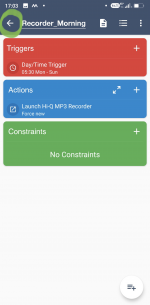
16. Now tap the back arrow at the top:
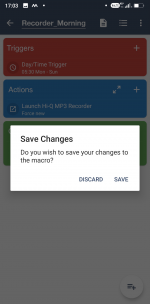
18. Tap on "SAVE" to save the macro:
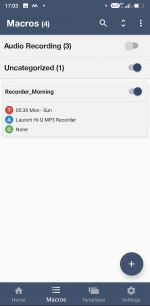
The macro is now ready for use and can be switched on or off with the slide switches.
Important: The start of the recording app (here: 5:30 a.m.) is implemented reliably, but not to the minute. It may be that the recorder app will start a few minutes later than was set in the trigger. So please be patient when testing
In order to automate another recording, e.g. every evening at 7:00 p.m., a second macro must be created with the corresponding start time.
If you want to edit, delete, copy, deactivte (and some further points) your macro (or trigger / actions), tap on it shortly and follow the pop-up menu.
The recording duration and all audio-specific settings are set directly in the "Hi-Q" recorder app. Here are the steps to take:
1. Install and start the "Hi-Q MP3 Recorder" recorder app:
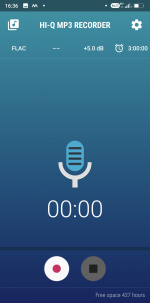
2. Tap on the gear symbol at the top right:
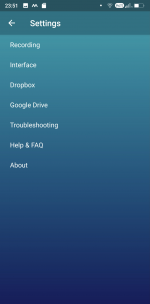
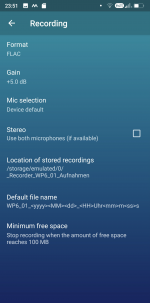
3. Tap on "Recording" to select the recording format (MP3 or the losslessly compressed FLAC format), the mic gain (+ 5dB has proven, please test it yourself), the mic selection (must be set to "Device default" when using an external microphone"), the location of stored recordings on the smartphone (it is best to create a folder beforehand) and the default file name (the date and the exact time in the file name can be helpful for later evaluation).
4. Go back with the arrow at the top left, then tap on "Interface":
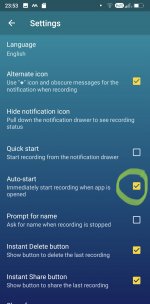
5. Set a tick in the "Auto-start" checkbox, then return to the start screen with the arrow at the top left.
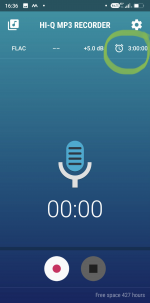
6. Tap the clock symbol in the top right to set the duration of the recording:
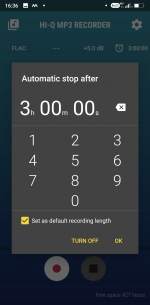
7. Set the duration of the recording, tick "Set as default recording length", confirm with "OK".
Congratulation! The autonomous recorder is now set up and ready for use!
Anyone who has made it this far can surely guess now how many possibilities were not even touched on here. Please experiment by yourself or visit one of the well-known Macrodroid forums, it's worth it. If necessary, send me a PM. It's even possible to share preconfigured Macrodroid macros by exporting / importing them.
So that the thread, which is already a bit long, remains clear somehow, the Autonomous Field Recorder PART V will continue with some sound samples and practical experience separately.
If there is anything You're intereested in, just let me know!
Thx for sharing!
13. Select the "Hi-Q MP3 Recorder" app:

14. Tick the "Force New" checkbox and confirm with OK:

15. The time trigger (5:30 Mon-Sun) and the action (Launch Hi-Q MP3 Recorder) should now be displayed like that:

16. Now tap the back arrow at the top:

18. Tap on "SAVE" to save the macro:

The macro is now ready for use and can be switched on or off with the slide switches.
Important: The start of the recording app (here: 5:30 a.m.) is implemented reliably, but not to the minute. It may be that the recorder app will start a few minutes later than was set in the trigger. So please be patient when testing
In order to automate another recording, e.g. every evening at 7:00 p.m., a second macro must be created with the corresponding start time.
If you want to edit, delete, copy, deactivte (and some further points) your macro (or trigger / actions), tap on it shortly and follow the pop-up menu.
The recording duration and all audio-specific settings are set directly in the "Hi-Q" recorder app. Here are the steps to take:
1. Install and start the "Hi-Q MP3 Recorder" recorder app:

2. Tap on the gear symbol at the top right:

3. Tap on "Recording" to select the recording format (MP3 or the losslessly compressed FLAC format), the mic gain (+ 5dB has proven, please test it yourself), the mic selection (must be set to "Device default" when using an external microphone"), the location of stored recordings on the smartphone (it is best to create a folder beforehand) and the default file name (the date and the exact time in the file name can be helpful for later evaluation).

4. Go back with the arrow at the top left, then tap on "Interface":

5. Set a tick in the "Auto-start" checkbox, then return to the start screen with the arrow at the top left.

6. Tap the clock symbol in the top right to set the duration of the recording:

7. Set the duration of the recording, tick "Set as default recording length", confirm with "OK".
Congratulation! The autonomous recorder is now set up and ready for use!
Anyone who has made it this far can surely guess now how many possibilities were not even touched on here. Please experiment by yourself or visit one of the well-known Macrodroid forums, it's worth it. If necessary, send me a PM. It's even possible to share preconfigured Macrodroid macros by exporting / importing them.
So that the thread, which is already a bit long, remains clear somehow, the Autonomous Field Recorder PART V will continue with some sound samples and practical experience separately.
If there is anything You're intereested in, just let me know!
Thx for sharing!
Last edited:


