• Welcome to BirdForum, the internet's largest birding community with thousands of members from all over the world. The forums are dedicated to wild birds, birding, binoculars and equipment and all that goes with it.

    Please register for an account to take part in the discussions in the forum, post your pictures in the gallery and more.
ZEISS DTI thermal imaging cameras. For more discoveries at night, and during the day.

Canon 450D + Skywatcher 80ED (2 Viewers)

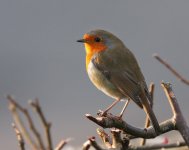
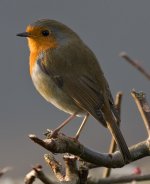
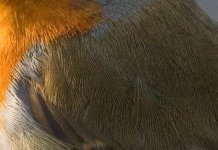
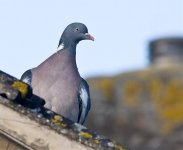
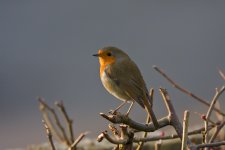
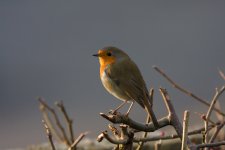
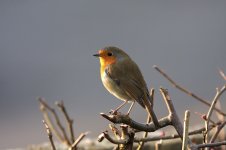
The focus is spot on with both of the files. I've run them through Adobe Lightroom and this is the result. I'll try them through ACR later this evening. I cropped the Pigeon roughly the same as yours. Cropped the Robin and also posted a 100% crop of the feathers. I think this proves now that it's a post processing issue.

Paul.
 

Attachments

  • Robin_musoman.jpg
    Robin_musoman.jpg
    154.2 KB · Views: 80
  • Robin_musoman2.jpg
    Robin_musoman2.jpg
    103.1 KB · Views: 88
  • pigeon3.jpg
    pigeon3.jpg
    53.3 KB · Views: 67
Last edited:
Wow - well at least we know its me thats messing it up somewhere, but unless someone was sat here watching me go through the various PP stages, its kinda difficult to nail down.

But thanks for that anyways :t:

there's obviously nowt wrong with the gear at least. In fact its best that it IS me, as i can try and do something about it, which will cost nothing, as opposed to buying more gear to correct the issue :king:
 
Last edited:
I just updated the Pigeon photo on my last post, lightened it a bit more and made it 1024 pixels wide the same as yours so it's a better comparison.

Later on I'll go through the ACR steps in detail so you can at least copy them.

Paul.
 
This is your Robin without any cropping. The focus was so good it didn't need hardly any sharpening.

Paul.
 

Attachments

  • Robin_musoman3.jpg
    Robin_musoman3.jpg
    142.4 KB · Views: 68
Marvellous :-O

I also have DPP ( canon RAW proggy ) which is free. Dont know if you have ever used it Paul

Since you spotted the problem at the time when i was using ACR > CS4, I've been using DPP > CS4 instead.

Regarding ACR, i'm wondering if there's something in the Edit / Preferences / drop down box that might not be helping. A preset or something. . Same goes for Edit / preferences in CS4, I know that Image Intopolation is set to Bicubic , so maybe that could be altered to Bicubic smoother or Bicubic sharper
 
Last edited:
I tried the Robin in DPP but couldn't get it to come out very well and any time I tried to reveal the detail it made a bit of a mess of it. I'd stick to ACR if I were you. ACR is a fair bit better but still not quite as good as I get with Lightroom. Lightroom has some unique tools for bringing out detail that I've not found elsewhere.

This photo is the ACR version. I basically opened the photo and didn't alter the image at all. I left the levels as they were and set the sharpness tool to zero. I also made sure the luminance noise is set to zero as this is one thing that will remove a lot of detail. Leave colour noise where it is on about 25 or whatever the default is.

Then I open in Photoshop. I tweaked the levels a little just to brighten the image. Then I use Smart Sharpen as this tool sharpens well and is the least destructive. I used settings of Radius 1 and about 40% sharpening. I increased the saturation a tiny bit but not much. Then I used the save for web function and that's about it.

Regarding the bicubic stuff in Phototshop, mine is just the default bicubic the same as yours.

Paul.
 

Attachments

  • Robin_ACR.jpg
    Robin_ACR.jpg
    141.4 KB · Views: 52
Makes a big difference thats for sure. Well done sir

Lightroom - is that a free proggy, and off the top of your head, do you know what it can do that ACR5 cant do ?
 
Adobe Lightroom isn't free but you can download a trial version via this link. http://www.adobe.com/products/photoshoplightroom/

It gives you so much control over the RAW that I couldn't begin to list it all here. As long as the photo is well exposed then the main things that I use are a couple of sliders called 'Clarity' and 'Detail'. Neither of them sharpen like a normal sharpen tool as a normal sharpen tool can degrade the image quite easily. Lightroom also has a nice way of letting you adjust the levels. It's broken down into 4 sections so you can control the darkest shadows, add a fill light, adjust the main levels or if some highlights have blown out you can reel them back in without affecting the rest of the image too much. Those are main tools I tweak and then just export to Photoshop for any extra adjustments before posting on here.

On top of that there's loads of other tools to play with that go way beyond what ACR can do. I'd try the trial version and see what you think.

Paul.
 
Some RAW software that is free and is quite good is called Raw Therapee. It has loads of things you can play with beyond the basics and is an excellent piece of freeware. See http://www.rawtherapee.com/

This is the Robin photo run through Raw Therapee.

Paul.
 

Attachments

  • Robin_RAW_Therapee.jpg
    Robin_RAW_Therapee.jpg
    184.9 KB · Views: 53
I'll give Therapee a go, as that Robin looks better than the previous version you posted - i cant imagine a freebie being as powerful as ACR , but none the less, worth a shot

I've just seen on the adobe website that there's a V3 beta for free download till expiry in April, so i'll give that go
 
Last edited:
Looks like we posted at exactly the same time so make sure you see my last post just above yours regarding Raw Therapee software.

My Lightroom is the old 1.4 version so it's come on a long way since my version.

Paul.
 
I'll give Therapee a go, as that Robin looks better than the previous version you posted - i cant imagine a freebie being as powerful as ACR , but none the less, worth a shot

I've just seen on the adobe website that there's a V3 beta for free download till expiry in April, so i'll give that go

Raw Therapee continues to be developed and has been around for years, it's a lot more powerful than ACR but not as simple to use as Lightroom. :t:

Paul.
 
I need simple Paul, believe me. ;)

I've reset some things in ACR and CS4 and i still cant get the IQ you managed. There just seems to be more noise than when the RAW file is first opened.
 
That looks pretty good to me.

I do remove all the background noise but I don't remove any noise from the bird itself. I leave 100% noise on the bird to retain all the detail. To remove the noise from the background I use a plug-in for Photoshop called Noise Ninja. It removes noise across the whole photo but it also has a tool to let you tell it where to leave noise in. You can do the same thing in Phototshop by making a duplicate layer. Then blur the duplicate layer as much as you want using something like Gaussian Blur. Then choose the eraser tool, set it to a soft edge and then erase the blur from the bird only. This will let the sharpened first layer show through. It's a trick that a lot of bird photographers use to get those really nice soft backgrounds.

Paul.
 
Last edited:
I can still see more noise in there than in yours


I'll try and figure all that layer stuff out in CS4 - its not an action i normally do, so have no experience of that

I downloaded lightroom 3 and simply hated it. Spose i'm so used to ACR. It looked like a GUI mess compared to ACR. I never did find the way to get the RAW into CS4 after a few tweaks. I ended up having to exit the program because i couldnt find any back buttons to undo wrong moves.

I'll stick with ACR5.6 i reckon ;)
 
I saved your last posted image of the Robin and did the duplicate layer noise removal method in Photoshop. I've left all the noise/detail in the bird and foreground branches and blurred the background. Once you remove background noise then people rarely notice any on the bird. Open them in separate tabs and flick back and forth to see the changes.

Paul.
 

Attachments

  • robin_noise.jpg
    robin_noise.jpg
    155.8 KB · Views: 52
Last edited:
Yep i can see the diff - i just have trouble with layers. There's so many ways...new adjustment - duplicate etc. And even with a dupe layer or new adjustment layer, how does the NN proggy know to only de-noise the background, and not the bird ?

We're getting into complicated stuff with CS4 now thats beyond me really
 
A quick tutorial with simple key shortcuts so you don't need to hunt around for stuff.

1. Process image as usual in ACR and open in Photoshop. Do any extra sharpening, level adjustment etc at this stage.

2. Hold down Ctrl and press J to create a new layer. This takes away and hassle of knowing which type of layer to create.

3. Along the top menu bar click on 'Filter', then choose 'Blur' from the list and on the next list choose 'Gaussian Blur'. A window will pop up and set the radius to something like 2 and press OK. The top layer will now look very out of focus.

4. Now press the 'E' key and this will select the 'eraser tool'. At the top left of the screen it will say 'Brush' and just to the right it says a number which is the brush size and then there is a tiny arrow head pointing down. Click on the arrow head and set the hardness to 0%. Also on this pop up window you can change the 'Master diameter' size of the brush to suit the area you are working on.

5. Also at the top of the screen it says 'Opacity' and 'Flow'. Leave opacity at 100% but set the flow to about 50%. The lower the percentage is on flow then the less effect the brush has. I set it lower for edges and set it higher for working on the main bulk of the bird.

6. That's about it, just erase over the bird and watch the detail pop out while leaving the background nice and smooth. Use it on any foreground or branches etc that need to be sharp and leave the rest blurred. Once you do this a few times you will see it's very simple.


Noise Ninja does a similar thing to this but it doesn't create a new layer, it just works on the original layer. A window pops up where you do all the work and then you just apply the changes to the original. In the beginning it profiles the image and tries to work out where the detail is and then it tries to only remove noise where it thinks there is no detail. It works to an extent but it has a built in eraser tool where you just go over the bits that you don't want affected by noise removal. It basically the same as doing the steps above in Photoshop.

Paul.
 
Last edited:
Cheers Paul.. since i have NN installed as a plugin within CS4, i should try that too.
But I'll start with the first action of layers in CS4
 
Warning! This thread is more than 14 years ago old.
It's likely that no further discussion is required, in which case we recommend starting a new thread. If however you feel your response is required you can still do so.

Users who are viewing this thread

Back
Top