Could it be that I need to shoot on IS mode 1 instead of mode 2 for still shots on my zoom lens? The lens does have an adjustment for this.
For static subjects you should use IS mode 1, which stabilises the lens both vertically and horizontally. Mode 2 is for panning and only stabilises vertical movements, not horizontal ones. For a 300mm lens on a 1.6X crop body without IS you should have a shutter speed of 1/500 or faster for hand holding. However, if you use IS on the 70-300 that should buy you 3 stops (or is it 4?) of leeway on shutter speed. In other words you should be OK down to 1/60 if you have a steady hand. Obviously that doesn't account for subject movement. Nonetheless, with IS Mode 1 engaged you should be OK at 1/250 if the subject is keeping still.
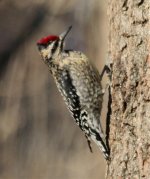
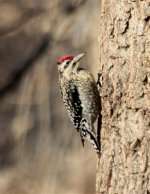
One question about the woodpecker shots - are they full frame images, resized, or crops? If they are crops then how much have you cropped? The 1/(focal length x crop factor) guidelines for shutter speed were intended for viewing "normal" photos printed at "normal" sizes and viewed from "normal2 distances. I'm not sure what values "normal" should be but I mean something like a full, uncropped image when printed no larger than 10"x8" and viewed from 12" away. Remember that when you view a 10MP image at 100% size the whole image is blown up to a size of something around 30"x20" or perhaps even more. Viewing such an image on a computer screen from 12" away is bound to reveal artefacts in noise and sharpness that were never meant to be seen under the old rules.
Here is a shot with my 100-400 at 400mm and 1/60, handheld, together with a 100% crop. The bird is a little soft when viewed at 100%, which might be down to a little camera shake or perhaps subject movement. The IS on the 100-400 is only supposed to be good for 2 stops and at 400mm on a 1.6X crop the shutter speed should be at least 1/640 without IS and 1/160 with IS, so 1/60 is pushing my luck.
To Stephen Fletcher - I was not suggesting for one minute that anyone should buy the LensAlign tool but it was a convenient way to show how focus testing should be set up and how it works, given that there are videos on the site demonstrating the tool in action. If a picture paints a thousand words then a video with commentary paints a million. The focus test chart and procedure you linked to -
http://www.focustestchart.com/focus21.pdf - is little different to the one I also linked to -
http://www.focustestchart.com/focus12.pdf - which was an earlier design by the same guy. I favoured the older design because it more closely mimics the design goals of the expensive tool, while costing no more than a couple of sheets of paper and some ink and glue/tape.


")